Farscape Pulse Rifle

Just letting you guys know I'm still here and still working on the project, although slowly. 14 hour work days suck.

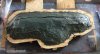
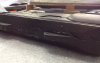
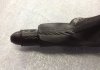
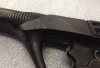
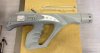
I managed to squeeze in the greeblies that make the Scorpy version of the heavy pistol into the Xhalax version. In place of red LEDs, I just dropped in a couple of Airsoft BBs.

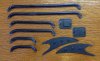
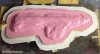
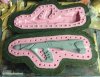
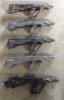
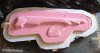
I'm gonna have a bunch of molds to make when I finally get to silicone!
 

Attachments

  • IMG_1872.JPG
    IMG_1872.JPG
    197.6 KB · Views: 156
  • PDVD_082.jpg
    PDVD_082.jpg
    86.6 KB · Views: 186
I have been sculking RPF for a long time, but finally made an account. Now I tell you all how awesome your builds are! Man there are so many projects I would love to do or be involved in! Thanks for keeping Farscape alive.
 
Welcome Slaide! Grab a hot razlac and enjoy. We won't let Farscape fade away!

I reworked the ribbed rings on the scopeflash by carving out a channel and insetting a piece of Ziptie. Originally, I had scribed them in with a razor knife and I wasn't very happy with the result. I spotted the Zipties at work and they had the perfect texture - I just had to get them on somehow.
 

Attachments

  • IMG_1891.JPG
    IMG_1891.JPG
    182.5 KB · Views: 110
Had a bit of a computer melt-down - I lost one of my main hard drives. Yep, it was the one with all the stuff I've been designing and drawing for the past 4 years, including props. Took a while, but I think I salvaged all my files.

Good news is - I got a shipment of silicone today! This weekend's looking good, so with my GF's blessing, maybe I can get some molds done!
 
Last edited:
Had a bit of a computer melt-down - I lost one of my main hard drives. Yep, it was the one with all the stuff I've been designing and drawing for the past 4 years, including props. Took a while, but I think I salvaged all my files.

So sorry to hear that but I'm glad you were able to save everything! Technology is a blessing and a curse at times.
 
Finally got some work done on molds! Been having a bit of a problem with the Pulse Rifle 2.0 mold, though. I bought a thixotropic additive to put some thick layers after a detail layer, but I'm not doing something right because I put a lot in and it only thickened a little (see pic for results.) Looking for advise at this point. The silicone is approximately 4 or 5mm thick over the rifle master. Should I attempt another layer or will this be sufficient?

Also, pics of the flashscope castings!
 

Attachments

  • IMG_1928.JPG
    IMG_1928.JPG
    174.8 KB · Views: 90
  • IMG_1927.JPG
    IMG_1927.JPG
    176.6 KB · Views: 87
  • IMG_1926.JPG
    IMG_1926.JPG
    182.8 KB · Views: 119
I figured out how to thicken the silicone how I wanted. Probably not the way I should, but it worked. I put 5 times the amount of thixotropic additive I had before and waited 40 minutes (the silicone has a 45 minute pot life). I'm comfortable with the mold thickness now. I'm hoping to have the mold complete and do a first cast this weekend. No, I mean it this time. Really!

While waiting for that solution to percolate in my brain, I molded and cast the greeblies that make the Xhalax version of the heavy pulse pistol, so they'll be ready when I get to mold that one. :)
 

Attachments

  • IMG_1929.JPG
    IMG_1929.JPG
    290.6 KB · Views: 106
  • IMG_1930.JPG
    IMG_1930.JPG
    221.3 KB · Views: 105
Are you sure the thixotropic you're using is compatible with the silicone you're using? I use Smooth-on's Stroke for brushup molds, it's got a good consistency right out of the bucket and changes based on how much you move it.
 
I'm using Smooth-On's Mold Max 30 with the Thi-Vex thickener. I even asked Smooth-On's advice on the products I intended to use and they said it would work. Maybe it doesn't work how I think it should.

I think I'll follow your lead and try Stroke next time.

Oh - and an update pic. One side done! A long time ago (but not very far, far away), I had some auto body filler with a name like 'Kittyhair' or something like that. It was a fiberglass/bondo-type combination. This stuff is a variation of that called 'Dynaglass'. It's what I thought of when I saw Plasti-Paste for the first time. That's a piece of 1/4 inch plywood embedded around the edge (there's a layer of Dynaglass underneath it). I figured when I put bolts and wingnuts to secure the two halves together, the wood would help spread the pressure evenly.

This Is gonna be one HEAVY mold! It should stand up to what I intend to put it through.
 

Attachments

  • IMG_1935.JPG
    IMG_1935.JPG
    236.9 KB · Views: 111
I didn't get as much done as I hoped but I finally have both sides done. I opened up one side to clean out the clay from the pour spout so I can cast a tight-fitting silicone plug. Had a few very messy leaks last time which resulted in a couple pair of pants that could almost stand by themselves.

Hark! What's that yonder? A light at the end of the tunnel? Please, don't let it be a train!
 

Attachments

  • IMG_1957.JPG
    IMG_1957.JPG
    265.6 KB · Views: 155
Wow...it looks AMAZING p00k1333! It really does! I'm so glad you didn't get too discouraged with this because your hard work and dedication to finishing this is paying off. So shiny!
 
First casting attempt with the new mold.

I'm extremely happy with the way the mold performed. Not a drop of resin spilled. The casting came out very clean with little flash. Unfortunately, my rotocasting-by-hand technique hasn't improved. I foam-filled it before I removed it from the mold and the foam really makes the thin spots stand out, not to mention bulging and distorting the casting.

And I ran out of mold release, so I have to wait a few days until my order comes in before I can attempt a different technique. :(

The flashscope looks pretty good mocked up on it though!
 

Attachments

  • IMG_1966.JPG
    IMG_1966.JPG
    137.6 KB · Views: 156
  • IMG_1965.JPG
    IMG_1965.JPG
    147.3 KB · Views: 148
  • IMG_1964.JPG
    IMG_1964.JPG
    160 KB · Views: 160
You might try doing a brushup coat of resin in both halves first then a roto coat. It should let you get a more even shell thickness.
 
Jack, you just saved me from a very hard workout. I was thinking of rotocasting several smaller batches of resin in an attempt to build up the thickness evenly. I like your idea much better. This thing is HEAVY (I'll have to weigh it). Maybe I could sell it as a fitness routine and have people pay me to rotocast my stuff! :)

I gotta find the time to build that rotocasting machine!

I really like the feel of the foam-filled rifle. More solid, but really light. Great for cons!
 
I finally had the time last night to try the new technique. As careful as I was, it'll have to be listed as a fail. Apparently, one side of hardened resin lifted from the mold as I was joining the two halves together. I also was unable to seat them together properly, causing a lot of leakage and flash. I knew something wasn't right when I tested the resin batch (through the pour spout) that was to seal the halves together. It was paper thin. So I attempted to salvage the cast by mixing a large enough batch of resin to fill the void, making it a solid cast.

:(

Only positive note - the weight feels awesome. At this point, I think I'll abandon the hollow / foam-filled idea and go solid by extending and lightening the resin with pecan shell flour. I just need to modify the mold with a few air vents and find a source of pecan shell flour, hopefully local so I can try again this weekend.
 

Attachments

  • IMG_1979.JPG
    IMG_1979.JPG
    129.8 KB · Views: 112
  • IMG_1980.JPG
    IMG_1980.JPG
    153.1 KB · Views: 114
  • IMG_1981.JPG
    IMG_1981.JPG
    142.4 KB · Views: 119
I didn't get as much done as I hoped but I finally have both sides done. I opened up one side to clean out the clay from the pour spout so I can cast a tight-fitting silicone plug. Had a few very messy leaks last time which resulted in a couple pair of pants that could almost stand by themselves.

Hark! What's that yonder? A light at the end of the tunnel? Please, don't let it be a train!

I helped cast the actual pulse rifles on the first season and spilt the fast cast urethane all over the head of departments shoes as I moved in the opposite direction while pouring. He was not too happy with stiff shoes.
 
Yay! I found a local source for the pecan shell flour. I have to 'bake' it first to remove the moisture from it, but, girlfriend willing, I may get to try a casting tomorrow morning.

Another good suggestion Jack! I've been watching the ED-209 build and it never occurred to me to try fiberglassing them. One of these will have to be wired for LEDs at some point!

amfx74, It's good to hear someone who worked on Farscape is here on the RPF! And it's good to hear I'm not the only one to fling urethane about in an attempt to plastic coat things in my immediate vicinity. :)
 
I got one!

After many attempts (see the wall of fail pic), I think I've got a process that works. Rotocasting with plain resin as a sort of gel-coat, and then two successive layers with the pecan shell flour/talc mixed in. The flour doesn't extend the resin as advertised, as far as I can tell, but it does thicken it. Essentially, I have a thin detail coat backed up by two thickened coats. I cast another before I left work, so we'll see if I can do it consistently.

The mold performed perfectly. The pics are right out of the mold, with sprues cut off and the minimal flash brushed off with my fingertips.

This was my main goal when I began this project a year and a half ago!
 

Attachments

  • IMG_1986.JPG
    IMG_1986.JPG
    103 KB · Views: 114
  • IMG_1989.JPG
    IMG_1989.JPG
    88.5 KB · Views: 106
  • IMG_1993.JPG
    IMG_1993.JPG
    85.3 KB · Views: 110
  • IMG_1994.JPG
    IMG_1994.JPG
    254.7 KB · Views: 159
This thread is more than 3 years old.

Your message may be considered spam for the following reasons:

  1. This thread hasn't been active in some time. A new post in this thread might not contribute constructively to this discussion after so long.
If you wish to reply despite these issues, check the box below before replying.
Be aware that malicious compliance may result in more severe penalties.
Back
Top