You are using an out of date browser. It may not display this or other websites correctly.
You should upgrade or use an alternative browser.
You should upgrade or use an alternative browser.
Delete thread
- Thread starter STEALTH
- Start date
-
- Tags
- iron man 2
- Status
- Not open for further replies.
Jeepychan09
New Member
Re: Robo3687 - IRON MAN Mark 4/6 Pepakura FOAM Templates -Easy to Build "Green" Versi
i thought that same thing, but i didn't really care, but now i know that it works out
i'm still confused, if i was to make a mark 4 would i still use the mark 6es other parts, back forearms etc on page one?
i thought that same thing, but i didn't really care, but now i know that it works out
Re: Robo3687 - IRON MAN Mark 4/6 Pepakura FOAM Templates -Easy to Build "Green" Versi
hey im doing the shin to see if the scale is correct... and for some reason this part seems to be wrong, i attached a picture, 367 links to 367 correctly, but the 417 line seems wrong, do we correct this ourselves, or is it not supposed to line up exactly?
hey im doing the shin to see if the scale is correct... and for some reason this part seems to be wrong, i attached a picture, 367 links to 367 correctly, but the 417 line seems wrong, do we correct this ourselves, or is it not supposed to line up exactly?
EyeofSauron
Master Member
Re: Robo3687 - IRON MAN Mark 4/6 Pepakura FOAM Templates -Easy to Build "Green" Versi
youre missing a piece in there.
youre missing a piece in there.
7sinzz
Well-Known Member
Are you sure you haven't done something upside down or some other kind of mistake because none of your numbers seem to correspond with each other on opposite edges. I haven't got my laptop with me so I can't check for you, just offering a solution until someone else replies. I've never followed the numbers anyway, I just go by the shapes.
Gladiator
Member
Re: Robo3687 - IRON MAN Mark 4/6 Pepakura FOAM Templates -Easy to Build "Green" Versi
So, after reading MANY posts from a multitude of talented craftspeople (yea, that's you folks) and watching tutorials videos on foam building techniques, I took the plunge into making a foam Mark 6 suit. Here's where I'm at to date - helmet and neck; they need some minor pieces to finish; may redo the face plate (fits a little funny).
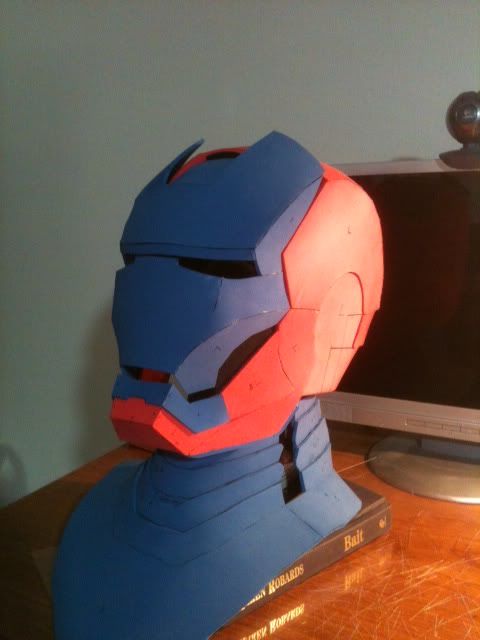
I've been using a mix of 2, 3, and 6mm foam, which is working good to get some well proportioned features by overlapping pieces. I found the overlaps makes it easer to attach pieces and helps prevent glue from globbing out of seams, which is tricky sometimes. Red and blue foam looks a little funny (evokes Spider Man), but this is pre sealing/painting.
One more thing, advice that people have given about changing out or sharpening blades on your cutters is solid advice. If you want nice seams, keep a sharp blade.
So, after reading MANY posts from a multitude of talented craftspeople (yea, that's you folks) and watching tutorials videos on foam building techniques, I took the plunge into making a foam Mark 6 suit. Here's where I'm at to date - helmet and neck; they need some minor pieces to finish; may redo the face plate (fits a little funny).
I've been using a mix of 2, 3, and 6mm foam, which is working good to get some well proportioned features by overlapping pieces. I found the overlaps makes it easer to attach pieces and helps prevent glue from globbing out of seams, which is tricky sometimes. Red and blue foam looks a little funny (evokes Spider Man), but this is pre sealing/painting.
One more thing, advice that people have given about changing out or sharpening blades on your cutters is solid advice. If you want nice seams, keep a sharp blade.
Gladiator
Member
Re: Robo3687 - IRON MAN Mark 4/6 Pepakura FOAM Templates -Easy to Build "Green" Versi
Not a weird question in my book. I mainly use a hobby knife to cut the foam. That gives you nice, accurate cuts with sharp edges, especially for long cuts. I found using scissors for general cutting can be a little sloppy (for me at least), but probably ok for short cuts. I use scissors to cut back edges when I need to create an angle between pieces. Watch STEALTH's awesome tutorials - I think part 3 shows examples of cutting with a blade and scissors.
Might be a weird question, but why don't people use scissors to cut foam?
Not a weird question in my book. I mainly use a hobby knife to cut the foam. That gives you nice, accurate cuts with sharp edges, especially for long cuts. I found using scissors for general cutting can be a little sloppy (for me at least), but probably ok for short cuts. I use scissors to cut back edges when I need to create an angle between pieces. Watch STEALTH's awesome tutorials - I think part 3 shows examples of cutting with a blade and scissors.
Jeepychan09
New Member
Re: Robo3687 - IRON MAN Mark 4/6 Pepakura FOAM Templates -Easy to Build "Green" Versi
i have been using the blade to make angles and i know they are not perfect but the pieces fit nicely together so i dont think it really matters too much
noob question everyone, when cutting foam angles, do you need to get the exact perfect angle or just a rough angle then heat and bend the foam later?? pls pm me..
i have been using the blade to make angles and i know they are not perfect but the pieces fit nicely together so i dont think it really matters too much
Re: Robo3687 - IRON MAN Mark 4/6 Pepakura FOAM Templates -Easy to Build "Green" Versi
367 and 132 are both facing each other correctly in that pic aren't they? The others don't apparently cause i'm missing a piece")
EDIT: hey gladiator in terms of your faceplate, have you tried to heat it, shape it to the correct shape and hold it that way till it cools? it might be able to fit itself correctly...
P.S. nice name man
Are you sure you haven't done something upside down or some other kind of mistake because none of your numbers seem to correspond with each other on opposite edges. I haven't got my laptop with me so I can't check for you, just offering a solution until someone else replies. I've never followed the numbers anyway, I just go by the shapes.
367 and 132 are both facing each other correctly in that pic aren't they? The others don't apparently cause i'm missing a piece
EDIT: hey gladiator in terms of your faceplate, have you tried to heat it, shape it to the correct shape and hold it that way till it cools? it might be able to fit itself correctly...
P.S. nice name man
Last edited:
Rhade Adama
New Member
Re: Robo3687 - IRON MAN Mark 4/6 Pepakura FOAM Templates -Easy to Build "Green" Versi
Hey guys. I'm new and had a question about the sharkman mark 6 foam helmet template. For the top of the helmet (page one of the template) how are you manipulating the piece? I've seen some people manipulate the template after printing to remove the gaps and then use a heat gun with the foam to get it to the right overall shape, and I've seen some videos where the people have cut it out as is (but they have never done anything with that specific piece in their video). I've tried cutting it out as is, but it doesn't seem like the gaps go deep enough prevent serious bulging.
Sorry if this has already been asked, but in my searching I have not seen this directly discussed.
Gladiator
Member
Re: Robo3687 - IRON MAN Mark 4/6 Pepakura FOAM Templates -Easy to Build "Green" Versi
Thanks Genises - I actually used a little heat on the 6mm foam for certain parts of the helmet, and on parts of the faceplate (3mm foam). The 3mm is so flexible that I probably didn't need the heat. I've seen some people use heat to good effect with eased curves, so I tried it out. Now this is my first build, so I'm learning as I'm going.
Rhade, I used the template as is, with the gaps that allow you to shape the curve. Figuring I might get bulges in the 6mm foam, I cut in a little deeper into the top piece of the helmet, and used some heat to ease the bend. Hope that makes sense. Like I said, I'm learning as I go, and trying to apply lessons from posts in this and other threads. Lots of great examples out there - I've extensively reviewed work done by STEALTH, Graphic Jordan, and Indiefilmgeek; all did awesome work. Keep picking up tips and have fun with your build.
Re: Robo3687 - IRON MAN Mark 4/6 Pepakura FOAM Templates -Easy to Build "Green" Versi
Hey my name is Max I am 15 years old and I am from Germany. I build a Iron Man Mark VI foam version and I want to know what you think about it this is my first build ever If you klick on the links below you can see the pictures of my work.
http://img543.imageshack.us/img543/9183/img1273za.jpg
http://img594.imageshack.us/img594/3752/img1271el.jpg
Hey my name is Max I am 15 years old and I am from Germany. I build a Iron Man Mark VI foam version and I want to know what you think about it this is my first build ever
If you klick on the links below you can see the pictures of my work.http://img543.imageshack.us/img543/9183/img1273za.jpg
http://img594.imageshack.us/img594/3752/img1271el.jpg
Re: Robo3687's IRON MAN Mark 4/6 Pepakura FOAM Templates -Easy to Build "Green" Versi
why did nobody talk about this... if its accurate, isn't this the easiest way to dispel almost every scaling question ever?
I used it and while i've only made 3 pieces so far, they seem to fit perfectly... Cod, shin and thigh in case someone was wondering...
Hi Gregchick1 - from the short time of lurking and absorbing information form this amazing forum adding 4 inches to each piece is going to make the armour excessively tall. You need to add 4 inches in total - so to adjust the overall scale to accomodate your height: the 6 foot scale is 25.411754 on my robo3687 files so divided that by 72 inches (6 feet) and then times by 76 inches (6'4 - your height) and a calcluated scale of 26.823518 is a better guestimate of adjustment.
If i am completely off I am sure one of the nice more experienced builders here will correct me.
Your lithe like build is too your advantage with the build you more than likely only need to concider the height variable - As a well built 6 footer I am having to work out where to add shims into the armour pieces to accommodate the extra girth of my chest legs and arms.
Good luck with the build and wow - a marathon in a full suit after the swim and cycle that's crazy but awesome.
why did nobody talk about this... if its accurate, isn't this the easiest way to dispel almost every scaling question ever?
I used it and while i've only made 3 pieces so far, they seem to fit perfectly... Cod, shin and thigh in case someone was wondering...
EyeofSauron
Master Member
Re: Robo3687 - IRON MAN Mark 4/6 Pepakura FOAM Templates -Easy to Build "Green" Versi
depends on which files you use.
if you use something like this, where all the files come from one full body model, it will work
but if every part is modelled separately, every part will have a different scale.
depends on which files you use.
if you use something like this, where all the files come from one full body model, it will work
but if every part is modelled separately, every part will have a different scale.
Bellotor
New Member
Re: Robo3687 - IRON MAN Mark 4/6 Pepakura FOAM Templates -Easy to Build "Green" Versi
Quick question... I can't find the EVA foam mats or rolls anywhere would either of these two work?
Cross Linked Polyethylene - 2LB: Cross Linked Polyethylene Foam - Closed-Cell Foam Padding, Packaging, Foam Sheets
Craft foam for Kids: Foam Sheets | Foam Sheet Crafts | Craft Foam Sheets | Hygloss Products (Even if I strengthen it?)
Gladiator
Member
Re: Robo3687 - IRON MAN Mark 4/6 Pepakura FOAM Templates -Easy to Build "Green" Versi
Hey there Rhade -- to help answer your question, here's a pic of the helmet top from my assembly.
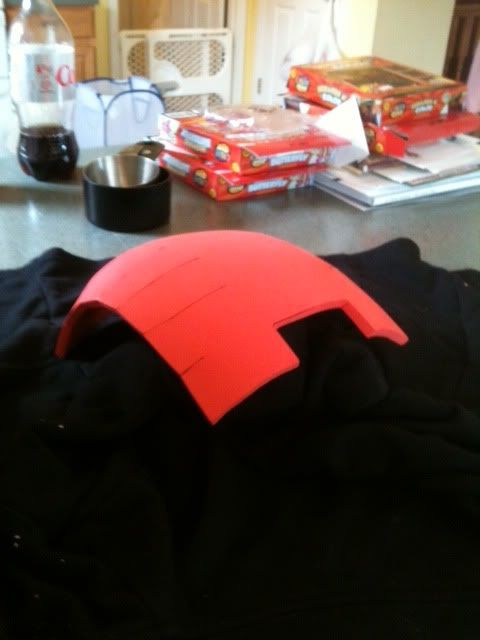
You can see where I cut into the foam (as shown in the template) to form the curve. I also used heat to help shape the curve (silly as it sounds, I used a hair dryer on high); that seemed to prevent bulges in the foam as I glued each seam together. Hope this helps.
Hey guys. I'm new and had a question about the sharkman mark 6 foam helmet template. For the top of the helmet (page one of the template) how are you manipulating the piece? I've seen some people manipulate the template after printing to remove the gaps and then use a heat gun with the foam to get it to the right overall shape, and I've seen some videos where the people have cut it out as is (but they have never done anything with that specific piece in their video). I've tried cutting it out as is, but it doesn't seem like the gaps go deep enough prevent serious bulging.
Sorry if this has already been asked, but in my searching I have not seen this directly discussed.
Hey there Rhade -- to help answer your question, here's a pic of the helmet top from my assembly.
You can see where I cut into the foam (as shown in the template) to form the curve. I also used heat to help shape the curve (silly as it sounds, I used a hair dryer on high); that seemed to prevent bulges in the foam as I glued each seam together. Hope this helps.
- Status
- Not open for further replies.
Similar threads
- Replies
- 1
- Views
- 1,082
- Replies
- 1
- Views
- 703
- Replies
- 16
- Views
- 4,912