You are using an out of date browser. It may not display this or other websites correctly.
You should upgrade or use an alternative browser.
You should upgrade or use an alternative browser.
ALIEN SHIPS 3D MODELS
- Thread starter GEEK1138
- Start date
Got the back engine area done, so that's all the main superstructure complete, which means I can start detailing this puppy. The sadly, late great Bill Pearson said that they bought 200 8Rad kits for this ship...I can believe it, there are about 60 hulls just in this area...also see a lot of Saturn V and Leopold.


Last edited:
Your 3D work is amazing! Can I ask what program you are using and how much time you spent on just blocking the nostromo out?
Also, if you haven't already aware, look up on YouTube the search of "Restoring the nostromo" it has a few videos related to the propstore auction of the original nostromo model, and it has some parts in close up to help with your reference search.
Thanks Wondersquid...I use Blender and Zbrush mostly. Probably took a coupla days to get the basic ship done, I was off my game a bitYour 3D work is amazing! Can I ask what program you are using and how much time you spent on just blocking the nostromo out?

So the Nose section is done... they threw everything at this ship. I've done the physical elements but there's loads of paint effects, stencil painting and weathering, over and above what u tend to see on SW props...all good though. Also they used hundreds of calculator number pads...Roger Christian said they collected boxes of them. You can even see the plus/minus signs in some places.
Look what we have here...the mount for the radar dish is an AT-AT head...seems a bit cannibalistic!
JimmyB
Member
That's a gorgeous 3D build of the Nostromo. I'm sure you already know this, but just in case you don't, Martin Bower is emphatic in this video on building the Outland miniatures (featuring the late, great Bill Pearson - a lovely man) that the Nostromo studio model was sprayed with zinc plate primer and not with grey.
Amazing as always!Thanks Wondersquid...I use Blender and Zbrush mostly. Probably took a coupla days to get the basic ship done, I was off my game a bit
So the Nose section is done... they threw everything at this ship. I've done the physical elements but there's loads of paint effects, stencil painting and weathering, over and above what u tend to see on SW props...all good though. Also they used hundreds of calculator number pads...Roger Christian said they collected boxes of them. You can even see the plus/minus signs in some places.
View attachment 1783255
View attachment 1783256View attachment 1783257
Look what we have here...the mount for the radar dish is an AT-AT head...seems a bit cannibalistic!
View attachment 1783258View attachment 1783259View attachment 1783260
Can I ask that you alter the tube next to the drooped antenna to be parallel to the ground and not perpendicular to the angled face.
They got it wrong when they restored the Nostomo and its annoyed me ever since.
Rant over, love your work!
Attachments
Thanks guys, I will get those things fixed. So the complete Docking Module is done...and while there is some symmetry, there's a lot that ain't. There is also very little ref of the top of the docking port and some areas of the shell, so a bit of artistic licence is used to fill in the blanks.


Are you going to sell the files for these Scott?
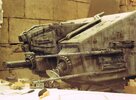
yep, I'll be uploading them when all the modelling is done. So the side thruster, engine parts are done...it's placing all the plating that takes so long...on the prop the plating is pretty sloppy, probably because of the neglect it suffered but it's still kind of all over the place...there are a few procedural modifiers that can generate random pattern plating, like Hardops and Boxcutter but they just don't look right
Luckily both engines are quite similar so just a few changes and they're both done;


Luckily both engines are quite similar so just a few changes and they're both done;
JimmyB
Member
If you have a UV unwrapped simple base mesh, you could create a large flat mesh of panels that you like (or even multiple panel meshes), then deform the panels onto your base mesh using the Mesh UV Tools in Tex Tools.there are a few procedural modifiers that can generate random pattern plating
Try copying the flat UV unwrapped Nostromo base mesh (or a part of it) that you get from Tex Tools; you'd probably need to freeze the shape and all modifiers (iirc that's not as straightforward as it could be - I think it involved exporting as an obj and then reimporting); orient and scale parts of the panel pattern (this should have no thickness - just 2D flats) to fit the flow of your flattened base mesh, then use Knife Project to cut the polys of the base mesh into the panels mesh*. Then it should be a case of wrapping (sticking) that panels mesh that has the added geometry to a Nostromo base mesh that's been run through the Tex Tools Mesh UV Tools and which can be deformed back its original shape, carrying the panels with it. A Solidify modifier could then be applied to the panels mesh to taste.
This is something I experimented with a couple of years ago and I can't recall the details precisely, but I did manage to do it. I'm also assuming you haven't tried it yourself. TBH your panels look great as they are anyway.
* You could do it vice versa, cutting the panels into the unwrapped base mesh. In fact, if the panels have gaps between them then it's probably a better option, and the Nostromo mesh boundaries already exist with no need to trim the boundaries of a panel mesh.
Similar threads
- Replies
- 9
- Views
- 599
- Replies
- 3
- Views
- 1,055
- Replies
- 10
- Views
- 666