You are using an out of date browser. It may not display this or other websites correctly.
You should upgrade or use an alternative browser.
You should upgrade or use an alternative browser.
ADI AvP Queen test casting, repair and modification
- Thread starter Palantirion
- Start date
Metalalien
Sr Member
There ya go... new project... you gotta build the head to go along with it... that should be pretty easyYep; speechless in terms of paint and all of the products you've mentioned earlierThis is looking amazing...imagine if you had the head of the beast
Palantirion
Active Member
This is looking amazing...imagine if you had the head of the beast
- Funny you should mention that.There ya go... new project... you gotta build the head to go along with it... that should be pretty easy
Thanks to all for your words of support and encouragement during this process. I am quite pleased overall with the way it turned out. I am even more pleased with how much I learned doing it; there were a lot of firsts for me during this project. Not the least of which was being the first time I worked on/modified an actual studio-built prop. I feel obliged to point out that Studio ADI made this! All I did was follow their work. Granted, some technical aspects of copying are harder than doing the original, but also copying requires virtually none of the creative talent that produced the original.
So I'd like to take a moment and have us reflect on how awesome ADI's design of the queen's crown is! And how awesome ADI's sculpt of the crown is! And how awesome ADI's paint concepts both are!
There is zero chance that I could have painted this crown without learning what I did from ADI. Zero. So I'm very grateful to have been in the position to have had this experience and learn so much!
Palantirion
Active Member
Oh, and I forgot to mention earlier that if anyone is in SoCal and wants to see it in person, that can be arranged.
Palantirion
Active Member
Been very busy the past couple of days. Too busy to start a new thread about the other thing I'm working on...hopefully tomorrow. But there was some solid progress made today in the complicated (for noob me) mounting of the queen's crown "on" the wall.
The first trick was to get it up on my lift arm again, by myself, without hurting the paint. As I have repaired (slightly enlarged) one of the lower cheek lobes the crown will no longer balance on end, so I had to place it exactly and then keep it steady with one hand while lifting the arm. Not a big deal, just something to think through.
hung.jpg")
Then, because I was curious, I managed to find a metal pole and used a cheap magnetic LED work light to roughly simulate the effect of light from the skylight hitting the crowd from above. The difference is that this LED is blue/white and the light coming through the skylight will have a distinct brown tinge because of the anti-HEV coating I applied to the skylights. So imagine this, but more amber like a 3400 kelvin lamp.
overhead light test.jpg")
Then I used up the rest of my ProPoxy-20 to reinforce the hanging bar, because...why not.
reinforced hanging bar.jpg")
Then I signed it on the back side with red alcohol ink and cleared over it with two coats of Gloss Medium and Varnish (not pictured).
signed.jpg")
The first half of today was spent driving ALL OVER &#@$ing TOWN trying to find a single block and tackle! Seriously, WTH people? It's only been a fundamental method of mechanical advantage for millennia, so NO hardware stores carry one - and only Ace even knew what it was! At stop #5, Harbor Freight, I was finally able to get something that will work: A game dressing hoist (because we hunt a lot of deer and elk in Orange County???), with two sets of double pulleys and good for 400lbs.
After lunch, I had to break out my big ass ladder and get over the fear of heights thing. Only partially successful. I hate being on tall ladders. I did notice something interesting though: This is the perspective from 14.5' up, pretty close to the height of the AvP queen (older, and much taller than the Aliens and Resurrection queens). Imagine this as your world view.
.jpg")
I installed four eye bolts...
.jpg")
.,..two to hang the crown from, on 100lb test braided steel cable (these knots look terrible but I couldn't get them to loosen)...
.jpg")
...and two 34" from the wall to suspend the block from. It has to be that far away to clear a display cabinet I can't move. The plan is to lift the crown up, cleat off the line (OMG, only 1 employee today even knew what a cleat was!) and then swing the crown back so I can clip it's cable into the locking link I added to the hanging cable. Then I can lower the block and transfer the load to the hanging cable. In theory this shall work.
.jpg")
A quick hang test, because why not. This EZ-Up is a few pounds heavier than the crown.
.jpg")
Hoisted and cleated. Leaving it up overnight to make sure there's no weird sag, and/or to see if anything else loosens. Barring catastrophe tomorrow the crown shall be hung!
.jpg")
Btw, if you've never gotten your hands on a block and tackle (or similar) DO IT! It's a really neat lesson in physics. I was able to casually lift that 50lb EZ-Up with one hand. This is the one I'm buying. It's cheap, strong, and a proper block and tackle as opposed to the dressing hoist which is very similar but structurally a little different. For under $30 why not have both.
Also, the only cleat I could find at any of the stores isn't "rated" for weight like most mounting hardware. Assuming the worst I think it's still probably good for 75lbs but that's probably pushing it - and that's too close to 50lbs for me to be super happy. I did attached it to the wall with two drywall screws (my favorite multi-purpose screw) going through holes in the steel frame around the door jamb, so I feel secure about that at least. The neat part about the block and tackle is that of the 50lb total load, the load on the cleat is only about 8lbs because of the way the pulleys redirect the load within the block. Physics is awesome!
The first trick was to get it up on my lift arm again, by myself, without hurting the paint. As I have repaired (slightly enlarged) one of the lower cheek lobes the crown will no longer balance on end, so I had to place it exactly and then keep it steady with one hand while lifting the arm. Not a big deal, just something to think through.
Then, because I was curious, I managed to find a metal pole and used a cheap magnetic LED work light to roughly simulate the effect of light from the skylight hitting the crowd from above. The difference is that this LED is blue/white and the light coming through the skylight will have a distinct brown tinge because of the anti-HEV coating I applied to the skylights. So imagine this, but more amber like a 3400 kelvin lamp.
Then I used up the rest of my ProPoxy-20 to reinforce the hanging bar, because...why not.
Then I signed it on the back side with red alcohol ink and cleared over it with two coats of Gloss Medium and Varnish (not pictured).
The first half of today was spent driving ALL OVER &#@$ing TOWN trying to find a single block and tackle! Seriously, WTH people? It's only been a fundamental method of mechanical advantage for millennia, so NO hardware stores carry one - and only Ace even knew what it was! At stop #5, Harbor Freight, I was finally able to get something that will work: A game dressing hoist (because we hunt a lot of deer and elk in Orange County???), with two sets of double pulleys and good for 400lbs.
After lunch, I had to break out my big ass ladder and get over the fear of heights thing. Only partially successful. I hate being on tall ladders. I did notice something interesting though: This is the perspective from 14.5' up, pretty close to the height of the AvP queen (older, and much taller than the Aliens and Resurrection queens). Imagine this as your world view.
I installed four eye bolts...
.,..two to hang the crown from, on 100lb test braided steel cable (these knots look terrible but I couldn't get them to loosen)...
...and two 34" from the wall to suspend the block from. It has to be that far away to clear a display cabinet I can't move. The plan is to lift the crown up, cleat off the line (OMG, only 1 employee today even knew what a cleat was!) and then swing the crown back so I can clip it's cable into the locking link I added to the hanging cable. Then I can lower the block and transfer the load to the hanging cable. In theory this shall work.
A quick hang test, because why not. This EZ-Up is a few pounds heavier than the crown.
Hoisted and cleated. Leaving it up overnight to make sure there's no weird sag, and/or to see if anything else loosens. Barring catastrophe tomorrow the crown shall be hung!
Btw, if you've never gotten your hands on a block and tackle (or similar) DO IT! It's a really neat lesson in physics. I was able to casually lift that 50lb EZ-Up with one hand. This is the one I'm buying. It's cheap, strong, and a proper block and tackle as opposed to the dressing hoist which is very similar but structurally a little different. For under $30 why not have both.
Also, the only cleat I could find at any of the stores isn't "rated" for weight like most mounting hardware. Assuming the worst I think it's still probably good for 75lbs but that's probably pushing it - and that's too close to 50lbs for me to be super happy. I did attached it to the wall with two drywall screws (my favorite multi-purpose screw) going through holes in the steel frame around the door jamb, so I feel secure about that at least. The neat part about the block and tackle is that of the 50lb total load, the load on the cleat is only about 8lbs because of the way the pulleys redirect the load within the block. Physics is awesome!
Then I signed it on the back side with red alcohol ink and cleared over it with two coats of Gloss Medium and Varnish (not pictured).
Ummm... what? You're off by 10 years there. Did you not think to double-check before writing it AND clear coating it?
Nice work on the restoration though!
Palantirion
Active Member
-LOL, yeah, I must have brain farted on that. No prob, I'll paint over it and correct the date! Thanks for the catch.View attachment 1650196
Ummm... what? You're off by 10 years there. Did you not think to double-check before writing it AND clear coating it?
Nice work on the restoration though!
Palantirion
Active Member
*UPDATE*
Fixed the sig block. Thanks again to The 48th Ronin for the catch.
sig revised.jpg")
Fixed the sig block. Thanks again to The 48th Ronin for the catch.
Palantirion
Active Member
And...I did manage to get it hung. With only one moment of terror. Few aspects of this lift were easy, although not terribly surprising as this was my first lift of anything heavy and high - and using equipment beyond a single ladder and muscles.
The lifting area, prepped. Bonus points if you can name the Lego kit in the big box I used as a platform to raise the crown high enough that I could get its wire on the block's hook. I couldn't lower the rope any farther because I had to splice the line to get enough length for the lift and that splice wouldn't fit through the block's pulleys.
mounting set up.jpg")
It was about 1mm from impossible, but I got the wire on the hook. One of many examples of when it would have been far easier with a second set of hands.
hooked to block.jpg")
Officially hanging. And tilted and wonky. The center of gravity on this crown is strange, relative to its shape. And because of the center spike contacting the ropes it really wants to rotate to the left or right.
hooked to block.jpg")
Luckily I had more rope, and a pulley, and car whose wheels are already trashed. So I used my Mustang's front wheel to run a stabilizing tether (I don't know what this line is supposed to be called). Normally there would be one or two and humans would tension them during the lift to keep the object level. Lacking additional humans this was my improvised solution.
tether pulley.jpg")
Which seems to work. Much straighter.
tether pulley.jpg")
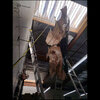
The rest of the lift went quite smoothly, up to the point where the middle spike made contact with the block (about 14' up). I still needed it to go another foot higher so I could attach it to the wall-anchored wire. I expected it to slide over the block, which it sort of did...
hoisting.jpg")
...until a disaster of sorts. Or at least terror. As the horn made contact it slide up and sideways, imparting an anhedral effect that spun and inverted the crown quite violently and I was certain it was about to fall and crush my cabinet and maybe some other stuff. But it was so heavy that its weight kept the wire on the hook and after a lot of thrashing it settled down - hovering sideways way up over my head. I lowered it a bit and climbed up to inspect and figure out how to salvage the situation.
flipped.jpg")
Lowered it a little more so I could get hands on it from my step ladder so I could be in front of it. On the plus side, I now KNOW that my 2x4 mount setup is strong enough!
flipped.jpg")
Then it was time for lift #2. Up to the block again...
final lift.jpg")
Then over the course of an hour I inched it up and ever time I saw it twitch I would cleat off the lifting line, climb the ladder, and adjust the crown's angle. Every inch. Until it was high enough to make the hand-off to the wall cable.
final lift.jpg")
As an aside I discovered how to get over your fear of ladders - have something huge and heavy suddenly start spinning over your head! Never even thought about my height on the ladder after that.
Successful hand-off to the wall anchored cable! Again, made it by just a mm, but made it nonetheless.
transfer to wall mount.jpg")
Then it took over half an hour to lower it, again very very slowly and with many stops to check its orientation, until it got closer to the wall and I could snake my arm between the side plates to wriggle the wire off the block's hook.
lowering.jpg")
lowering.jpg")
Straightened her, removed the block and it's suspension line, and done!
hung.jpg")
Here is a pic with the lights off, just late afternoon sun through the skylight.
hung.jpg")
And from a closer viewing angle.
hung.jpg")
hung.jpg")
Friends.
hung.jpg")
And a wider angle shot. She really dominates the space. Oh, and yes I now have to put all the stuff back on the weapon wall. That's going to be a longer work-in-progress as I have some plans to extend the pegboard and better organize the collection.
hung.jpg")
The lifting area, prepped. Bonus points if you can name the Lego kit in the big box I used as a platform to raise the crown high enough that I could get its wire on the block's hook. I couldn't lower the rope any farther because I had to splice the line to get enough length for the lift and that splice wouldn't fit through the block's pulleys.
It was about 1mm from impossible, but I got the wire on the hook. One of many examples of when it would have been far easier with a second set of hands.
Officially hanging. And tilted and wonky. The center of gravity on this crown is strange, relative to its shape. And because of the center spike contacting the ropes it really wants to rotate to the left or right.
Luckily I had more rope, and a pulley, and car whose wheels are already trashed. So I used my Mustang's front wheel to run a stabilizing tether (I don't know what this line is supposed to be called). Normally there would be one or two and humans would tension them during the lift to keep the object level. Lacking additional humans this was my improvised solution.
Which seems to work. Much straighter.
The rest of the lift went quite smoothly, up to the point where the middle spike made contact with the block (about 14' up). I still needed it to go another foot higher so I could attach it to the wall-anchored wire. I expected it to slide over the block, which it sort of did...
...until a disaster of sorts. Or at least terror. As the horn made contact it slide up and sideways, imparting an anhedral effect that spun and inverted the crown quite violently and I was certain it was about to fall and crush my cabinet and maybe some other stuff. But it was so heavy that its weight kept the wire on the hook and after a lot of thrashing it settled down - hovering sideways way up over my head. I lowered it a bit and climbed up to inspect and figure out how to salvage the situation.
Lowered it a little more so I could get hands on it from my step ladder so I could be in front of it. On the plus side, I now KNOW that my 2x4 mount setup is strong enough!
Then it was time for lift #2. Up to the block again...
Then over the course of an hour I inched it up and ever time I saw it twitch I would cleat off the lifting line, climb the ladder, and adjust the crown's angle. Every inch. Until it was high enough to make the hand-off to the wall cable.
As an aside I discovered how to get over your fear of ladders - have something huge and heavy suddenly start spinning over your head! Never even thought about my height on the ladder after that.
Successful hand-off to the wall anchored cable! Again, made it by just a mm, but made it nonetheless.
Then it took over half an hour to lower it, again very very slowly and with many stops to check its orientation, until it got closer to the wall and I could snake my arm between the side plates to wriggle the wire off the block's hook.
Straightened her, removed the block and it's suspension line, and done!
Here is a pic with the lights off, just late afternoon sun through the skylight.
And from a closer viewing angle.
Friends.
And a wider angle shot. She really dominates the space. Oh, and yes I now have to put all the stuff back on the weapon wall. That's going to be a longer work-in-progress as I have some plans to extend the pegboard and better organize the collection.
Attachments
Last edited:
Metalalien
Sr Member
Oh you got all kinds of nice things in there! The crown looks perfect in there... you should do a video tour of your garage!
Palantirion
Active Member
- Thanks. A video tour would take too long...and be mostly boring for any one person because it's a very eclectic mix of things. Personal tours work better, because then I can direct according to their interest. Also, I don't care to show off. Share, yes. Videos seem more like the latter to me.Oh you got all kinds of nice things in there! The crown looks perfect in there... you should do a video tour of your garage!
- Thanks. Glad we didn't bid against each other then. Or maybe you were the guy/gal who kept bidding on the same Starship Troopers stuff as me a few years ago? Same bidder number through the whole auction, we each won about 1/2 the items. Sort of felt bad, but also wanted to shake the other's hand - good taste.Great work! I almost hid on this myself. You did a wonderful job - I see a queen tail in the background.
The tail is also ADI's from AvP, it's one of the 1:1 animatronic foam latex tails. Bought it from PropStore's regular catalog after the auction. It's pretty beat up inside, nixing my idea of supporting it internally with armature wire. Hanging it was very difficult, in the context of not letting it self-destruct. I made a 10' long splint from a bunch of discarded 2x1s then wrapped them in bubble wrap, then muslin (from PropStore packaging, I don't throw things away), and then bound it one vertebrae at a time to the splint using muslin strips. Then I used a box as a vertical spacer and then made clamps from plastic plumber's strap and wrapped each with foam and gaffer tape. Starting at the top I used drywall screws to secure the first strap and vertebrae, then worked down anchoring every few, then unbinding the splint to that point. I tipped the splint as I went to make the curve. I hope never to touch it again! It's very fragile.
p.s. The Big Chap is Hollywood Collectible's released...2019? I think 2019.
Palantirion
Active Member
-Thanks man! And a good eye. Now shhhh...keep it secret, keep it safe....companion thread coming soon...I was sweating bullets looking at that hoisting exercise
Palantirion
Active Member
Ok, the cat has been let out of the bag. Round two: Bruce Hansing Queen face repair and modification
Palantirion
Active Member
Today has been exciting. Alec Gillis was kind enough to write me back on Instagram and told me many interesting things about my queen's crown. And he said I could share this info.
- The AvP crown was sculpted directly over the crown from Aliens, using Wed clay, then molds were pulled and the Aliens crown was returned to it's original condition.
- The Aliens queen and the AvP queen models (and presumably creatures) ARE the same size. But...certain CGI shots might [absolutely did! IMO] have had the scale exaggerated in post production. This would obviously not have been part of ADI's contribution or direction.
- My crown was not actually used for AvP, but instead it was used as a paint test panel for treatments for the alien cockpit interior they built for Independence Day 2. This is particularly amusing to me because the very first time I saw my crown after unwrapping it I found I preferred the green side but dismissed it's appropriateness for an aliens queen because it reminded me too much of the aliens from Independence Day - LOL
Here are some archive videos of them working on that cockpit:
Pt.1, the initial form building and sculpting. I was surprised how many shapes and details (the more organic ones) are very similar to the style from Aliens and the queen's crown.
Pt.4, painting and final assembly. I laughed many times during the painting, as I see them using the same application techniques as I figured out during my painting.
- The AvP crown was sculpted directly over the crown from Aliens, using Wed clay, then molds were pulled and the Aliens crown was returned to it's original condition.
- The Aliens queen and the AvP queen models (and presumably creatures) ARE the same size. But...certain CGI shots might [absolutely did! IMO] have had the scale exaggerated in post production. This would obviously not have been part of ADI's contribution or direction.
- My crown was not actually used for AvP, but instead it was used as a paint test panel for treatments for the alien cockpit interior they built for Independence Day 2. This is particularly amusing to me because the very first time I saw my crown after unwrapping it I found I preferred the green side but dismissed it's appropriateness for an aliens queen because it reminded me too much of the aliens from Independence Day - LOL
Here are some archive videos of them working on that cockpit:
Pt.1, the initial form building and sculpting. I was surprised how many shapes and details (the more organic ones) are very similar to the style from Aliens and the queen's crown.
Palantirion
Active Member
At the request of a certain someone I took the time to finally process all the pics and post a thread on a related queen project: Aliens Queen OSL pencil sharpener repaint (warning VERY pic heavy!)
While it may not seem to have a direct correlation to this full size crown project, the OSL aspect of the sharpener repaint was critical experience for me to understand how to envision and apply the blue and green sides across the middle of the ADI crown in a quasi-OSL fashion.
While it may not seem to have a direct correlation to this full size crown project, the OSL aspect of the sharpener repaint was critical experience for me to understand how to envision and apply the blue and green sides across the middle of the ADI crown in a quasi-OSL fashion.
Similar threads
- Replies
- 76
- Views
- 5,155
- Replies
- 0
- Views
- 172
- Replies
- 4
- Views
- 1,033