Thanks joberg. Like I said to SK, piping is my thing. Past ship model stuff which is fun. Material is a choice. I have seen the weathering skill of folks on this site and many exhibits. Properly done, styrene looks like aged metal. Impossible to tell the difference. No short cut on these types of models.Man that's beautiful...the fact that you're using a lot of brass for the piping adds the feeling of "This is the construction of the original MF in dry-dock"
You are using an out of date browser. It may not display this or other websites correctly.
You should upgrade or use an alternative browser.
You should upgrade or use an alternative browser.
5 ft. ANH “Wooden” Falcon
- Thread starter Searun
- Start date
An awesome update of your awe inspiring build John. I think I get a kick out of seeing yours taking shape, as the details & materials of choice are so different to mine, it's like a completely different take on the same miniature!. My dad worked alot in metal for his models & I particularly liked his brass work & seeing your brass piping brought on a smile. Not easy in metal to do what you are doing here, but just lovely work John, really is!.
eagle1,An awesome update of your awe inspiring build John. I think I get a kick out of seeing yours taking shape, as the details & materials of choice are so different to mine, it's like a completely different take on the same miniature!. My dad worked alot in metal for his models & I particularly liked his brass work & seeing your brass piping brought on a smile. Not easy in metal to do what you are doing here, but just lovely work John, really is!.
Interestingly, cutting .032 aluminum with a good set of sears and use of the nipper really is not that much more work than the correct thickness of styrene. Making patterns, measuring, fitting and reworking them is 90% of the work. The benefit of the metal armor comes with the ability to readily “snap it off” of the wooden skin to rectify things. Also, seems easier to recover from poor greeblie placement without destruction of rare kit parts.
My Falcon does have the benefit of the generous photographs from your incredibly precise build. Also, those professionals who completed their Falcons in the past have shared their pictures and feedback which is priceless. Appreciation for those that have made large space ship movie models using ILM kit part methods increases with every greeblie location.
Sabs
Active Member
Just finished reading this thread from the beginning. Completely blown away and inspired by this project.
While I understand the need to paint the model, have you considered doing a silver foil gilding on the plastic parts instead? Then you could keep the metal clad look.
I’ve never tried gilding before so I don’t know how much detail you’d loose in the process.
If only electroplating was an easier thing to do at home.
Eagerly following along.
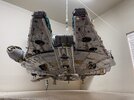
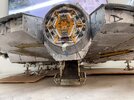
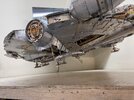
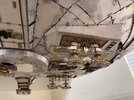
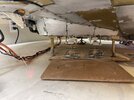
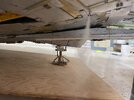
Here are a few shots of the Falcon bottom. On the deck with retractable gear & ramp extended. Rigged up some very strong eye bolts & pulleys to show what it looks like lifting off. Also a shot on the Lazy Susan & plywood turn table to aid in 360 degree construction work. 80 to 100 pounds.
Thanks to Studio Kitbash on reminding me during design to confirm gear extension so as not to crush the bottom turret gun.
Thanks to Studio Kitbash on reminding me during design to confirm gear extension so as not to crush the bottom turret gun.
Attachments
JediMichael
Master Member
Its so really hard to tell, but these pics look fabulous, but it doesn't LOOK like it would be the full 5 feet. Knowing it is makes it even all the more insane.
Curious, since you put wooden, in the title. But it looks all covered in metal panels. Just wondering what the wooden part covers.
Its quite a feat and its turning out really good.
Curious, since you put wooden, in the title. But it looks all covered in metal panels. Just wondering what the wooden part covers.
Its quite a feat and its turning out really good.
LOVE the lift-off shots -- now if only you could make those landing gear retract into the hull...
Pyramidrep
Sr Member
Searun,
Absolutely wonderful - a beautifully engineered quality to the work.
Absolutely wonderful - a beautifully engineered quality to the work.
Thanks JediMichael. The Falcon Started out using a strong wooden skeleton with light model aircraft plywood skin per the meticulous drawings of Andre who used vintage model kit parts to validate critical dimensions along with photogrammetry, CAD, as well as contributions from Falcon experts.Its so really hard to tell, but these pics look fabulous, but it doesn't LOOK like it would be the full 5 feet. Knowing it is makes it even all the more insane.
Curious, since you put wooden, in the title. But it looks all covered in metal panels. Just wondering what the wooden part covers.
Its quite a feat and its turning out really good.
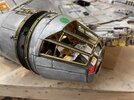
These I used modified to permit .032 aluminum armor and some slightly thicker plates added as needed. Thin brass plates used on wooden skin sections, since not every inch of the Falcon has armor. Lots of adjustments in wooden material when I started adding key kit parts. Thicknesses of materials chosen and slight unavoidable errors can add up.
JediMichael
Master Member
I had a feeling thats what you had done. Its looking good.Thanks JediMichael. The Falcon Started out using a strong wooden skeleton with light model aircraft plywood skin per the meticulous drawings of Andre who used vintage model kit parts to validate critical dimensions along with photogrammetry, CAD, as well as contributions from Falcon experts.
These I used modified to permit .032 aluminum armor and some slightly thicker plates added as needed. Thin brass plates used on wooden skin sections, since not every inch of the Falcon has armor. Lots of adjustments in wooden material when I started adding key kit parts. Thicknesses of materials chosen and slight unavoidable errors can add up.
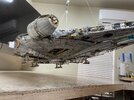
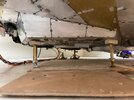
O.K. SK,LOVE the lift-off shots -- now if only you could make those landing gear retract into the hull...
Here is a shot with wheels up from my cell phone. I am a poor photographer.
Attachments

Thanks joberg.Wow Searun
I will put a scale under it on the next lift. Remaining greeblies needed. But they will not add any extra significant weight.
In the mean time I am installing lighting as well as smoke system for the stabilizing jets. May need to mock up a compressed air spray can addition. Nozzles need to alternate and work like the did on the Bespin landing platform.
Wow Searun, you moved fast! And what an incredible build. Now that I have mine in a sort off full shape, I know that it takes some courage to hang this beast on a few ropes in the air. (I couldn't sleep if I did that. haha. Your build is something special. I use CAD and printing. But this is true craftmanship. Respect!
Bjorn
Sr Member
Tremendous respect!Your build is something special. I use CAD and printing. But this is true craftmanship. Respect!
Couldn't agree more.
Thanks Bjorn & Dimitri-Ajith. I used a slide rule in school and also in the early days in engineering. All drawings were drafted & the typing pool did our specifications. Micro film was how we did research v.s. the internet. So, you know I have an enormous appreciation for the CAD, computer jockeys, photogrammetry, 3-D formatting software, casting skill knowledge you guys utilize in your builds. Took me nearly 3 years before being reasonably comfortable in how to recognize greeblies from maps and photos plus navigating to the proper kits and the importance of the instruction manual when sprue number is not given.Tremendous respect!
Couldn't agree more.
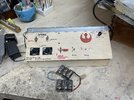
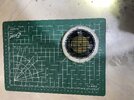
Attached are a few shots showing:
1. Placement of Cool Shade around cockpit that has some attempt at lighting.
2. Jacks placed on starboard main landing gear for retraction demonstration. Aircraft including airlines do it this way.
3. Mock-up of a control panel to figure out wiring.
4. Smoke test of one or 8 jets. Bigger smoke machine ordered.
5. Mock-up of a “muffin fan” before firing for effect.
Attachments

Smoke machine??? That's awesome!!!
Similar threads
- Replies
- 243
- Views
- 15,077
- Replies
- 4
- Views
- 613
- Replies
- 55
- Views
- 8,177