Hey guys,
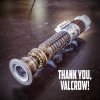
Little bit late to this thread, but ive now finished my second Obi Wan 3d print from Jacky. This is by far one of the most exciting builds ive had in a long while and the weathered was first to be done. After that I then wanted an AFBB model. They are not perfect by any means (my paint - not Jackys creation ) but that guy has made a lot of prop collectors happy. Im just hoping we get more and more soon enough. The chrome on the AFBB was a bitch to get right, and plenty of cursing involved-especially as these are both painted using rattlecans!!! The best part is that im using a real original AS handwheel on the weather at the moment ( yes, the exact one as per the original) so this is my found part saber
  I have another to go on the AFBB aswell.


With regards to the foil tape I tried that but was too lazy to prime it numerous times to get the flat surface. Im sure it could be done. However, after buying two replica bubble strips from Roy's site (Wanna Wanga) I saw these:
http://wannawanga.com/products/tfa-clamp-cover/
Now I bought one for each of my builds and im sure they will compliment them well and give them that really cool real metal look. Ill post up pics when they arrive to show how they look.
I think with a bit of work, real bubble strips and these covers that these 3D sabers can look as good as machined versions . heck, even with the standard supplied bubbles and clamp it looks great.
Lee
Little bit late to this thread, but ive now finished my second Obi Wan 3d print from Jacky. This is by far one of the most exciting builds ive had in a long while and the weathered was first to be done. After that I then wanted an AFBB model. They are not perfect by any means (my paint - not Jackys creation


With regards to the foil tape I tried that but was too lazy to prime it numerous times to get the flat surface. Im sure it could be done. However, after buying two replica bubble strips from Roy's site (Wanna Wanga) I saw these:
http://wannawanga.com/products/tfa-clamp-cover/
Now I bought one for each of my builds and im sure they will compliment them well and give them that really cool real metal look. Ill post up pics when they arrive to show how they look.
I think with a bit of work, real bubble strips and these covers that these 3D sabers can look as good as machined versions . heck, even with the standard supplied bubbles and clamp it looks great.
Lee


