Machiavelli
New Member
Hello everyone,
Let me first start by saying that I have been on RPF for the last month and with just a cursory look at all the projects everyone does on here - let's just say color me impressed, wowed, awed etc. Lol.
I love Halloween, and like many of you I am sure, was not satisfied with costumes off the rack and so I started putting together costumes about 5-6 years ago. My first big build was of a Roman soldier a few years ago and I feel in love with the whole process.
I have always wanted to do a Han Solo costume and so I decided to make it a reality this year.
I started with research here and on the Rebel Legion site - looking for more information on how to be as accurate as possible (at least for someone with no prop building training could).
My only caveat was to meet Rebel Legion standards for the costume - as I wanted to apply for membership at the end! ;-)
- - - Updated - - -
So, to start I had to organize the costume into different parts -
1) Shirt/Vest/Pants
2) Belt
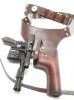
3) Holster
4) DL-44 Blaster
5) Tools
6) Boots
All being specific for the ANH versions.
Let me first start by saying that I have been on RPF for the last month and with just a cursory look at all the projects everyone does on here - let's just say color me impressed, wowed, awed etc. Lol.
I love Halloween, and like many of you I am sure, was not satisfied with costumes off the rack and so I started putting together costumes about 5-6 years ago. My first big build was of a Roman soldier a few years ago and I feel in love with the whole process.
I have always wanted to do a Han Solo costume and so I decided to make it a reality this year.
I started with research here and on the Rebel Legion site - looking for more information on how to be as accurate as possible (at least for someone with no prop building training could).
My only caveat was to meet Rebel Legion standards for the costume - as I wanted to apply for membership at the end! ;-)
- - - Updated - - -
So, to start I had to organize the costume into different parts -
1) Shirt/Vest/Pants
2) Belt
3) Holster
4) DL-44 Blaster
5) Tools
6) Boots
All being specific for the ANH versions.


")


