Ladman's Patriot Warmachine Build

ladman

Well-Known Member
Hello to all,

This is just a thread to show the progress of my build. I cant thank jackie and everyone else who has worked so hard to create these files for everyone to use. One to the Build!!!

Chest piece Progress. This piece was hard to make, but i was given some advice that helped me out a lot, since this is my first build, ill take all i can get. I cut out all the pieces for the foam templates, and then put a lot of them together to make large pieces. I think when i was done doing that, it came out to be only 7 large pieces, that made up about 90% of the entire chest. Then it was just all the little pieces after that. The most difficult part i would say was the inset U shape in the back where the cannon can move from side to side on a rail. My advice on that piece is to put the back together and leave out the Small U shaped center. after you have assembled the back, put one big piece of foam, i would say a 1\8 inch thick piece would be sufficient, and then glue the small U shape center piece on top of that. I did not think of doing that until i had already struggled with trying to put it together with all the little inset pieces:cry Anyway, enough talk, here are some pictures of what i have so far of the chest. I have 3D printed detail pieces being made for the rest of the Chest.

IMG_20130305_175902_628_zps0202ed7c.jpg


IMG_20130227_021244_640_zpsbff1e12b.jpg


IMG_20130227_012055_032_zpsbbca8580.jpg


IMG_20130224_231529_942_zpsfc578e61.jpg


IMG_20130224_231440_509_zpsf1fc0bcc.jpg


IMG_20130224_231429_314_zps84a94e1c.jpg


IMG_20130219_202512_755_zps873387a0.jpg


IMG_20130204_243934_414_zps17aa956a.jpg


IMG_20130204_243913_608_zpsc0d50cff.jpg


IMG_20130204_243900_006_zps000c5edc.jpg
 
Last edited:
Looking good for a first timer mate. The only tip I'd give is to try and minimise how much glue gets on the outside of the seams as it makes your life harder when you're coating/painting etc. Use less glue on the seams themselves and always put the pieces together with the outer edge first, and then sandwich them together so any excess glue squirts on the INSIDE of the seam. Then once that is dry and holding, add more glue to the back of the seam across the seam itself onto both of the pieces to add more solidity.
 
Looking good!

Thanks Man!!

Its coming out great! Keep up the good work :)

If it was not for you, this would not be possible, Thanks for all your hard work you did and are still doing on these files.

:thumbsup Subscribed! :thumbsup

Thank you for Subscribing man, and also Thank You to you as well. I know you have been working hard on the V2 Cannon. Cant wait to get it up and running. I hope you don't mind, i designed my own servo system for the V2 cannon.
 
Thank you for Subscribing man, and also Thank You to you as well. I know you have been working hard on the V2 Cannon. Cant wait to get it up and running. I hope you don't mind, i designed my own servo system for the V2 cannon.[/QUOTE]

No worries, I want to see what people come up with (y)thumbsup Half my stuff I can't post up because it's too hard to explain :lol Good luck with your build!
 
Got a chance to work on the Lower Torso last night.

One question, How are the center of the abbs supposed to be connected? are they to be left free floating or attached to one and other?

IMG_20130306_023324_221_zpsa4babf72.jpg


IMG_20130219_202512_755_zps873387a0.jpg
 
Last edited:
Finally had more time to work on the Lower Torso.

Im not sure what im doing wrong with my pieces, but for some reason even after i followed my templates exactly and cut them perfectly, my pieces still seem to come out too long or too short. I have had to modify pieces to fit. Not sure what im doing wrong.

For example: The pieces that are on the side of the abbs, for some reason they don't fit? i have to go and make smaller ones to put into those areas. Its not a big deal, they still came out ok, but i just don't know why that happened.

Here are some update Pictures:

IMG_20130225_230436_373_zps34f7bdc5.jpg


IMG_20130224_231440_509_zpsf1fc0bcc.jpg


IMG_20130219_201854_727_zps009c83c5.jpg
 
Last edited:
Nice man. I like the cardboard mockup of the neck in that last pic lol. Also, are those some of those clear bra straps attached to the shoulder pieces? Or is that just some weird camera thing?

P.S, your mirror needs a clean :p
 
You might be just better off to section either your sides or the center to make them fit rather than starting over? Also, those sections are REAAAALLLLLLY EASY to get flipped upside-down, especially the side-pieces in relation to the front. When I built my first set of IP abs, I already had the entire ab rings assembled, I just had to stack the pieces in the correct order with the correct side up, and I couldn't do it without the file in front of me. Nothing sticks out with your build as being goofy though piece-wise. (except for the gaps obviously)
 
Nice man. I like the cardboard mockup of the neck in that last pic lol. Also, are those some of those clear bra straps attached to the shoulder pieces? Or is that just some weird camera thing?

P.S, your mirror needs a clean :p

Lol, thats not bra string, its the coat hanger. again, lol.

You might be just better off to section either your sides or the center to make them fit rather than starting over? Also, those sections are REAAAALLLLLLY EASY to get flipped upside-down, especially the side-pieces in relation to the front. When I built my first set of IP abs, I already had the entire ab rings assembled, I just had to stack the pieces in the correct order with the correct side up, and I couldn't do it without the file in front of me. Nothing sticks out with your build as being goofy though piece-wise. (except for the gaps obviously)

Thanks man, I picked up some paint-able flexible calk today to take care of all the imperfections in the suit.
 
This is starting to look quite nice. You're making good progress. I'm still working on the upper torso with a couple of mods. Looking forward to seeing this to the end...GM
 
This is starting to look quite nice. You're making good progress. I'm still working on the upper torso with a couple of mods. Looking forward to seeing this to the end...GM

Thanks Man:thumbsup

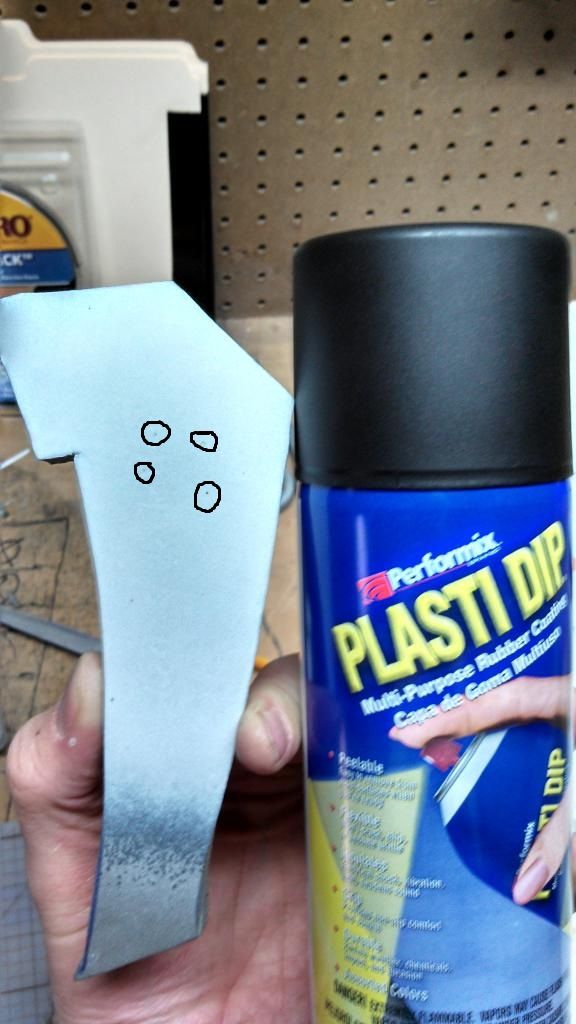
I found this product called plastiDip yesterday at Homedepot. It is a rubberized coating. I tested it on a piece of my foam. I used two coats Plastidip and two coats of white primer. it came out not half bad. It did not leave any holes and was quite smooth. I might go with this instead of using the StyroSpry1000. It is only 6 bucks a can, and the 2 gallons of SS1000 would have been 120. Here are some pics of the test i did.

I think if i use the plastiDip on this build, depending on how the it comes out. Then if in not happy with the results, ill do SS1000 on the next one.

IMG_20130221_131815_352_zps91951c2f.jpg


IMG_20130221_131707_483_zpsef1f28a7.jpg


IMG_20130221_131656_920_zpsd3f229db.jpg
 
Last edited:
Nice, I thought it was more expensive than that. I've used their stuff to dip parts, but I was afraid the aerosol would give too much of a bubbled 'undercoat' finish. Thanks for posting those pictures :thumbsup
 
I was also surprised on how cheap it was. I heard it was a lot more expensive.

I did look closer at the test piece and noticed that there were some little imperfections in the pieces. Here is a picture that shows them.

PlastiDip_zpsf51bbb2c.jpg


It was not exactly warm in my basement when i did this so that could have contributed to this, anyway, its nothing a little caulk cant fix.
 
This thread is more than 9 years old.

Your message may be considered spam for the following reasons:

  1. This thread hasn't been active in some time. A new post in this thread might not contribute constructively to this discussion after so long.
If you wish to reply despite these issues, check the box below before replying.
Be aware that malicious compliance may result in more severe penalties.
Back
Top