You are using an out of date browser. It may not display this or other websites correctly.
You should upgrade or use an alternative browser.
You should upgrade or use an alternative browser.
1/24 X-Wing near 100% from scratch
- Thread starter Moska
- Start date
Hey Rafa, I hope this will help and sorry I have not yet been able to make the droid strips available.
Moska
Sr Member
Hey Rafa, I hope this will help and sorry I have not yet been able to make the droid strips available.
Hi Nighteyes.
Thank you very much for the image. It's really useful for me. I always thought that these pieces were flatter.
")
Thanks a lot for your help.
Hey Rafa, here's some pics of the Airfix Scharnhorst, Frog Whitley Whitworth, Hasegawa Essex & Airfix Harrier parts for you.
Ask away if you need more specific shots or measures mate.
Hope they help?.
Stu
Stu, these images are a great treasure for my project. Especially the Harrier pics …I'm getting horny.:love
I can't find words to thank you for your valuable cooperation.
Rafa
Moska
Sr Member
Hello Stu.
By working with your images, I found a serious doubt. According to the measurements I took from them, it seems that my blueprints were wrong. But if I took as reference the Panther part, it seems that my plans are correct. This is driving me crazy.:eek
Can you please tell me the exact measurements of this central part of the Scharnhorst?
I wait these measures with great anxiety. :confused
Rafa
Hello Stu.
By working with your images, I found a serious doubt. According to the measurements I took from them, it seems that my blueprints were wrong. But if I took as reference the Panther part, it seems that my plans are correct. This is driving me crazy.:eek
Can you please tell me the exact measurements of this central part of the Scharnhorst?
I wait these measures with great anxiety. :confused
Rafa
Hey Rafa, ok, hope these actual measures help?.
The extreme length of the Scharnhorst middle section is 65.5mm & the extreme width is 20mm.
The cut-down Panther part sits in a space 21.5mm x 18.25mm.
These are exact measures Rafa, so you were'nt too far off mate!.
Just shows, even pics with rulers next to them can distort to give slightly off measures.
Stu
Moska
Sr Member
Well, I already thought my drawings surely are not 100% accurate :behave but is not a catastrophic situation and I can ignore it.
I feel very relieved.
I was very worried that my plans and my pieces were bull**** and would have to start again.
Thank you very much for the information.
Stu, your photos of the Harrier parts have been tremendously helpful and I have already prepared the plans to build them.thumbsup:thumbsup
Thanks a lot and Merry Christmas friends. :cheers
Rafa
Note: I hope to finish the Messer part tomorrow. New pics coming soon…
I feel very relieved.
I was very worried that my plans and my pieces were bull**** and would have to start again.
Thank you very much for the information.
Stu, your photos of the Harrier parts have been tremendously helpful and I have already prepared the plans to build them.
thumbsup:thumbsupThanks a lot and Merry Christmas friends. :cheers
Rafa
Note: I hope to finish the Messer part tomorrow. New pics coming soon…
Moska
Sr Member
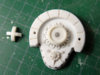
Hey! Moska-san!
I made a comparison pic.
At least length and the placement of the parts, both of us are the same opinion.:thumbsup
Anyway, Happy Christmas!:cheers
Hi atom-san.
I am glad that you confirm that my plans are correct.
I respect your discretion for the phenomenal job you're doing in your X-Wing, for your attention to detail and accuracy.
thumbsup:thumbsupI invested too much time on my drawings taking all kinds of references available and, honestly, I was very worried when I couldn't fit with eagle1 pics. Apparently, these pics showed more distortion of the apparent at first sight.
Thank you very much for your interest.
Rafa
Moska
Sr Member
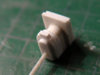
Not completely finished yet but here are some pics of the Messerschmitt part as promised.
Thanks for looking.
Rafa
Thanks for looking.
Rafa
Attachments
atom
Well-Known Member
Not completely finished yet but here are some pics of the Messerschmitt part as promised.
Thanks for looking.
Rafa
Hi! Rafa-san.
Amazing work!
It 's unbelievable!
I am glad these pics might help.:thumbsup
ozzyguanche
Sr Member
Rafa,
Your approach to breaking down the piece into workable shapes is wonderful, and has given me inspiration to take a fresh look at some of the scratch bits I have been working on.
Well done
Ozzy
Your approach to breaking down the piece into workable shapes is wonderful, and has given me inspiration to take a fresh look at some of the scratch bits I have been working on.
Well done
Ozzy
crackerjazz
Sr Member
Hi Moska, your work is unbelievable. There is no 3D printing involved here at all, is there? Also, how do you make those tiny bolt heads?
Moska
Sr Member
atom, ozzyguanche, justice88…
thank you very much for your kind words.
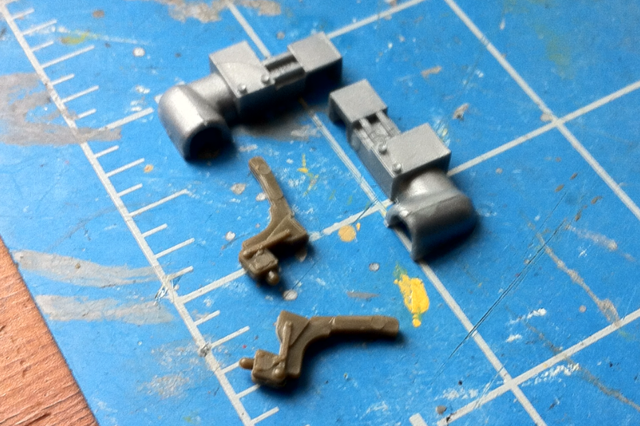
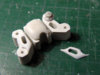
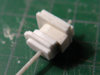
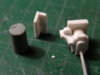
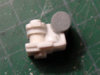
Hey crackerjazz, if you look at the first photo in my previous post, the piece that is on the left is the base of the group, and if you look closely, you'll see that there are already holes made to place these bolts. You only need to introduce through those holes small bits of stretched plastic and paste them, once dried, lightly sand until they matched at the correct height.
It's really easy to do.
thank you very much for your kind words.
Hi Moska, your work is unbelievable. There is no 3D printing involved here at all, is there? Also, how do you make those tiny bolt heads?
Hey crackerjazz, if you look at the first photo in my previous post, the piece that is on the left is the base of the group, and if you look closely, you'll see that there are already holes made to place these bolts. You only need to introduce through those holes small bits of stretched plastic and paste them, once dried, lightly sand until they matched at the correct height.
It's really easy to do.
Moska
Sr Member
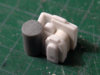
New pics.
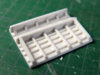
The finished Messer part, also the Ticonderoga, and currently working on the piece of Panzerspähwagen 232 that goes into the rear cap of the X-Wing.
I temporarily put aside the droidstrip to see if I can do the part of the Panzerspähwagen because it's a complex piece and I'm not sure if I could get a result that satisfies me. If I can't get it, I'll have to buy the kit. At the moment everything is going ok but ... we'll see how it ends.:rolleyes
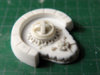
Of the remaining pieces, the only worry because I still don't know how I'll make, is that of Bandai 1/15 Stug or Hummel. The piece is not complicated, but the center hole with gear teeth is what I have not decided which may be the best way to do it. I accept ideas and suggestions. :confused
Many thanks for looking.
The finished Messer part, also the Ticonderoga, and currently working on the piece of Panzerspähwagen 232 that goes into the rear cap of the X-Wing.
I temporarily put aside the droidstrip to see if I can do the part of the Panzerspähwagen because it's a complex piece and I'm not sure if I could get a result that satisfies me. If I can't get it, I'll have to buy the kit. At the moment everything is going ok but ... we'll see how it ends.:rolleyes
Of the remaining pieces, the only worry because I still don't know how I'll make, is that of Bandai 1/15 Stug or Hummel. The piece is not complicated, but the center hole with gear teeth is what I have not decided which may be the best way to do it. I accept ideas and suggestions. :confused
Many thanks for looking.
Attachments


Absolutely stunning work Rafa. Each piece is a work of art, I'm blown away by how crisp & precise your work is. How you did that Essex part is just mind-boggling, knowing just how small this part really is mate!.:love
Great start to the 8-rad part Rafa. If your'e not happy with your final scratched part, don't buy the kit, I have a spare I can give you. Of course, I think you'll be able to pull it off.
It is an honor Sir to be viewing this amazing build, from scratch, with not one resin part to be seen.
Stu
Great start to the 8-rad part Rafa. If your'e not happy with your final scratched part, don't buy the kit, I have a spare I can give you. Of course, I think you'll be able to pull it off.
It is an honor Sir to be viewing this amazing build, from scratch, with not one resin part to be seen.
Stu
Moska
Sr Member
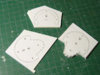
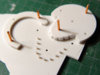
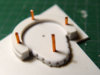
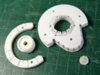
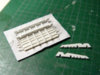
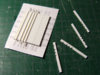
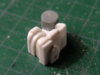
Thanks to eagle1 and Rodmart85 who were kind enough to send detailed pictures of these pieces, I've finished the first piece of the Harrier. I used the technique I call "The Skewer technique" :lol (When you see the pictures you will understand why this name).
Based on the photographs, I can figure out how to separate the target piece into small parts easy to make and work and that, once joined together, shape the final piece.
When these small pieces are joined on each other forming several layers, it'll make a axis point that will help me to position each in its proper place with no mistake. I make a hole of 0.6 mm at the axis point of each piece and, as seen in the pics, I just need to pass through these holes a small plastic rod forming a small skewer of plastic parts that results in the desired final piece.
In the pictures below you can see the entire process, including the drawings I did for this part of the Harrier. I print these plans with a laser printer and stuck the printed paper on the sheets of appropriate thickness styrene using 3M repositionable adhesive spray. So I can cut each of the small pieces with great precision, making this job a lot easier than it seems at first sight.:love
Thanks for looking and HAPPY NEW YEAR!!
Rafa
Attachments
Similar threads
- Replies
- 2
- Views
- 560
- Replies
- 3
- Views
- 756
- Replies
- 12
- Views
- 1,372