Future floor polish

I was referring to the procedure I use for clear canopies specifically - didn't make that plain, however! Sorry...

1. Sand & Polish to restore clarity
2. Clean really well, including a tack cloth
3. Dip into Future (submerge it...) using tweezers holding a spot that will be painted (if no frame areas, leaving a portion of sprue attached as a handle is required...need a firm place to grip the part.)
4. Let excess drip off until it basically stops; use a paper towel as a wick if needed.
5. Set on a paper towel (good quality to lessen chance of stray fibers) under a clear plastic cover that has one edge propped up by a chopstick for venting.
6. Let set overnight undisturbed in a low airflow area (away from air vents, fans, windows, etc.)
Result: Crystal clear part

R/ Robert
 
I bought a bottle of finish ages ago on amazon, and at some point my wife put it away in the "things I can't identify" closet. At any rate, we just moved to a new house and I found it again. Admittedly it was sitting there for about 7 years, nevertheless, it was not clear like water anymore but rather with a tinge of yellow and has a slight haziness to it.

I have not done any tests with it to say how it looks sprayed on a model, but I am a bit nervous if the yellow will be noticable either now or in the years to come. Has anyone else noticed this?
 
image.jpeg


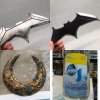
I absolutely love this stuff. Found out about it a few years ago from a scale model painter and have been using it since. It goes over metallics so well. In this case, it's mirror chrome and faux gold leaf in my example... The photo of the Pledge isn't mine, because I'm lazy and I had it in my camera roll already. Credit to them!
 
Just found a bottle of 'Pledge Floor Care - Finish' at the local Wally-Mart. Smells nearly the same (if memory serves...) just got to test it out to see. Was tricky to find however since it wasn't on the same aisle as the floor cleaners & mops. It was on the aisle with the laundry detergents... just in case others have a similar difficulty!

Cheers! Robert
 
Hi Guys


I got a question related to this thread.

So a long story short...came home from Holiday yesterday and saw that an engine had came lose from my RC Tantive IV, I guess due to sunlight/Heat or what have you, there it was an Engine hanging down from the model only attached by the wiring from the Engine LED :(. So of course I started to glue it back with "Superglue" and of course some of it dropped down on the Base/Stand that is made out of a clear Plexi painted from the back in black...FRACK!...So what did I do, I used 2500 wet sand paper and slowly started to rub it away, so far no prob. Then I saw that the Plexi was getting sorta milky, again no wonder as this will will happen when sanding plexi D'OH! :p

I then resulted in to something pretty crazy...I decided to give the Plexi a good coat of Future Floor :) "That should bring back the sheen right!" ..Well it sorta did but its not 100%. So now my question, what to use to "buff" the Future up to a high gloss finish?.

Cheers Guys.
 
Clean the 'Future' off (ammonia works well) then continue with the sanding. You need to get it to the point that it is pretty much clear again before applying the top coat of Future. Because the Future is designed to 'self-strip' (as a floor finish), applying multiple coats in order to completely fill the sanding scratches can take a spell. If the sanding scratches are a significant depth compared to the Future film, the Future won't completely 'flow over' the marks. If you get a variety pack of wet sanding papers with at least as high as 600 grit, followed by plastic polish, then that should do it.

I have a set of micro mesh sanding pads that go down 24000 grit (IIRC) but I've also used the 'four grit' beauty salon nail "files" for similar results (as in, nearly completely clear without Future...)

Realizing that sanding is just a matter of using particles of a certain size to knock off the peaks while generating 'furrows' (scratches) of a matching size, then as you go through smaller and smaller 'grit' particles, the scratches also become progressively tinier until you reach the desired level of surface texture (from deep to shallow to microscopic, as it were.) That is why even plain paper can sometimes be used - the wood fibers may be harder than the material being abraded & so can act to 'smooth' the surface.

Anyway, for what it's worth.
Regards, Robert
 
How do you spray your future? Just straight from the airbrush?


View attachment 659441


I absolutely love this stuff. Found out about it a few years ago from a scale model painter and have been using it since. It goes over metallics so well. In this case, it's mirror chrome and faux gold leaf in my example... The photo of the Pledge isn't mine, because I'm lazy and I had it in my camera roll already. Credit to them!
 
How do you spray your future? Just straight from the airbrush?

Yup. Straight from the bottle into my airbrush and onto my model. Sometimes if I want to thin it just a tad so it doesn't set and get tacky as fast as it does, I will spritz a little ammonia or glass cleaner with ammonia in it.

I always use a very thin coat of Future (Pledge floor care) seal in my initial paint job, and then again over washes and weathering/carbon scoring.

I also use this for my decal setter. I either brush a line of Future or airbrush a base then slide my decal into position and apply another brush or blast once it sets over the decal and 'sandwich' it into the bottom coat. Makes decals look like they are painted on the substrate. Then I apply a heavier final coat to seal it all in. On some models, like my Viper Mk II from Moebius, several coats of Future will result in a ridiculously handsome gloss coat.
 
How do you spray your future? Just straight from the airbrush?

The piece with the faux gold leaf, (Enchantress headpiece) was hand brushed on and I think I may do it that way a little more in the future. It self levels beautifully.

When I do spray it, I use my airbrush at a low PSI. The future is straight from the bottle.. I start with just a "dust" coat, and then I go in and spray until it has a "wet" look. If you've ever clear coated with an HVLP gun, I used a technique similar to that. In general, I'll try my best to spray it to the point right before it will run or drip. Cover the piece in the spray booth, and if needed apply a second coat when dry for a higher shine. The simple green trick works a treat as well.

I've not used it on a model really, so I'm not much help there, sorry!
 
Clean the 'Future' off (ammonia works well) then continue with the sanding. You need to get it to the point that it is pretty much clear again before applying the top coat of Future. Because the Future is designed to 'self-strip' (as a floor finish), applying multiple coats in order to completely fill the sanding scratches can take a spell. If the sanding scratches are a significant depth compared to the Future film, the Future won't completely 'flow over' the marks. If you get a variety pack of wet sanding papers with at least as high as 600 grit, followed by plastic polish, then that should do it.

I have a set of micro mesh sanding pads that go down 24000 grit (IIRC) but I've also used the 'four grit' beauty salon nail "files" for similar results (as in, nearly completely clear without Future...)

Realizing that sanding is just a matter of using particles of a certain size to knock off the peaks while generating 'furrows' (scratches) of a matching size, then as you go through smaller and smaller 'grit' particles, the scratches also become progressively tinier until you reach the desired level of surface texture (from deep to shallow to microscopic, as it were.) That is why even plain paper can sometimes be used - the wood fibers may be harder than the material being abraded & so can act to 'smooth' the surface.

Anyway, for what it's worth.
Regards, Robert

Oh dear :) I knew the best solution would require some hard work :p
As I am planning to make a Clear Canopy for my Hasbro Slave 1 I actually ordered a set of Micro Meshes to polish it when done. I did not get them yet but, funny I ordered them together with two Bottles of Future Floor...running low on stock here.

Will give this Operation a go when all the Hardware are in place

Great advice Robert really appreciate it!

Cheers.
 
I recently completed my second Bandai R2/R5 kit and was about to apply a gloss cote before applying decals. I approached this kit a bit differently from first kit that I completed. One difference was that I spray painted the silver parts/dome with Testors Spray Enamel Metallic Silver 1246.

I was about to apply Testors Clearcote 1261, but did a bit of research first to make sure I wouldn't hit any problems with paint/plastic.

I came across this article http://www.hubhobbyshop.com/hint12.htm which states (under Lacquers) that Testors 1261 should never be applied over Testors 1246.

I'm now looking for another option for a gloss coat to apply before hitting decal stage. I just printed the 10 page article from a link to swannysmodels that user blakeh1 posted and am going to start reading it and the rest of this thread after typing this post.

Basically, if any of you experts read this post you may save me a lot of time. I have not stepped up to an airbrush yet, so I don't know if Future Floor Polish or similar products can be applied with a brush. Also, if anyone has used Testors Silver 1246 perhaps you could recommend a gloss finish.

If anyone has recommendations it'd be greatly appreciated. I'm still gonna do my reading on Future, sounds like it has some great advantages, and I plan on getting an airbrush soon - but wanted to get this R2 kit done before then.

Anyway, Thanks.
Jim
 
You can apply it with a brush. Just put it on quickly and then leave it alone.
It's acrylic, so as long as your enamel is cured you won't have any compatibility issues.

I stopped gloss-coating silver years ago, because it always seems to dull the silver,
but Mr Mold Maker seems to be getting good results with Future, so I intend to give it a try someday.

Thanks, Axlotl.

The silver on R5 is so sparse, and I'm gonna weather, so not too worries about dulling. Just didn't want a big mess ruining the paint. Will try him first. Really just wanted a good gloss finish for decals - going to use Micro Set/Sol for first time and was anxious to give it a run. From what I've seen online those products do wonders for making decals look "painted on" to a pretty good degree.

Thanks again.
 
This thread is more than 6 years old.

Your message may be considered spam for the following reasons:

  1. This thread hasn't been active in some time. A new post in this thread might not contribute constructively to this discussion after so long.
If you wish to reply despite these issues, check the box below before replying.
Be aware that malicious compliance may result in more severe penalties.
Back
Top