charliiee
New Member
Hi everyone !! This is my first post so be kind !! I've always loved Samus so I decided to make her Varia suit. Unfortunately with such a big design I don't expect to have her done until at least April or later ( I'll be debuting Samus for Dragoncon 2016)
This is also my first pepakura build so it's been a little rough but I will say fun....
So I started with files, my pepakura files were bought off etsy off Tetra Variations. (His samus files are super awesome totally worth it!)
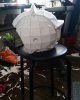
And started with her shoulders . It took me about 9-11 hours to assemble each shoulder which resulted in a lot of paper pieces on my floor.
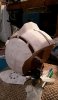
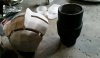
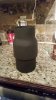
I then took both shoulders and the bottom half of the cannon and fiberglassed the both of them and put rondo on the inside. Then the fun part!! Bondo! Which resulted in bondo sanding more bondo more sanding. Because I have ocd with sanding 3 days later and yay finished cannon! I'll add spot putty to fix up minor holes etc. My shoulders are still in the process of being sanded and then applied with more bondo I'll hopefully have them done for Monday or Tuesday night. I used fluorescent orange acrylic to hold the lighting on the inside which is 15 red leds, I used white insulation as a diffuser and then placed a clear acrylic piece on the front , which seems to me works out great !
I'll keep adding to this post the farther I move along... but for now this is all hahaha.
Any questions feel free to ask! You can also find me on instagram where I post more frequently
ALSO don't mind my messy work room where i clearly eat sunchips and garage...
This is also my first pepakura build so it's been a little rough but I will say fun....
So I started with files, my pepakura files were bought off etsy off Tetra Variations. (His samus files are super awesome totally worth it!)
And started with her shoulders . It took me about 9-11 hours to assemble each shoulder which resulted in a lot of paper pieces on my floor.
I then took both shoulders and the bottom half of the cannon and fiberglassed the both of them and put rondo on the inside. Then the fun part!! Bondo! Which resulted in bondo sanding more bondo more sanding. Because I have ocd with sanding 3 days later and yay finished cannon! I'll add spot putty to fix up minor holes etc. My shoulders are still in the process of being sanded and then applied with more bondo I'll hopefully have them done for Monday or Tuesday night. I used fluorescent orange acrylic to hold the lighting on the inside which is 15 red leds, I used white insulation as a diffuser and then placed a clear acrylic piece on the front , which seems to me works out great !
I'll keep adding to this post the farther I move along... but for now this is all hahaha.
Any questions feel free to ask! You can also find me on instagram where I post more frequently
ALSO don't mind my messy work room where i clearly eat sunchips and garage...
Attachments
-
 IMG_20151109_163339.jpg947.7 KB · Views: 108
 -
 1448174854164.jpg120.7 KB · Views: 114
 -
 20151123_013206.jpg582.6 KB · Views: 105
 -
 20151110_123038.jpg875 KB · Views: 93
 -
 1448214634948.jpg90 KB · Views: 102
 -
 20151114_230238.jpg663.4 KB · Views: 150
 -
 20151123_020109.jpg817.2 KB · Views: 96
 -
 20151123_020720.jpg480 KB · Views: 89
 -
 20151123_020732.jpg776.6 KB · Views: 110
")
