Star Lord Build from scratch-ish...

Staar Lord Maan, Aww thanks but we are all heros here at RPF. Yeah I get conflicting pictures of the shirt. There's one with 2 patch on the front at ab height. Which I don't remember seeing in the movie. Guess I'll have to go watch the movie again for the 3rd time lol
 
Last edited by a moderator:
@Staar Lord Maan, Aww thanks but we are all heros here at RPF. Yeah I get conflicting pictures of the shirt. There's one with 2 patch on the front at ab height. Which I don't remember seeing in the movie. Guess I'll have to go watch the movie again for the 3rd time lol

I hear ya, LOL!

I did some digging and it looks like there are two lighter colored patches framing the abs on that shirt Chris Pratt wore at the beginning of the movie
screengrab 3.jpg screengrab 2.jpg

...for the rest of the film, we see him in that steel blue number, possibly, because Zoe Saldana kicked the livin' $#1t out of the blue thing Chris wore during that early fight scene and it got damaged.

That's my story (and my 50th post) and I'm stickin' to it.
 
Last edited:
Some pictures from Jango Wes over in the definitive Starlord costume thread show those patches pretty clearly. they look like a very loose, almost mesh material. I know absolutely nothing about matching fabric types, so the most I can say is it reminds me a bit of certain athletic shirts.

10495709_10203623841470132_6737953101376451353_o.jpg

I also remember a scene of Starlord putting on a shirt in one of the trailers that definitely didn't make the final cut, so it's entirely possible that there were multiple very similar shirts with different details used.
 
Some pictures from Jango Wes over in the definitive Starlord costume thread show those patches pretty clearly. they look like a very loose, almost mesh material. I know absolutely nothing about matching fabric types, so the most I can say is it reminds me a bit of certain athletic shirts.

View attachment 372607

I also remember a scene of Starlord putting on a shirt in one of the trailers that definitely didn't make the final cut, so it's entirely possible that there were multiple very similar shirts with different details used.

Ah, yeah, I've seen these images, thanks for putting one here :) Diving into the character, one could also say that he owns more than one shirt, too, heh! If I lived in a space ship, I'd own at *least*....two, maybe three shirts and wear the one that smelled the least. :sick
 
Possibly the most brilliant thing I've heard in my entire life, this morning, LOL! if you slap a micrometer on that bad boy, how thick is the stock? I may just pick up thick wire and follow suit, heh!

Just got my tandy 1.75" D rings. They are .2" thick and are 1.8" long (from outside edge of straight part to outside edge of curved part).
 
Just got my tandy 1.75" D rings. They are .2" thick and are 1.8" long (from outside edge of straight part to outside edge of curved part).

Sweet! They probably look humongous. I just scored a deal on eleven of them at my local Tandy, Most likely gonna pick em up a week from Monday, (when the paycheck comes....and subsequently 'goes') :facepalm
(side note...can any one see my profile picture in the left margin? I can't. What am I doing wrong?)
 
I can't see your profile picture...maybe check the format? I know they have restrictions on size and formats, so they may get messed up if they aren't correct.

The d rings are pretty hefty. They are much heavier and more solid than the regular D rings. They'll probably be the most durable part of the bag!
 
Those vent patches on the shirt are very interesting. I had assumed they were decorative lighter patches and not a functional piece of the costume. You always hear about costumes being so hot to wear. It is a brilliant stroke by the designer to make costumes as breathable as possible.
 
Pretty simple post, this Sunday evening on my progress...

No Pattern No problem.JPG

"No Pattern, No problem" - Okay, so maybe a little problem...damn near skewered myself twenty times with the seam ripper while removing the stitching form a pair of Levi's 501's that were 'donation-bound', but having the right size helps immensely. Now I get to attack it with a piece of chalk to draw on the inner thigh pads, and other design elements. The tricky part is getting all the other bits made, attached and then being successful in assembling it. Pardon my plajorism on these images from other posts, but having all the detail in one place for me to reference helps a lot, too.

PANTS outdoors on set.jpgScreen Shot 2014-06-10 at 11.57.14 AM.pngThigh .jpgInner Thigh reinforcemnt Coururoy.jpg

Ren-Faire costuming was easy, but I've never tailored proper pants before. This will be fun...

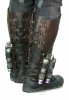
Oh, and let me tell you this....it is quite a daunting task deconstruction a pair of these things, but now that it's in pieces, I may consider using parts of it in the knee construction because heck...look at this thing and how many fabrics there are involved, here...

Knees Coururoy.jpg
I still need to figure out what fabric/material they used for that rocket control sub strait located on the thigh, though. That silver thing with, what looks like, magnets or some kind of attaching studs on them is kind of throwing me. Oh, and the back of the knee looks pleated, not stitched. The whole thing, unfolded, may be three feet long, for all I know....
Back of Knees.jpg

In any case, I *did* manage to find some twill, canvas and corduroy, so they're getting popped into a mild bleach wash to get that chocolate tone I need for this.

Every picture I've seen, the pants look brownish - any suggestions?
 

Attachments

  • Boots BACK.jpg
    Boots BACK.jpg
    1.5 MB · Views: 266
Last edited:
I can't see your profile picture...maybe check the format? I know they have restrictions on size and formats, so they may get messed up if they aren't correct.

The d rings are pretty hefty. They are much heavier and more solid than the regular D rings. They'll probably be the most durable part of the bag!

I figured out my whole image not showing up thing....I forgot to assign one to my Avatar. So there you have it...that's me in the line up....arrested for appearing ridiculously slovenly amongst the beautiful people of Xandar...
 
Last edited by a moderator:
I have good news for anyone reading this post.

I have the one inch oblong grommets as well as the tools for them. The website said '40 pieces per bag' and I read that to mean that there were twenty tops and twenty bottoms, making a forty piece bag, right? wrong....one 'piece' to them is a 'set'....so in my over preparedness, i got two bags hoping to get 40 'sets', (that's 40 tops and bottoms), and wound up with 80 SETS, (that's 160 total pieces) :facepalm
oblong gromet and setter.JPG
On the bright side, once I get all the materials I need assembled, I'll have more than enough to make a bag or two. This is not to say that I'll be doing any runs, mind you, I need to make sure I bang-one that meets or exceeds my *own* standards first.

...but who knows what the future holds...

What I'll need to make this happen is a lot of leather, canvas, a trip to the screen printer, those big brass rivets* on the back of the strap, a relatively approprieately sized pattern, and a whole lot of guile....

*10mm?
 
Last edited:
Staar Lord Maan, were did you get the punch tools and what model number are they, plus the grommets?
I havent started my pants yet :( wanted to get my belt and boots done first. But ill get to them. Im following your thread too.
Vallejo, ca. My one Boss was up there last week doing evaluations of the earthquake damages.
Oh i like our avatar and your signature. I was thinking about after i get my star lord costume done is do that. Its great to make other happy smile, when they need it.
My one cousin up in San Fransico Volinteries time to help the babies

I have good news for anyone reading this post.

I have the one inch oblong grommets as well as the tools for them. The website said '40 pieces per bag' and I read that to mean that there were twenty tops and twenty bottoms, making a forty piece bag, right? wrong....one 'piece' to them is a 'set'....so I have 80 SETS.
View attachment 374913
On the bright side, once I get all the materials I need assembled, I'll have more than enough to make a bag or two. This is not to say that I'll be doing any runs, mind you, I need to make sure I bang one out to my own standards first, but who knows what the future holds...

What I'll need to make this happen is a lot of leather, canvas and those big brass rivets on the back of the strap. Were those 10mm?
 
Staar Lord Maan, were did you get the punch tools and what model number are they, plus the grommets?
I havent started my pants yet :( wanted to get my belt and boots done first. But ill get to them. Im following your thread too.
Vallejo, ca. My one Boss was up there last week doing evaluations of the earthquake damages.
Oh i like our avatar and your signature. I was thinking about after i get my star lord costume done is do that. Its great to make other happy smile, when they need it.
My one cousin up in San Fransico Volinteries time to help the babies

Pants:
Don't feel bad, all my fabric, while generally-speaking, the correct weave etc is the wrong color. Dye time. A little Red to the gray will *hopefully* make it brown. My wife asked me why not make the pants and THEN dye it. At that point I run the risk of the whole thing looking like a bucket of....unhappiness.

Belt:
Jealous of you for having that kind of leather in the right color. I have a half hide of BLACK. grr....

Punch, Grommets and tools:
I've been reading that there is a gap on either side of the strap going through the grommet, so I'd suggest the one and a quarter inch 'oval grommet'. I'd do a search for 'oblong grommet' for better results, though. PM me for the website, though, I don't want to overwhelm this poor guy with massive orders.

Avatar:
I love Photoshop, LOL! The next time your boss comes up, have him drag you along - we'll grab a pizza or something!

Volunteering time for babies:
Would that be for preemies? Tell him he's awesome for me.
 
Last edited:
Hey, I just wanted to jump in here and say my piece before you go dying any fabrics. I've seen the costume up close and the pants are black, not brown. The sideways corduroy panels are a little warm, and you could probably get away with a REALLY dark brown for those, but I'd call them black. The denim and canvas are both plain black. The only brown part is the leather for the holsters.
 
Hey, I just wanted to jump in here and say my piece before you go dying any fabrics. I've seen the costume up close and the pants are black, not brown. The sideways corduroy panels are a little warm, and you could probably get away with a REALLY dark brown for those, but I'd call them black. The denim and canvas are both plain black. The only brown part is the leather for the holsters.
I could bugs bunny-kiss you, right now.

Here's *my* fabric with a size comparison on that grain...
Back of back cords and gray cords.JPG Canvas and Cords.JPG Denim front and back.JPG
and leather bits...
Belts.JPG black and red leather.JPG
 
Peter Quill's VEST!!! Here are some much anticipated shots of it from angles we've not yet seen!

From the back, we see some kind of chain mail weave or something. Looking at this, makes me think that when they took the back off the jacket to replace it with the fabric screen printed stuff, they had 'leftovers' to work from. Note the details surrounding the arm hole...and the belt that's been integrated...

VEST DETAIL 0 back.JPG VEST DETAIL 2 back.JPG VEST DETAIL 1 back.JPG
and some more adorable ones from the front; I tried to crop in such a fashion as to put an emphasis on the details found on the front. There is a lot going on there...VEST DETAIL.JPG VEST DETAIL 2.JPG VEST DETAIL 0.JPG
 
The corduroy in pic 2 is pretty close to the real stuff. If you dye that canvas in the same pic flat black, especially if you can get rid of the warm tone, it'll be perfect. Where did you get that stuff? The denim in the third pic is dark, but the stuff on the real pants is actually very slightly waxed, it's a bit shiny, and super thin.

The holster panels are thin lambskin with embossed designs (you can check out my build thread for a quick tutorial) and an edge binding. Definitely the hardest part to make.

EDIT: Also, as for the vest. The grey straps on there are definitely the same ones on the pants and jacket, it's heavy weight grey 1" elastic. It's hard to tell, but I think that back panel might be the same mesh they used to line the short jacket.
 
This thread is more than 6 years old.

Your message may be considered spam for the following reasons:

  1. This thread hasn't been active in some time. A new post in this thread might not contribute constructively to this discussion after so long.
If you wish to reply despite these issues, check the box below before replying.
Be aware that malicious compliance may result in more severe penalties.
Back
Top