1987 RoboCop - First foam costume build!

Cyberdragon

New Member
Hi guys, so I thought I'd make a build thread to keep track of this project as I work on it over the summer and so I'm not intruding on other people's threads. I'm currently studying Character Creation and SFX at Hertfordshire university where I've  just finished my first year and I am building '87 RoboCop as my first costume for October's MCM Expo in London.

Making anything out of EVA foam, let alone an entire costume is completely new to me so I'll be learning as I go, I'll be using Laellee's Pepakura files for my templates. I also face the challenge of working out how to taylor the thing to fit me, as I am a 5ft3 female - the complete opposite to Peter Weller, Haha! I've already been given some advice on other threads so I think this will be a fun project to keep me occupied over the summer! :)

Step 1: The gun:
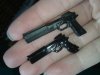
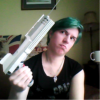
Seeing as I'm from the UK, finding an airsoft replica of the Auto-9 was pretty much impossible for me to do, so I started looking at toy guns and found one that looked very close: S.W.A.T Academy Spy Gun: Amazon.co.uk: Toys & Games So I bought this for about £4 (I see the price has gone up since then, personally I wouldn't buy it for the £8.99 they're asking now) however it's too small. Looks fine in my (small) hands now, but when I make the gloves for RoboCop - it'll look tiny!

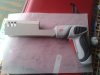
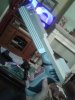
Instead, I ended up buying an electric Screwdriver for £20 and some thick card to make the gun from. Thought it would be fun to make a flash burst on the end of the gun that spins when pressing the button on the screwdriver,  something to add a little uniqueness to the prop rather than having a static gun!
This is my source of inspiration: Cardboard RoboCop Cosplay - YouTube

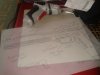
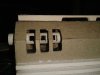
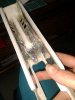
The whole gun has been completely freehanded by me so far, starting off with a traced image of the auto-9 at the size I want it for reference purposes along with two versions of the gun from the NECA and Figma RoboCop figures. It's not going to be 100% to scale which I am okay with. I think any bigger and it would be TOO big looking for my size.

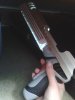
The screwdriver has a built in light which turns on in sync with the button, so I've incorporated that into the design to light up the notches at the tip of the guns barrel. I also lined the inside of the gun using an old silver holo reflective birthday banner to help the light travel further. The final picture is how it looks so far, I'm currently working on the flash burst and grip!

Anyway, without further ado....pictures! Hope you enjoy the progress so far!
 

Attachments

  • 2014-05-29 08.54.59.jpg
    2014-05-29 08.54.59.jpg
    808.9 KB · Views: 214
  • 2014-05-29 15.31.21.jpg
    2014-05-29 15.31.21.jpg
    811.3 KB · Views: 335
  • 2014-05-30 18.34.06.jpg
    2014-05-30 18.34.06.jpg
    774.8 KB · Views: 250
  • 2014-05-30 18.33.23.jpg
    2014-05-30 18.33.23.jpg
    801.7 KB · Views: 236
  • 2014-05-31 22.52.05.jpg
    2014-05-31 22.52.05.jpg
    333.1 KB · Views: 236
  • 1401802326550.jpg
    1401802326550.jpg
    178.3 KB · Views: 230
  • 2014-06-01 14.55.41.jpg
    2014-06-01 14.55.41.jpg
    304.8 KB · Views: 202
  • 2014-06-03 16.18.41.jpg
    2014-06-03 16.18.41.jpg
    850.5 KB · Views: 266
  • Picture of me 4 (2).png
    Picture of me 4 (2).png
    268.6 KB · Views: 328
Last edited:
Looking forward to seeing how this turns out.
You're gonna have fun with the foam when it comes to the full costume :)

Just ordered a nice big roll of 1/4" EVA foam mat from amazon! ;) Can't wait to get started on the actual costume, gonna make a ductape mannequin for it on Monday.
 
Your scratch building is excellent, it's a shame the base you've used is lacklustre, it detracts from your fine work.
 
Last edited:
So Im totally necro-ing this thread. Where are the updates?

Dont worry, I've recently brought this project back from the dead! I'll type up a full update post with pictures later today, im currently making each part in paper to get an idea of fit which I can adjust before I move on to foam. :)
gun looks excellent!

Your scratch building is excellent, it's a shame the base you've used is lacklustre, it detracts from your fine work.

Thank you! I'm going to cover the handle of the screwdriver to make it look less... uh. Screwdrivery :lol I'm hoping when it's all one colour it'll look better however I've managed to find another toy Auto-9 that is at a proper size and I've been practicing spinning it so I don't know whether I'll continue with the card one.
 
Last edited:
I guess it's finally time to update this then eh? :p Long post incoming!

So a little over 2 years after originally starting this thread, I've finally decided to pick this project back up again now that I've graduated from university and have the time to make personal projects again! Turns out it's also the 30th anniversary of RoboCop this year so hey, what timing! I'm definitely aiming to commit to the build this time and get it done for October MCM this year (October is the one I usually go to), so I'll try to keep this updated the best I can!

I started off with making a helmet from my 6mm foam to get a feel for working with foam and to see if it would fit. The final result is very rough and wonky but as this was a tester, I don't mind, I'll be making a new one that hopefully will look far better later down the line. The fit runs a fraction on the small side, and considering that I printed the templates for the helmet 2 years ago, I cannot for the life of me remember what number I scaled it to...whoops! However I can still fit my head in it (without the back piece with the "port" and vents on) and I don't have much of a chin so can't fill out the jaw too well. I don't think it looks too small but to be honest, I really need lots of second opinions at this stage. (I have the new and improved toy Auto-9 in the below photo too!)

tumblr_ojfpmirryT1uos2xho1_1280.jpg

Since making the helmet, I've also printed out all the templates for the rest of the suit from Laellee's files, as mentioned in my original post at the scale of 410 (which should roughly equal my height of 5ft 2 - 5ft 3) based on his instruction in his original thread (found here: http://www.therpf.com/showthread.php?t=171503&highlight=robocop). The pieces I've made so far are the chest, left arm, cod and left leg. At the moment, I'm just taping the paper patterns together to get an idea of whether the pieces have been scaled correctly to make sure they fit so I'm not wasting foam by making pieces that are way too big or small. The other benefit of building in ordinary paper first is that I can cut and adjust the templates to better fit my female form, especially on the legs. as they are, they are way too chunky and will need to be trimmed down a little. Although I want to retain RoboCop's original form the best I can, compromises have to be made somewhere.

tumblr_olc0nnyhP51uos2xho1_1280.jpgtumblr_inline_ol8ko7lJJX1tobjxo_540.jpg

Get the Robo Look™

Chest and leg fit test. Adjustments needed on the leg to allow for better movement but overall length/fit is good I think? The armour is much bulkier than my actual legs, especially the calves so I might have to find a way to tighten the gaps a bit. The chest was super easy to build which is good though I feel like it's a little too wide and I'm having a hard time finding a good reference of how it and the arms are supposed to sit on the shoulders so I'm kinda winging it for now.

Made the left arm yesterday, my god it's so fiddly and all the tiny parts have made it the most frustrating part so far. I'm kinda dreading making the foam version.. but I shall persist! I'm thinking I might end up using thick card for the thinner pieces that'll otherwise be a pain to cut out in foam. The pep templates are actually missing some tiny pieces which don't help, as you can see in the pics below.
The forearm didn't go together too well either. I don't know if that's my fault or if it's because these files are designed for foam so need that extra thickness to look right. Anywho, the arm turned out to be too big for my own arms (I don't have a picture of me wearing it at the moment, sorry!) and as I said in the previous paragraph, I think the chest is too big to fit them on properly so I'm gonna take some more measurements of myself and try these parts again at a smaller scale.

WhatsApp Image 2017-02-16 at 7.06.56 PM.jpegtumblr_olfhymeT9C1uos2xho1_1280.jpgtumblr_olf4ad9Qyy1uos2xho1_1280.jpgWhatsApp Image 2017-02-16 at 7.07.29 PM2.jpeg


Today I worked on adjusting the left leg. The pep file for the lower leg is identicle for both legs so I simply just have to flip the templates over to make the right shin. The thigh however is different on both sides but for now I'm just putting one side together to save time and I can copy the adjustments on the other leg anyway. I've pinched the back of the shin in a bit so I have more room to move at the back of the knee- meaning I can bend my leg! Hooray! minimum movement ability achievement unlocked! and I also trimmed the inside of the thigh to allow for more freedom of movement when walking. Second achievement unlocked! Now I can walk up and down stairs easily without eveything falling apart! Not bad for sellotape and printer paper! I still need to shorten the shin a bit as I feel it's a little too long and redo the hinges as they are now too big (hence them bulging out, theyr'e attached together with tape.)

WhatsApp Image 2017-02-17 at 5.33.29 PM2.jpegWhatsApp Image 2017-02-17 at 5.33.29 PM.jpegWhatsApp Image 2017-02-17 at 5.33.29 PM3.jpegWhatsApp Image 2017-02-17 at 5.33.29 PM4.jpeg

And that's it so far! I'll update further as I go along but I'd love to hear everyone's crits, comments and suggestions! :)

-Kerrie
 
Last edited:
Just printed a new set of chest templates out at a smaller scale. 387 instead of 410, bringing the total width to about 360mm so it should sit on my shoulders quite nicely. Hopefully this one will fit me better without looking too small.
 
Man. Why do all the cool girls have to be in the UK? Looks great, still enamored over the auto9, totally subbed, cant wait to see more updates!

And you guys can all thank me since I was the one that necroed this thread! :cool
 
I made the smaller chest yesterday and just tried it on with the legs. Think it looks better? It certainly fits better and it's much easier to move in without feeling like I'm gonna rip it to pieces but I'm wondering if it's worth bumping the size back up a little bit. My last one was 38 cm from shoulder to shoulder and sat a little too wide, which made it very awkward to move my arms and bowed in on itself. This one is 36cm wide and sits just on the ball joint of my shoulders and allows more freedom of movement on my arms and holds its shape.

20170218_230519.jpg

I also made the neck seal part although unless I give it a drastic trimming down, I won't be using it as it makes the neck hole too small.

EDIT:

Dug my homemade auto-9 out of its storage box to take a comparison photo alongside my most recently aquired auto-9 v3 (like the first one, I bought it from amazon but this one was £20.)

You can clearly see the difference in width! There's tape on the trigger to pull it back which makes for easier gun twirling! :p This one doesn't fire.

20170219_175248.jpg20170219_175307.jpg
 
Last edited:
A quick update! I haven't made much progress this week due to a couple of reasons. I spent the weekend in London to celebrate my 24th birthday and I'll admit I've been very addicted to playing my Godzilla game on PS4 as well! :lol (This game has made me wanna make a Final Wars Gigan costume... but I think I'll make sure I finish Robo first haha but chainsaws for hands are way too tempting)

But anyway, I have decided to jump in on making the legs in foam first as I'm happy with how they fit. Working on the left thigh as I type, about half way done with it now! Hopefully I should be able to get both thighs and shins done in a week or two! :)
 
Foam left thigh complete! It's not 100% perfect and a little wobbly in some places but considering I'm still new at foamsmithing and this is my first completed piece of armour, I'm very happy with it! I know it's not pretty on the inside.

20170303_213628.jpg20170303_213441.jpg20170303_213453.jpg
20170303_213504.jpg20170303_213515.jpg

Sorry, I don't know why they've uploaded sideways.
 
Last edited:
Working on the right thigh. Should be exactly the same besides the detailing on the front panel, but somehow I've managed to mess this one up in more places than the last one! :/

20170307_141418.jpg
 
This thread is more than 7 years old.

Your message may be considered spam for the following reasons:

  1. This thread hasn't been active in some time. A new post in this thread might not contribute constructively to this discussion after so long.
If you wish to reply despite these issues, check the box below before replying.
Be aware that malicious compliance may result in more severe penalties.
Back
Top