MaxaMillaMalark
New Member
Hi everyone. I real new to the cosplay world. I've made costumes as a kid, and love details. Optimus Prime has been a dream build of mine since the cartoon first came out in the 80s. But I figured I'd take it to a higher level and get him to transform. Yes I've seen people make the same costume, but they either look really good in robot form, or really good in truck form. I've designed and figured out how to get the best of both worlds.
I don't have a whole bunch of money to get the best materials or programs to help create this beast of a build, so I'm using my head, pen & paper, and lots of guess work. I'd like to use the cheapest materials possible and Hope to have it built by nycc 2016. But that depends on if I can get the right materials for the job.

In this image, I was able get the basic function of the feet in squared form for the
base. The cardboard works great to show what I want, but it's not strong enough to
support the weight of the whole costume completed. It's too flimsy to hold up to
wear and tear. The joints are plastic rivets.

I even got as far as building the shin base, though this is when I found the cardboard's
weakness. On the base, I'm adding foam matting.

A friend gave me about 50 foam mat pieces for me to create from. By using my
scroll saw and belt sander, I made the cuts needed.

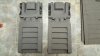
All the shin padding parts laid out

An after and before picture of gluing them to the bulk padding which is about 8 layers thick.

I've created the hands a few months ago. They're made from cardboard and
craft foam, all glued on top of a glove. I purposely designed the hands with the
squared tips just like in the cartoon and comics.

It took many hours (which I didn't count unfortunately), but I do know to make
a new pair takes about 2 weeks. I am in the process of making a more simplified version
with the weathered look on a printable pattern. Something people can buy, but after the
whole costume is completely finished.
That's the progress I have as of now. I've tried melting plastic bottles and some other plastics to only have them melt funny or curl up and shrink. All to try and find a strong replacement for the cardboard base. I really need help with finding or making another material to be light, strong, and semi flexible enough to hold up to the full weight of the costume. I plan to put so much detail into this project that every joint and moving will be covered somehow, but without using a fabric to do so. Any advice or assistance is greatly appreciated.
I don't have a whole bunch of money to get the best materials or programs to help create this beast of a build, so I'm using my head, pen & paper, and lots of guess work. I'd like to use the cheapest materials possible and Hope to have it built by nycc 2016. But that depends on if I can get the right materials for the job.
In this image, I was able get the basic function of the feet in squared form for the
base. The cardboard works great to show what I want, but it's not strong enough to
support the weight of the whole costume completed. It's too flimsy to hold up to
wear and tear. The joints are plastic rivets.
I even got as far as building the shin base, though this is when I found the cardboard's
weakness. On the base, I'm adding foam matting.
A friend gave me about 50 foam mat pieces for me to create from. By using my
scroll saw and belt sander, I made the cuts needed.
All the shin padding parts laid out
An after and before picture of gluing them to the bulk padding which is about 8 layers thick.
I've created the hands a few months ago. They're made from cardboard and
craft foam, all glued on top of a glove. I purposely designed the hands with the
squared tips just like in the cartoon and comics.
It took many hours (which I didn't count unfortunately), but I do know to make
a new pair takes about 2 weeks. I am in the process of making a more simplified version
with the weathered look on a printable pattern. Something people can buy, but after the
whole costume is completely finished.
That's the progress I have as of now. I've tried melting plastic bottles and some other plastics to only have them melt funny or curl up and shrink. All to try and find a strong replacement for the cardboard base. I really need help with finding or making another material to be light, strong, and semi flexible enough to hold up to the full weight of the costume. I plan to put so much detail into this project that every joint and moving will be covered somehow, but without using a fabric to do so. Any advice or assistance is greatly appreciated.
![20160702_220621[2].jpg](https://therpf-f28a.kxcdn.com/forums/data/attachments/340/340668-02da2af04b39518d4c94faf747468210.jpg "20160702_220621[2].jpg")
![20160702_220641[1].jpg](https://therpf-f28a.kxcdn.com/forums/data/attachments/340/340669-b3f119c2432e59a75f287d550d25b444.jpg "20160702_220641[1].jpg")
![20160702_220656[1].jpg](https://therpf-f28a.kxcdn.com/forums/data/attachments/340/340670-4c4729df1789410766c0f1e9683918b1.jpg "20160702_220656[1].jpg")
![20160703_223241[1].jpg](https://therpf-f28a.kxcdn.com/forums/data/attachments/340/340671-4d3c7b299ff4faaea74aa5d61145a311.jpg "20160703_223241[1].jpg")
![20160709_210944[2].jpg](https://therpf-f28a.kxcdn.com/forums/data/attachments/340/340672-b38dec204e6e243efd88aa9819919942.jpg "20160709_210944[2].jpg")
![20160717_180734[1].jpg](https://therpf-f28a.kxcdn.com/forums/data/attachments/340/340667-4c18e8608353a13c810384f7bfd23f8a.jpg "20160717_180734[1].jpg")
![20160725_165705[1].jpg](https://therpf-f28a.kxcdn.com/forums/data/attachments/343/343848-cd653e92d2b0172f5de1ba72194f48ad.jpg "20160725_165705[1].jpg")
![20160729_214416[1].jpg](https://therpf-f28a.kxcdn.com/forums/data/attachments/343/343849-c7880d241bc5b53ca340da3ef95a4de8.jpg "20160729_214416[1].jpg")
") Will definitely keep tabs on your ultra awesome project.
Will definitely keep tabs on your ultra awesome project.![20160904_203057[1].jpg](https://therpf-f28a.kxcdn.com/forums/data/attachments/352/352201-8b7a51e52d81447b845ce9be3cd775b9.jpg "20160904_203057[1].jpg")
![20160904_203027[1].jpg](https://therpf-f28a.kxcdn.com/forums/data/attachments/352/352202-2fc89987dc2d7751f12ecb4adf6356a9.jpg "20160904_203027[1].jpg")
![20160904_202912[1].jpg](https://therpf-f28a.kxcdn.com/forums/data/attachments/352/352204-36f3e8fd24fbd8c9ee10d83797dcf572.jpg "20160904_202912[1].jpg")
![20160904_202825[1].jpg](https://therpf-f28a.kxcdn.com/forums/data/attachments/352/352206-70473c288bd2030f32f5733305da8a54.jpg "20160904_202825[1].jpg")
![20160904_202811[1].jpg](https://therpf-f28a.kxcdn.com/forums/data/attachments/352/352207-aa3e37cb60d21aa06f17807c8c47b7a3.jpg "20160904_202811[1].jpg")
![20160904_202801[1].jpg](https://therpf-f28a.kxcdn.com/forums/data/attachments/352/352208-791fc62c8f8fde05382f0df4c6a1fd72.jpg "20160904_202801[1].jpg")
![20160904_202744[1].jpg](https://therpf-f28a.kxcdn.com/forums/data/attachments/352/352218-69d7a41a5160f1a353287758090350eb.jpg "20160904_202744[1].jpg")
![20160904_202655[1].jpg](https://therpf-f28a.kxcdn.com/forums/data/attachments/352/352219-4cd4a255932b2cbbb2608adcbe136cfe.jpg "20160904_202655[1].jpg")
![20160904_202644[1].jpg](https://therpf-f28a.kxcdn.com/forums/data/attachments/352/352221-3743f39826e8520efe9bddcbe38df039.jpg "20160904_202644[1].jpg")
![20160922_234515[1].jpg](https://therpf-f28a.kxcdn.com/forums/data/attachments/359/359103-5802b421f9aea296da32c19540e9236b.jpg "20160922_234515[1].jpg")
![20160922_234543[1].jpg](https://therpf-f28a.kxcdn.com/forums/data/attachments/359/359104-49c742f19d6523ef7f4302d03457d6b5.jpg "20160922_234543[1].jpg")
![20160922_234558[1].jpg](https://therpf-f28a.kxcdn.com/forums/data/attachments/359/359105-3d7e0eeadc2648c795c6ed760b46f483.jpg "20160922_234558[1].jpg")
![20160922_234605[1].jpg](https://therpf-f28a.kxcdn.com/forums/data/attachments/359/359106-54a415e6ea7103c43735626592274bd9.jpg "20160922_234605[1].jpg")
![20160925_230239[1].jpg](https://therpf-f28a.kxcdn.com/forums/data/attachments/359/359107-ea4bd96cb4d6c32c86002be877a4a99e.jpg "20160925_230239[1].jpg")
![20160925_230257[1].jpg](https://therpf-f28a.kxcdn.com/forums/data/attachments/359/359108-169a72d9f2e3068f48f59bf9893efebe.jpg "20160925_230257[1].jpg")
![20160927_193723[1].jpg](https://therpf-f28a.kxcdn.com/forums/data/attachments/359/359111-3e500ae96d9e1b4acf2cb0d33e94ba1d.jpg "20160927_193723[1].jpg")
![20160927_195517[1].jpg](https://therpf-f28a.kxcdn.com/forums/data/attachments/359/359112-9b6b19057f21d886656715754614ace9.jpg "20160927_195517[1].jpg")
![20160927_195530[1].jpg](https://therpf-f28a.kxcdn.com/forums/data/attachments/359/359113-b71462993097b8bb160ad587f5a1bf4d.jpg "20160927_195530[1].jpg")
![20160927_200548[1].jpg](https://therpf-f28a.kxcdn.com/forums/data/attachments/359/359114-c78bdfb33af08ce7d87abd12d383e1e0.jpg "20160927_200548[1].jpg")
![20160927_200601[1].jpg](https://therpf-f28a.kxcdn.com/forums/data/attachments/359/359115-e40cb2ccb156478ec9167a015854070c.jpg "20160927_200601[1].jpg")
![20160927_200609[1].jpg](https://therpf-f28a.kxcdn.com/forums/data/attachments/359/359116-ba2326e28785f2bbd6a5f71c5a05886d.jpg "20160927_200609[1].jpg")
![20160927_200638[1].jpg](https://therpf-f28a.kxcdn.com/forums/data/attachments/359/359117-6ecf526943312e62f6671fb712ee62ef.jpg "20160927_200638[1].jpg")
![20160927_205412[1].jpg](https://therpf-f28a.kxcdn.com/forums/data/attachments/359/359118-30d5c631b71e94b1e143f6ffeb683ca8.jpg "20160927_205412[1].jpg")
![20161003_134934[1].jpg](https://therpf-f28a.kxcdn.com/forums/data/attachments/359/359119-f3467291b0a99a719c0f897ec6b7fcd5.jpg "20161003_134934[1].jpg")
![20161003_203230[1].jpg](https://therpf-f28a.kxcdn.com/forums/data/attachments/359/359120-7e341db24630e386484517f866d66d6c.jpg "20161003_203230[1].jpg")
![20161004_102950[1].jpg](https://therpf-f28a.kxcdn.com/forums/data/attachments/359/359121-e2143c174fa9c44d684aaaa8bede6ebe.jpg "20161004_102950[1].jpg")
![20161004_150634[1].jpg](https://therpf-f28a.kxcdn.com/forums/data/attachments/359/359122-345b69bf6673f88319c4e73733d7c44a.jpg "20161004_150634[1].jpg")
![20161004_182625[1].jpg](https://therpf-f28a.kxcdn.com/forums/data/attachments/359/359123-fb35c3305ca3068cc954034deca0a37f.jpg "20161004_182625[1].jpg")
![20161005_002100[1].jpg](https://therpf-f28a.kxcdn.com/forums/data/attachments/359/359124-e9e5d9bc47e4f4cbcbcd81eb26818fb3.jpg "20161005_002100[1].jpg")