Dr. Henry Killinger

B Wo

Well-Known Member
RPF PREMIUM MEMBER
I will be attending The Chicago Comic and Entertainment Expo the weekend of March 18th, 19th, and 20th. About a week ago, I decided that I wanted to go as Dr. Henry Killinger, of Venture Bros. fame. Here he is (w/ Hank Venture for reference).

Dr. Henry Killinger.jpg Killinger Reference 2.jpg

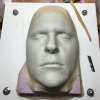
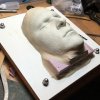
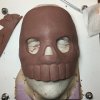
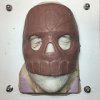
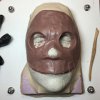
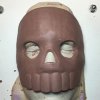
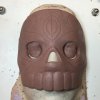
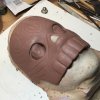
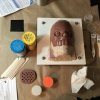
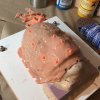
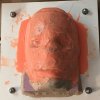
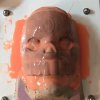
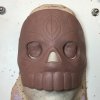
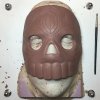
I've never sculpted, molded, and cast a mask. I've never sewn, besides a middle school Home Economics windsock. Thankfully, the internet is a wealth of knowledge, including this fantastic forum, so I'm going to see if I can knock it out in time for C2E2.
 
Last edited:
Two Halloweens ago, my now-fiance and I did life casts of our faces so we could make some fun silicone appliances. Since I'm sculpting a mask for my face, how fitting that I should my mug to sculpt it on?! I built it up a bit on a base of some foam insulation sheeting and oil-based clay.

Killinger WIP - 2.1.jpg Killinger WIP - 1.1.jpg

From that same Halloween that yielded me this life cast, I had a 5lb container of Monster Clay. I dove right in blocking out forms, and then refining them into some semblance of Killinger's mask.

Killinger WIP - 3.1.jpg Killinger WIP - 4.1.jpg Killinger WIP - 5.1.jpg Killinger WIP - 6.1.jpg
 

Attachments

  • Killinger WIP - 1.jpg
    Killinger WIP - 1.jpg
    17.8 KB · Views: 91
  • Killinger WIP - 2.jpg
    Killinger WIP - 2.jpg
    21 KB · Views: 169
  • Killinger WIP - 5.jpg
    Killinger WIP - 5.jpg
    17.2 KB · Views: 107
  • Killinger WIP - 4.jpg
    Killinger WIP - 4.jpg
    16.6 KB · Views: 209
  • Killinger WIP - 3.jpg
    Killinger WIP - 3.jpg
    17.9 KB · Views: 163
  • Killinger WIP - 6.jpg
    Killinger WIP - 6.jpg
    14.6 KB · Views: 103
  • Killinger WIP - 7.jpg
    Killinger WIP - 7.jpg
    15.6 KB · Views: 162
  • Killinger WIP - 8.jpg
    Killinger WIP - 8.jpg
    21 KB · Views: 102
  • Killinger WIP - 9.jpg
    Killinger WIP - 9.jpg
    22.7 KB · Views: 85
  • image.jpeg
    image.jpeg
    761.8 KB · Views: 130
  • image.jpeg
    image.jpeg
    650.4 KB · Views: 65
  • image.jpeg
    image.jpeg
    472.3 KB · Views: 119
  • image.jpeg
    image.jpeg
    331.9 KB · Views: 138
  • Killinger WIP - 8.1.jpg
    Killinger WIP - 8.1.jpg
    142.2 KB · Views: 74
  • Killinger WIP - 7.1.jpg
    Killinger WIP - 7.1.jpg
    103.1 KB · Views: 66
  • Killinger WIP - 6.5.jpg
    Killinger WIP - 6.5.jpg
    119.3 KB · Views: 79
Last edited:
I tried editing the post, above, to make it a little more comprehensive, and to add larger pictures, but I ended up w/ a jumbled mess. I've reported the post, to see if an admin would delete the copious amount of attachments, but so far I haven't heard anything.

Suffice it to say, I think you get the idea of the general sculpting/mold-making process, even if it is chronologically ambiguous at points and in small and medium-sized pictures.
 
With my brush-on mold cleaned up, I applied a mother mold of some plaster bandages I had lying around. I wanted this fast and dirty. With the plaster cured, and the mask de-molded, I was in pretty good shape.

Killinger WIP - 14.1.jpg Killinger WIP - 15.jpg

I took about 4oz of Smooth-On Onyx Fast and slushed it around and got my first pull. I am very pleased w/ how the mask fits. I wanted the teeth to hit right about mid-lower lip, and it's about dead-on. Also, the 4oz got me just about the exact thickness I wanted.

Killinger WIP - 16.jpg Killinger WIP - 17.jpg

Content with how the mask shaped up, so far, I tinted some Smooth-Cast 65D and slush cast 3 coats into the mold. This will be the basis that I refined to make my final mold.

Killinger WIP - 18.jpg
 
Changing gears a little, I purchased this pattern from Burda, for the black lab coat-looking get up.

25647564095_c3947f3539_z.jpg

It's pretty near-net, so I'm just going to shorten the bottom, shorten the sleeves, and do a little tweaking here and there. When you buy a pattern off Burda's website, you can elect to have it professionally printed, OR you can download it and print it on A4 sheets and assemble it yourself. I am trying to be more frugal in my various projects. Also, I'm impatient. So, I printed it. Here is what less than half looks like, assembled:

Killinger WIP - 20.jpg

After a lot of tape and a lot of hunching over applying said tape, i was ready to cut out my pattern. I started with the lining, since the material was inexpensive, and I could fudge it, if something went horribly wrong.

Killinger WIP - 21.jpg

Here are the sleeves (I learned that if you fold material over, you can cut out two pieces at a time), with a tomato pin cushion that I think has been in my family longer than I have.

Killinger WIP - 23.jpg

The material I'm using for the jacket is a medium weight pleather. It has a little stretch, which is nice, but will overall hold its shape well.

Killinger WIP - 24.jpg
 
Last edited:
Some miscellanea:

The embroidery place called me on lunch, so I was able to pick up the patch that will go on the left side of chest on the jacket.

Killinger WIP - 22.jpg FullSizeRender.jpg

Killinger appears to have grey, slicked back hair, with white streaks at the temples.

Killinger Face.JPG

I was able to find this "Guido" wig online, that looked like it might fit the bill:

Capture.JPG

Except, so far, when I put it on it looks like this:

Killinger WIP - 19.jpg

I think I can work with it. I've been bald for so long, I forget where my hairline starts. Hopefully, with a little adjusting, and some styling, this will be salvageable.
 
Tonight, I'm hoping to sand the mask to about 75% done.

Saturday, I'm starting bright and early with sewing the jacket together. If I use a sewing machine as well as I use fabric scissors, pins, and paper patterns, then the earlier the better. I also hope to get the Magic Murder Bag at least started on Saturday, if not finished. I got some patterns online, and the construction seems pretty straightforward.

Sunday, I will finish up the mask, and get it molded. While I'm waiting for the mold to cure, I can work on the slippers, the umbrella, and molding the insignia on the bag.

I got the burgundy zentai suit I'll be wearing underneath the jacket in. I've never worn one of those before, but after taking it for a test run, I may invest in a few more and just wear them around the house. It is very comfortable, and very hilarious.
 
Last edited:
Sewing is hard.

My fingers are scabbed and inflamed little meat pincushions. Although, after a long weekend of taking care of business and working overtime, the jacket is sewn and hemmed, and all I have to do is add the buttons and Killinger patch on the chest

I did finish the slippers. I found a pair of women's XL Dearfoam brand house slippers in 'pewter'. I just grabbed a $.99 felt sheet from Hobby Lobby, cut out the shapes I needed, and hand stitched them on.

Killinger WIP - 27.jpg Killinger WIP - 28.jpg Killinger WIP - 29.jpg Killinger WIP - 30.jpg Killinger WIP - 31.jpg Killinger WIP - 32.jpg
 
I wanted to post more progress pictures, but I found myself in a mad dash in the days leading up to C2E2. My lack of experience with sewing, in particular, resulted in gross underestimations of the time involved in this undertaking.

I filled in some low spots with Bondo spot and glazing putty on my junk cast. Once I sanded that, I hit it with some sandable primer. I went back and forth with primer and sanding until I got it smooth enough with respect for the amount of time I had left to work on it.

Killinger WIP - 25.jpg Killinger WIP - 26.jpg Killinger WIP - 34.jpg

I molded it with Rebound 25 and used Plasti-Paste II for a mold jacket, this time. I cast it in Smooth Cast Onyx Fast and got a very nice pull, after 3 or 4 attempts.

Killinger WIP - 37.jpg Killinger WIP - 38.jpg

Pro tip, if you're slush casting, maybe don't use Onyx Slow. Think "Onyx Slooooooooooooooooooooooooooow." That cast was a disaster.

I sprayed it with a base coat of Krylon Cover Max Satin, painted the recessed markings with Vallejo Game Color Scarlet Red, and then gave it a final coat of satin Krylon clear coat, all the while taking almost no progress pictures.

Killinger WIP - 39.jpg

I sprayed some superglue accelerator on the back of the eyes, and stretched some sheer yellow fabric over the eye holes. I used Loctite superglue to tack it in place, and then went around the whole lip, securing the eyes in place. I hot-glued some 5mm foam in the forehead, and 3mm foam in the cheeks and nose. I 5-minute epoxied some washers in the side, where the cord would go, to reinforce the holes.

Killinger WIP - 40.jpg

And then, the mask was done:

Killinger WIP - 41.jpg
 
Here's the completed jacket:

Killinger Wip - 42.jpg

As I mentioned, the sewing process was spent flying by the seat of my pants, so I took virtually no progress pics, much to my chagrin. There were many times when I couldn't even tell progress was being made. I recruited my mom to help me, and the poor woman didn't know what she was in for. She is a saint.

The Magic Murder Bag ended up being a Magic Murder Purse I bought of Amazon. I did try sewing a bag. I cut the pattern in muslin, first, and when I was done, the crisscrossing of seams made it look like an optical illusion, and the saddest pillow case you've even seen. I will make one, eventually, but when I have more time and hopefully more experience under my belt.

Killinger WIP - 35.jpg

I took some micromesh and rubbed off the gold plating on the hardware. I cut a small Killinger logo out of 3mm Sintra and cold cast it in aluminum and epoxied it to the front of the bag.
 
Here's the finished product:

Killinger Fin.jpg

And here with Henchman 21. Not only was this guy's costume stellar, but when he saw me he yelled, "Sic semper tyrannosaurus." He was on point.

25936496446_31b50f1248_z.jpg
 
This thread is more than 8 years old.

Your message may be considered spam for the following reasons:

  1. This thread hasn't been active in some time. A new post in this thread might not contribute constructively to this discussion after so long.
If you wish to reply despite these issues, check the box below before replying.
Be aware that malicious compliance may result in more severe penalties.
Back
Top