TheMadGasser
Well-Known Member
I became hooked on Red Dwarf back when it first ran on the Dallas PBS station in the late 80’s. I watched all of the episodes over and over, and then when the books came out, I snagged them and read them until the pages fell out. I never really bought anything other than the books, because (as many of you Smegheads know) they didn’t produce much in the line of merchandise for fans (especially the ones here in the states). So I turned my focus on other sci-fi shows, but forgot the misadventures of last slacker in the universe.
Throughout college I wore a used leather motorcycle jacket I picked up at the pawn show for a few bucks while I was looking for a camera for class. I thought many times how cool it would be to collect all of the patches and pins Lister had and make my own version to wear. But tracking down all of them would be difficult (since the internet wasn’t really popular at the time). It wasn’t until more recently (when I became interested in prop replicas) I decided it was time for me to start my Dave Lister leather jacket project.
This time it would be easier for me to build as I had not only the internet, but all of the episodes on disk so I could freeze frame and examine. So, with my wife (who I introduced Red Dwarf to 10 years ago) on the other side of the couch with note book in hand, we began our journey. We took notes through the first two series (remember British series usually consist of a lower number of shows than the US) when Dave really didn’t wear a leather jacket. But those episodes have helped in creating another set of costumes from the episode Parallel Universe (more on that in a different thread). When season 3 hit the screen my note book started to fill up with notes and placement sketches. That’s when it noticed that Lister’s jacket evolves through the episodes. It seemed like he was changing and rearranging his jacket because he was bored (more like the wardrobe was). But I continued taking notes so I could take my information and scour the internet for clues, images, and places to help out.
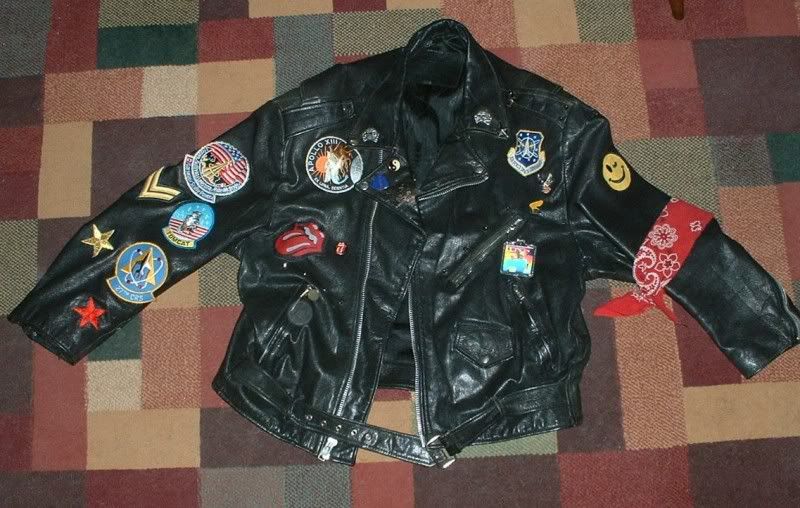
When I was ready to start, I decided that since his jacket seemed to be ever changing, it would give me free range in putting together a believable jacket. But, with me, I wanted something that was as close to what I saw on the small screen, so I needed to pick a certain episode to focus on. I noticed that throughout the series (the ones when he wore his motorcycle jacket), his patches seemed to look as if they were loose (and of course changed locations). I verified this by looking at numerous still shots and promotions pictures I found online. I came to the conclusion that the wardrobe dept ironed on the patches and as they fell off due to wear and the way that the leather sleeves fold when being used. When they started to loose their adhesive, they were moved elsewhere (or removed completely and replaced with a totally new patch). Considering all of the options I had, I decided that I would focus on the episode Sdrawkcab (Backwards) as a base for my project. This was the first episode we see Lister’s “new” jacket and something that had all of the elements that made his jacket.
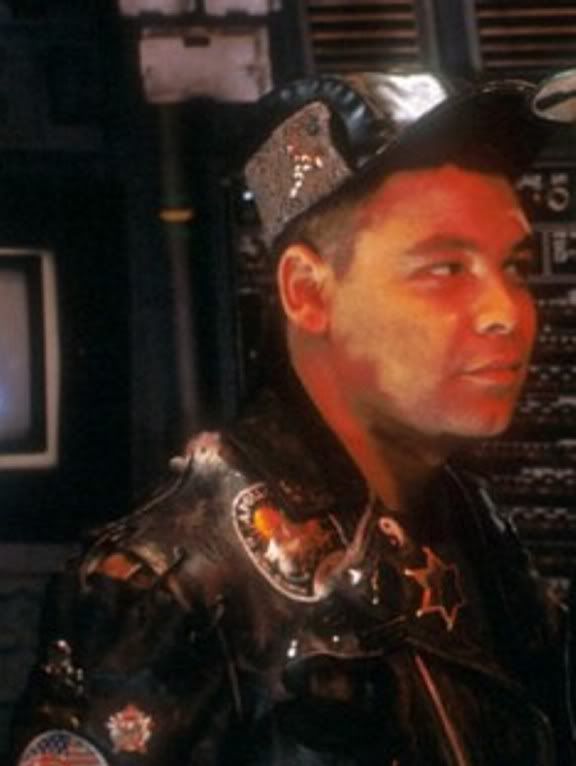
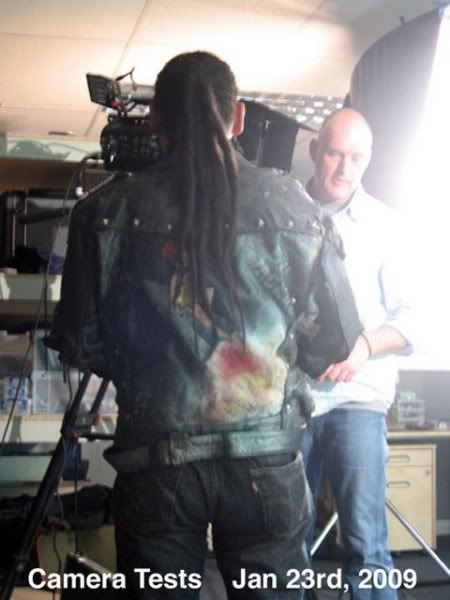
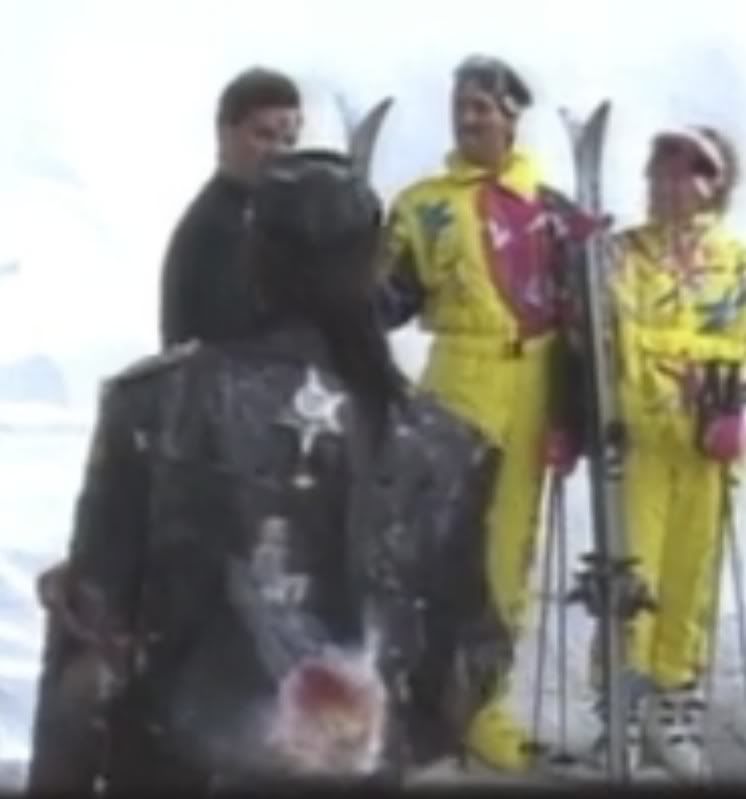
I came across a few posts here on the RPF (by a Red Dwarf search) and a few over at a couple of Red Dwarf fan sites that helped me out immensely with verifying my speculations. Before I got over whelmed, I decided to start with the easy stuff first then work my way to the harder parts. I picked up the patches cheaper than I had expected and started to sew them on as I got them in the mail. Every night I double checked the placement and I would sit on the couch and sew my patches on while watching a movie. While I was waiting on patches, I started to tackle the pins that were used. I cross referenced photos again to see if I could find the exact (or very close) pin that was used. At the time of writing this, I’m still about 2-3 pins short. I found a pretty decent image of the Wilma Flintstone pin-up on the rocket from a camera test from the Back to Earth episodes that came out a few years ago. But I could not tell what is written on Dave’s right shoulder. I did read somewhere that there was a phrase “Ground control to Major Lister” on the jacket, but I could not find any photo proof or any screen time of the back of his jacket that sported the phrase in a legible manner. The episode Timeslides has a few good moments when Lister is walking into the photos where we clearly see his back. The only thing close to that are the words “Major Lister” on the leather vest Dave wears in the later seasons. The funny thing is that the type style looked very similar to the jacket… but the text doesn’t look anything like the phrase I had read. The text on the jacket looks more like someone’s name (Bill Wacker?). For now, unless I find out what it actually says, I will probably omit that part and focus on Wilma on the rocket.
Now let me pause for a moment and mention the jacket itself. The jacket I am using a standard classic style we have all seen around the US. The jacket that was used in Lister’s wardrobe is most likely a British motorcycle jacket (I actually have read what brand it was, but I don’t recall the name off the top of my head, I do remember it being hard to find on eBay). If you look good, his jacket has many features that aren’t found on a standard leather motorcycle jacket. One is the lack of a coin pocket, his jacket doesn’t have one, and the other is that the sides of his jacket lace up. True, you can find leather jackets here in the states that lace up the side, but for the purpose of my own collection, I was going to make do with what I had on hand.
Here’s my check list of all of the items you will need to create your own Dave Lister jacket. I will say that that on a few of the pins I’m not 100% on and will place a question mark next to it. I have already purchased all of these parts and find them acceptable for my project.
Jacket Checklist:
1. PREFECT BADGE- Blue
2. Skull Bones Motorcycle Pin
3. Gold Star Patch (2.5”)
4. Red Star Patch (2.5”)
5. STS-41G Challenger Mission Patch
6. Rolling Stones Patch (4”x5”)
7. Rolling Stones Pin (Black Background- 1”-2”)
8. YinYang Pin (1”)
9. 27TH CRS PATCH (3 5/8" x 4 1/8")
10. US Air Force Space Command Patch (3”x3”)
11. APOLLO XIII Patch (4”)
12. Prismatic Hologram Key Chain (Square)
13. CORPORAL PATCHES
14. Grumman F-14 Tomcat Patch (3" - 4")
15. Smiley (winking) face patch
16 .Honda gold wing pin?
17. Harley Eagle Pin?
18. Skull & Crossbones Pin
19. Russian military star burst Pin
20. “MACK” (text) name pin
21. Sheriff Badge
22. 5 Point Star Studs
23. Round, Flat Studs
24. Round, Pointed Studs
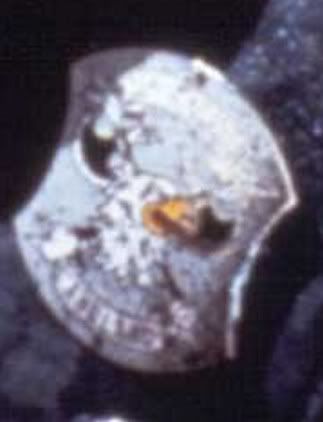
I would like to pause for a sec to touch on some of the pins. As mentioned in a previous thread, the “Prefect badge” (#1) can be found online for sale (I got mine on ebay). This pin will most likely come from the UK as I found no one here in the states who sell it. If you find someone, please post. The Honda Goldwing pin (#16) was a toss-up between it and a Kawasaki eagle pin. I could not find a good screen shot of the pin, but used deducted reasoning (and the price) to choose which pin I wanted to place on my jacket. I did the same for the Harley eagle pin (#17) as I found that the pin (with an eagle with its wings raised above its head) was used on dozens of designs ranging from Harley Davidson to Vespa. I couldn’t tell what the shield that the eagle sat on was, so I just grabbed a Harley pin (hey, this is an American version of the jacket). The “MACK” pin (#20) is more than likely going to be another “from the UK” pin. It is for the Mack truck company, so there could be a chance that someone in America carries it. This pin is usually seen on the right breast, sometimes snagged on the lapel corner. The Russian star pins (# 19) is a speculation as it “looks” like a Red star on top of a star burst, but the pics I have seen are very faint. The last thing on the list I want to mention is the holographic key chain. There had been speculation to what the subject was and I have found that it is indeed a comet/shooting star AND the planet Saturn. In the first few episodes the key chain was a shooting star (or comet) on both sides, but sometime during production it was changed to the planet Saturn. I think the reason why is that the key chain must have gotten broken or lost during a shoot and was replaced (since no one would actually see it on the TV screen). Since I couldn’t find either, I chose to get one that had the crew of Star Trek (TOS). I found it fitting since it was Sci-Fi as well. I will probably replace it when I find the proper one.
Below I created a rough diagram for the placement of the pins (or if the image is too big it will be thumb nailed at the bottom of this post).
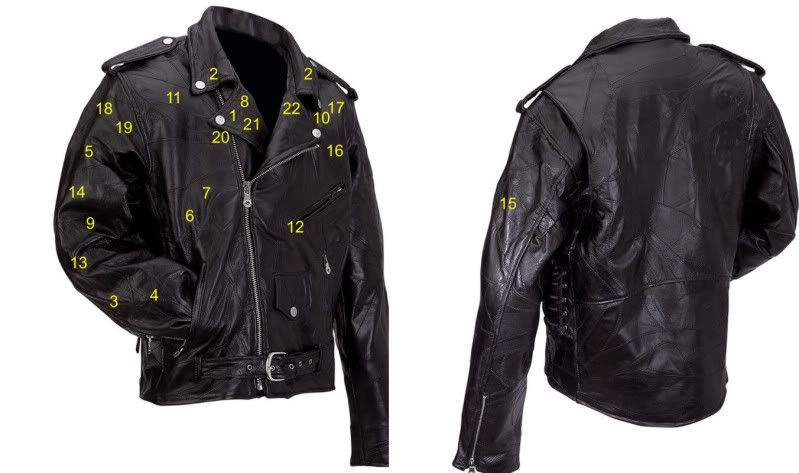
As you can see, I attempted to point out the placements, but if you want proper placement spots, you may want to consult my final images or episodes from season three. If anyone wants my reference images, I would be happy to help out a fellow smeghead and forward them on. Just PM me.
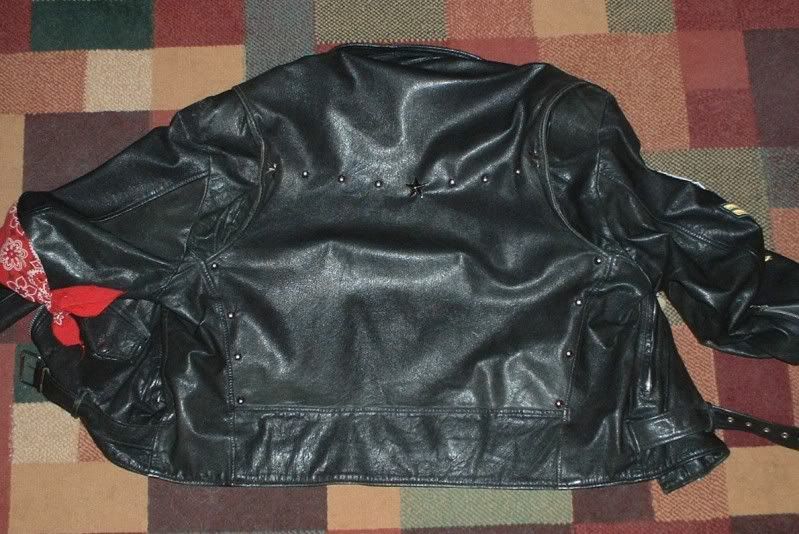
The next image you’ll see is the placement for the studs that adorn the jacket and a few other modifications to the jacket. The stud placement is about as close as I could get. I hope my key isn’t too confusing, I tried to make it pretty straight forward. There are a few things you will to do to your jacket that you must be prepared to do and that’s a little destruction. Lister’s jacket has the sleeve on the left side cut and re-stitched with a whip-stitch. If you are going to cut your sleeve off and re stitch it, make sure you don’t cut through your sleeve lining as it doesn’t appear to be cut. I would also look into getting black eyelets (or grommets) to place around the cut areas if you are going to cut and sew back. This will help from keeping the leather from tearing from wear. On his right sleeve, it’s cut off at the shoulder stitching and re-sewn with a whip stitch. The effect looked great back in the 90’s when it the series was in production, but has not weathered with time (see Back to Earth). I have opted to not cut my sleeves (even though I will more likely be displaying this more than wearing it) and will just whip stitch the shoulder and omit the one around the elbow on the left side.

This last image is the three groups of items you’ll need to collect. I have grouped the pins, patches, and studs in the order I have bought them and labeled them on the previous images. I bought the majority of my items on eBay. Some came from the UK and Hong Kong, but the majority was found here in the US. The Winking smiley face shows up on eBay from time to time, but I snagged mine from a nice lady who runs a site called Purple Moon. The final touches will be adding a bandanna around the left arm close to where the sleeve is cut and sown together and adding the chain around the left shoulder strap.

All in all, I think with shipping on everything, and bidding on the lowest ones I could find, I probably spent about $110. Not shabby. I was also able to score a couple of hats like Lister’s, but will save that for another thread. I thank you guys for reading this and will be posting pics of my project soon. I will be painting the back last as I am waiting on the studs and looking for cleaner pics of the lettering. The last thing I want to mention before I hit the post button is that there is a mysterious piece on his back that’s right under his neckline in the center. It looks like a giant six sided star. Lister’s dreads cover this star up often and I think was later removed, probably due to its size and the appearance that it wasn’t fastened on well. The only thing I can speculate what it could be is half of a Christmas ornament or tree topper. I will most likely omit it from my final design and will keep an eye open for a suitable piece and add it later.
Throughout college I wore a used leather motorcycle jacket I picked up at the pawn show for a few bucks while I was looking for a camera for class. I thought many times how cool it would be to collect all of the patches and pins Lister had and make my own version to wear. But tracking down all of them would be difficult (since the internet wasn’t really popular at the time). It wasn’t until more recently (when I became interested in prop replicas) I decided it was time for me to start my Dave Lister leather jacket project.
This time it would be easier for me to build as I had not only the internet, but all of the episodes on disk so I could freeze frame and examine. So, with my wife (who I introduced Red Dwarf to 10 years ago) on the other side of the couch with note book in hand, we began our journey. We took notes through the first two series (remember British series usually consist of a lower number of shows than the US) when Dave really didn’t wear a leather jacket. But those episodes have helped in creating another set of costumes from the episode Parallel Universe (more on that in a different thread). When season 3 hit the screen my note book started to fill up with notes and placement sketches. That’s when it noticed that Lister’s jacket evolves through the episodes. It seemed like he was changing and rearranging his jacket because he was bored (more like the wardrobe was). But I continued taking notes so I could take my information and scour the internet for clues, images, and places to help out.
When I was ready to start, I decided that since his jacket seemed to be ever changing, it would give me free range in putting together a believable jacket. But, with me, I wanted something that was as close to what I saw on the small screen, so I needed to pick a certain episode to focus on. I noticed that throughout the series (the ones when he wore his motorcycle jacket), his patches seemed to look as if they were loose (and of course changed locations). I verified this by looking at numerous still shots and promotions pictures I found online. I came to the conclusion that the wardrobe dept ironed on the patches and as they fell off due to wear and the way that the leather sleeves fold when being used. When they started to loose their adhesive, they were moved elsewhere (or removed completely and replaced with a totally new patch). Considering all of the options I had, I decided that I would focus on the episode Sdrawkcab (Backwards) as a base for my project. This was the first episode we see Lister’s “new” jacket and something that had all of the elements that made his jacket.
I came across a few posts here on the RPF (by a Red Dwarf search) and a few over at a couple of Red Dwarf fan sites that helped me out immensely with verifying my speculations. Before I got over whelmed, I decided to start with the easy stuff first then work my way to the harder parts. I picked up the patches cheaper than I had expected and started to sew them on as I got them in the mail. Every night I double checked the placement and I would sit on the couch and sew my patches on while watching a movie. While I was waiting on patches, I started to tackle the pins that were used. I cross referenced photos again to see if I could find the exact (or very close) pin that was used. At the time of writing this, I’m still about 2-3 pins short. I found a pretty decent image of the Wilma Flintstone pin-up on the rocket from a camera test from the Back to Earth episodes that came out a few years ago. But I could not tell what is written on Dave’s right shoulder. I did read somewhere that there was a phrase “Ground control to Major Lister” on the jacket, but I could not find any photo proof or any screen time of the back of his jacket that sported the phrase in a legible manner. The episode Timeslides has a few good moments when Lister is walking into the photos where we clearly see his back. The only thing close to that are the words “Major Lister” on the leather vest Dave wears in the later seasons. The funny thing is that the type style looked very similar to the jacket… but the text doesn’t look anything like the phrase I had read. The text on the jacket looks more like someone’s name (Bill Wacker?). For now, unless I find out what it actually says, I will probably omit that part and focus on Wilma on the rocket.
Now let me pause for a moment and mention the jacket itself. The jacket I am using a standard classic style we have all seen around the US. The jacket that was used in Lister’s wardrobe is most likely a British motorcycle jacket (I actually have read what brand it was, but I don’t recall the name off the top of my head, I do remember it being hard to find on eBay). If you look good, his jacket has many features that aren’t found on a standard leather motorcycle jacket. One is the lack of a coin pocket, his jacket doesn’t have one, and the other is that the sides of his jacket lace up. True, you can find leather jackets here in the states that lace up the side, but for the purpose of my own collection, I was going to make do with what I had on hand.
Here’s my check list of all of the items you will need to create your own Dave Lister jacket. I will say that that on a few of the pins I’m not 100% on and will place a question mark next to it. I have already purchased all of these parts and find them acceptable for my project.
Jacket Checklist:
1. PREFECT BADGE- Blue
2. Skull Bones Motorcycle Pin
3. Gold Star Patch (2.5”)
4. Red Star Patch (2.5”)
5. STS-41G Challenger Mission Patch
6. Rolling Stones Patch (4”x5”)
7. Rolling Stones Pin (Black Background- 1”-2”)
8. YinYang Pin (1”)
9. 27TH CRS PATCH (3 5/8" x 4 1/8")
10. US Air Force Space Command Patch (3”x3”)
11. APOLLO XIII Patch (4”)
12. Prismatic Hologram Key Chain (Square)
13. CORPORAL PATCHES
14. Grumman F-14 Tomcat Patch (3" - 4")
15. Smiley (winking) face patch
16 .Honda gold wing pin?
17. Harley Eagle Pin?
18. Skull & Crossbones Pin
19. Russian military star burst Pin
20. “MACK” (text) name pin
21. Sheriff Badge
22. 5 Point Star Studs
23. Round, Flat Studs
24. Round, Pointed Studs
I would like to pause for a sec to touch on some of the pins. As mentioned in a previous thread, the “Prefect badge” (#1) can be found online for sale (I got mine on ebay). This pin will most likely come from the UK as I found no one here in the states who sell it. If you find someone, please post. The Honda Goldwing pin (#16) was a toss-up between it and a Kawasaki eagle pin. I could not find a good screen shot of the pin, but used deducted reasoning (and the price) to choose which pin I wanted to place on my jacket. I did the same for the Harley eagle pin (#17) as I found that the pin (with an eagle with its wings raised above its head) was used on dozens of designs ranging from Harley Davidson to Vespa. I couldn’t tell what the shield that the eagle sat on was, so I just grabbed a Harley pin (hey, this is an American version of the jacket). The “MACK” pin (#20) is more than likely going to be another “from the UK” pin. It is for the Mack truck company, so there could be a chance that someone in America carries it. This pin is usually seen on the right breast, sometimes snagged on the lapel corner. The Russian star pins (# 19) is a speculation as it “looks” like a Red star on top of a star burst, but the pics I have seen are very faint. The last thing on the list I want to mention is the holographic key chain. There had been speculation to what the subject was and I have found that it is indeed a comet/shooting star AND the planet Saturn. In the first few episodes the key chain was a shooting star (or comet) on both sides, but sometime during production it was changed to the planet Saturn. I think the reason why is that the key chain must have gotten broken or lost during a shoot and was replaced (since no one would actually see it on the TV screen). Since I couldn’t find either, I chose to get one that had the crew of Star Trek (TOS). I found it fitting since it was Sci-Fi as well. I will probably replace it when I find the proper one.
Below I created a rough diagram for the placement of the pins (or if the image is too big it will be thumb nailed at the bottom of this post).
As you can see, I attempted to point out the placements, but if you want proper placement spots, you may want to consult my final images or episodes from season three. If anyone wants my reference images, I would be happy to help out a fellow smeghead and forward them on. Just PM me.
The next image you’ll see is the placement for the studs that adorn the jacket and a few other modifications to the jacket. The stud placement is about as close as I could get. I hope my key isn’t too confusing, I tried to make it pretty straight forward. There are a few things you will to do to your jacket that you must be prepared to do and that’s a little destruction. Lister’s jacket has the sleeve on the left side cut and re-stitched with a whip-stitch. If you are going to cut your sleeve off and re stitch it, make sure you don’t cut through your sleeve lining as it doesn’t appear to be cut. I would also look into getting black eyelets (or grommets) to place around the cut areas if you are going to cut and sew back. This will help from keeping the leather from tearing from wear. On his right sleeve, it’s cut off at the shoulder stitching and re-sewn with a whip stitch. The effect looked great back in the 90’s when it the series was in production, but has not weathered with time (see Back to Earth). I have opted to not cut my sleeves (even though I will more likely be displaying this more than wearing it) and will just whip stitch the shoulder and omit the one around the elbow on the left side.
This last image is the three groups of items you’ll need to collect. I have grouped the pins, patches, and studs in the order I have bought them and labeled them on the previous images. I bought the majority of my items on eBay. Some came from the UK and Hong Kong, but the majority was found here in the US. The Winking smiley face shows up on eBay from time to time, but I snagged mine from a nice lady who runs a site called Purple Moon. The final touches will be adding a bandanna around the left arm close to where the sleeve is cut and sown together and adding the chain around the left shoulder strap.
All in all, I think with shipping on everything, and bidding on the lowest ones I could find, I probably spent about $110. Not shabby. I was also able to score a couple of hats like Lister’s, but will save that for another thread. I thank you guys for reading this and will be posting pics of my project soon. I will be painting the back last as I am waiting on the studs and looking for cleaner pics of the lettering. The last thing I want to mention before I hit the post button is that there is a mysterious piece on his back that’s right under his neckline in the center. It looks like a giant six sided star. Lister’s dreads cover this star up often and I think was later removed, probably due to its size and the appearance that it wasn’t fastened on well. The only thing I can speculate what it could be is half of a Christmas ornament or tree topper. I will most likely omit it from my final design and will keep an eye open for a suitable piece and add it later.
Last edited:
")