Tronified Costumes

PenDragyn21

New Member
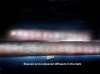
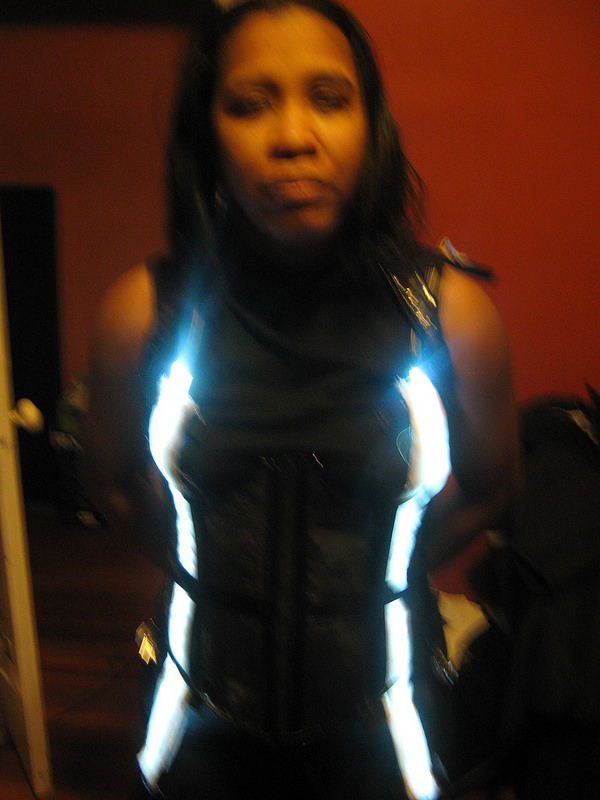
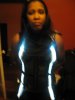
This is no specific character. I just wanted something Tron Legacy-like. More overall pictures in the mega thread. I started a new thread to detail how I made the lights and maybe an identity disc.

attachment.php

The inspiration for my diffuser came from a few sources:
[Question about diffusing light] ... Making a Tron costume. How can I diffuse the LED lights to look more smooth?
LED diffuser details? - Yahoo! Answers
Child's Quorra (Tron) Costume
LED Pants
I also got ideas from the builds of the following members: Aoifrost, Eddieadyr, ColonelMasako, Fireslayer26, and Annisse.

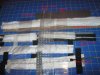
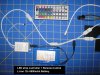
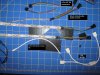
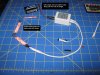
I chose to use LED strips. Why use LEDs strips instead of EL wire, sheets, tape, etc? Brightness. I have used EL wire on costumes before and they have some great advantages. They're cheap ($5 for 3M/9 feet plus inverter that uses 2xAA batteries) and they look awesome in the dark. However, while walking around outside or a decently lit convention center, the light just washed out and you could not see it unless you were standing right next to me.

I didn't have a specific costume in mind so I designed a system I could use to "Tronify" different base costumes.
This meant the LED strips plus the diffuser needed to be:

  • removable (to transfer it from outfit to outfit)
  • modular (the ability to change the layout of the strips).
  • the ability to swap out the LED strips for a different color or a fancier set
  • as breathable and thin as I could make them (for dancing)
Diffusers A and B in the pictures are just a sleeve made of anti-static lining and frosted vinyl then filled with different amounts of stuffing. Diffuser A barely diffused the light and B was too thick. So I came up with Diffuser C. The core of the diffuser is poly-fill sandwiched between 2 layers of blanket felt and optionally wrapped anti-static jacket lining. Even if you go with a different covering for the diffuser than I did, I recommend a piece of lining between the felt and LED strip. The felt, the vinyl, and the contact paper I experimented with all generated static. Static = Bad for electronics. You might be fine if you use the "waterproofed" LED strips.
 

Attachments

  • 28078627626_278d6776fd_c.jpg
    28078627626_278d6776fd_c.jpg
    139.4 KB · Views: 646
Last edited:
Re: Tron Legacy Themed WIP

Another picture of the diffuser in action as well as a thickness comparison. The last image shows some of the different combinations of backings and coverings I tried before I decided on the one in the first photos.

I sewed my diffuser to make it flatter and easier to experiment with but depending on what you're using as a backing or a covering you could skip it. For instance fold the fiber-fill into the felt, lay that on craft foam or cardboard and wrap it in packing tape or shower curtain.
The black strips are no-roll elastic attached using my emergency sewing method: the stapler. I plan to add velcro to them. They also hold the LED strips in place or remove them for upgrades.
 

Attachments

  • 28112303535_e11fdf59a4_c.jpg
    28112303535_e11fdf59a4_c.jpg
    219.8 KB · Views: 303
  • 27497568673_827dc32b8e_c.jpg
    27497568673_827dc32b8e_c.jpg
    215.9 KB · Views: 275
  • 27497837724_b40c6aa86e_c.jpg
    27497837724_b40c6aa86e_c.jpg
    225.4 KB · Views: 279
Last edited:
Re: Tron Legacy Themed WIP

Here are some progress pics of the identity disc.
The first identity disc is a flying ring frisbee I got as freebie from some game company. I slapped some masking tape, white paint, then glow in the dark paint on it. It didn't look too good but it was made from things I had laying around.
I hope to eventually make a light up disc. Unfortunately, I didn't buy one when they were cheap and plentiful. I'm working to see what I could create on my own.
I started with this nifty papercraft model of Sam's Identity Disc from here: Tektonten Papercraft - Free Papercraft, Paper Models and Paper Toys: Tron Legacy Papercraft: Sam's Identity Disc.
I goes together pretty easy. Tektonten recommends printing it out on card stock but I didn't have any. I started with paper and gave up after the third of fourth coat of gesso. I traced a simplified version of the pieces onto empty cereal/food boxes intending to reinforce the paper model. While playing around I realized how big the model was in relation to me. As you can see it's too big for my back, so I scaled it down.
I plan to transfer the scaled down pattern to food box cardboard, craft foam and Wonderflex then see which works better.
 
Re: Tron Legacy Themed WIP

I'll be making some Tron goodness myself soon in prep for Halloween 2k13, and I have been lurking on various pages of the uber thread, and will be reading in entirety sometime soon. I have been wrestling with lighting ideas for my costume, and figured LED strips or EL wire would be my answer (got into wiring and whatnot for my iron man last Halloween, and I want to expand on that experience).

Your reasoning with LED strips make complete sense in my mind, but I am curious if they are BLINDING when in a dark atmosphere? Thinking like pub crawls, bars, general night excursions, etc etc.

I've used them in night excursions myself while out at the "bah". Undiffused they are bright enough to help people find dropped keys. :lol You don't want to look directly at them for long. The diffuser cuts down on it but even with it on I triggered brightness correction in both my cameras. You can sort of see the difference in the overall shots where the strips slipped out of the diffuser.

Also it makes a difference the type and color LED strip you choose. I'm using color changing, tri-chip LED strips which are about as bright as you can get. If you don't want to blind people, chose "3528" lights in something over than a white color. Red is the most "conversational".
 
Last edited:
Re: Tron Legacy Themed WIP

Oh snap, I did not realize I was talking to a fellow Bostonian! Rockin'. :cool Thanks for the infos!
 
Re: Tron Legacy Themed WIP

Also the last picture attached to the first post shows a comparison of two different LED strip types: the top is "set to white" and bottom is a single color cool white LED strip.
 
Re: Tron Legacy Themed WIP

I took some shots of the connectors and power sources.

Here's the basic layout of the strips. I planned to put in more angles and maybe some circles.
 

Attachments

  • 27497838524_a023f96556_c.jpg
    27497838524_a023f96556_c.jpg
    227.1 KB · Views: 221
  • 27497838444_8117fa90bd_c.jpg
    27497838444_8117fa90bd_c.jpg
    382 KB · Views: 286
  • 27497838394_bdb0fd0e6d_c.jpg
    27497838394_bdb0fd0e6d_c.jpg
    374.3 KB · Views: 297
  • 28010051812_c8cb28e228_c.jpg
    28010051812_c8cb28e228_c.jpg
    170.7 KB · Views: 296
  • 27497838224_fc282113ae_c.jpg
    27497838224_fc282113ae_c.jpg
    212.9 KB · Views: 286
  • 28010052212_2565d79c91_c.jpg
    28010052212_2565d79c91_c.jpg
    140.4 KB · Views: 292
Last edited:
Re: Tron Legacy Themed WIP

Sorry for the lack of updates. I've been working on other costumes for cons I attended in Jan and Feb and I've got a con a month at least until June.

These are pictures of my test disc. I've already started a new one made from Wonderflex. I cut out the basic eight (8) pieces in food box cardboard and taped them together.
27832142060_075bf1e7e3_c.jpg
I made some diffusers for the c-ring from photo filters because it's what I had on hand. I later covered the inner ring with hot glue to increase diffusion.
27832142310_2bb95a3f42_c.jpg27497892404_a78283a51e_c.jpg27832142250_49853165f8_c.jpg27832142200_2091574c80_c.jpg
For the blade part, I cut the outer ring off some clear plastic plates, filled them with hot glue, and wrapped them with glow-in-the-dark gimp.
27497892524_1f5a08e435_c.jpg28078698856_3499bd38b5_c.jpg

To give the disc some internal structure, I cut a strip of plastic canvas and used it to reinforce the thick part of the disc. It also offers something to secure the inner ring of the LED strips so they can be mounted on their side.
28078698616_9d3d75c6a9_c.jpg
I also cut pieces of craft foam to cover the cardboard and give extra dimension for the channels that run just outside the inner light ring. I started mod podging the foam but may switch to plastidip. A meter of LED strip is just long enough to line the inside of the blade and the c-ring for my smaller sized disc. I used RGB LED strips. They are brighter and allow me to change the color of the disc lights without replacing the strips. They do require a controller though. I've found mini controllers online. In addition to changing the color of the strip, they can also flash it. Power is provided by a 9v battery. I haven't figured out a good way to access the controller from the outside of the disc, so for right now I have to open up the disc to change the color or effects.
27832142350_ffc10b0aa3_c.jpg27832142160_49853165f8_c.jpg
 
Last edited:
Re: Tron Legacy Themed WIP

I made a test vest out of old black t-shirts. I started by cutting material for the diffuser inserts then laying them out on scrap black t-shirt fabric. These will be used to make the pocket behind the diffuser. This pocket will allow the strips to removable for repairs, upgrades, or washing of the vest. (Although I don't know how washable felt and poly fiberfill are.)
27497629663_a2fb01105b_c.jpg28034977321_53952e51b4_c.jpg

Once the diffuser insert and backing fabric were sewn onto the t-shirt that was going to be my vest, I cut though the front of the vest to reveal the diffuser. Either leave the ends open when sewing or cut slits in the backing fabric for the lights.
27497629573_a96aa2a2f9_c.jpg
Don't mind the text on the back. It's going to be covered by the mount for my identity disc.
28078719516_ba9e477755_c.jpg28034977221_6a7cf2f7e4_c.jpg

This is what the vest looks like on the inside. Note the slits for feeding in the lights. These are also in roughly the same places where the joints and connectors are, allowing me disconnect parts of the lights to conserve battery power.
28078719706_4b1907d5f0_c.jpg

I found another benefit to the pocket design. Between my pocket being sewn in roughly the shape I wanted and the diffuser window on the front, I needed fewer joints. This came in handy when one set of lights stopped working and I had to replace them with lights made for a different design. While the strips rolled sideways some when they went around angles, it was barely noticeable.
 
Last edited:
Progress on my helmet and identity disc is going very, very slowly. I have a backlog of pictures to upload. I live in the Boston area and this got lost in the shuffle after the events at the marathon.
I renamed the thread to reflect my use of Tron lines on other costumes.
In the meantime here's a picture of the first version of my Link from Legend of Zelda-Tron crossover costume. The lights are a little hard to see since I was in direct sunlight.
558114_10151514602021111_806233668_n.jpg
 
Last edited:
Here's a first version of my Injustice Green Lantern. Although, the light up part actually are part of the in-game character design.
 

Attachments

  • 734598_555520997821326_177585347_n.jpg
    734598_555520997821326_177585347_n.jpg
    72.4 KB · Views: 358
At long last another update. I did a lot of work on the helmet. It's still a WIP but close enough. This is the first helmet I've ever built from scratch or otherwise. I mostly winged it, so it might have came out better if I had a plan. Progress was slow because I only had a vague idea of what I wanted the helmet to look like and where if at all to add lights. I cannot stress enough pre-planning what you want the helmet to look like ahead of time. Between that and mistakes, it took a year or so to make a helmet that could easily have been done in a month or maybe even a week.
TronHelmet_003.JPGTronHelmet_002.JPGTronHelmet_001.JPGTronHelmet_004.JPGTronHelmet_005.JPGTronHelmet_006.JPGTronHelmet_007.JPGTronHelmet_008.JPGTronHelmet_009.JPGTronHelmet_010.JPG

I started off with the basic cardboard headband method that Featherweight and several others use. I used another cardboard strip and a piece of cereal box to make a squared chin. I also rounded out where the chin strap and crown met with another piece of cereal box. The sides are cardboard that I wet and let dry so that they would bow out slightly then cut them to match the curve of the rear of the helmet. The opening in the bottom of the helmet is large enough for me to take the helmet on and off.
 
The white section of the dome is where I discovered the gesso I had was way too runny for this project. I used some gorilla wood glue instead to harden and smooth up the cardboard. The results were pretty good except the lower part and sides of the helmet warped because my brace slipped while it was drying.
I initially planned to use a 3-liter bottle for a full face visor, but it squished my nose. It wasn't until after I ruined it with a heat gun, that I had the idea to build the brim out. I probably should have just used the bottle for the upper part of a mask and something else for the lower part. Yay, lack of planning.
In order to avoid that happening again, I built out the brim with some foam and cardboard. Then I covered the helmet with some paper mache. I also used some DryDex spackle to build up the places where it wasn't quite round enough. Then reinforced the chin and sides with worbla. At this point I set it aside for awhile.


TronHelmet_011.JPGTronHelmet_012.JPGTronHelmet_013.JPGTronHelmet_014.JPGTronHelmet_015.JPGTronHelmet_016.JPGTronHelmet_017.JPGTronHelmet_018.JPGTronHelmet_019.JPGTronHelmet_020.JPG
 
Upon returning with a puffier hairstyle I found, the helmet too small. So I removed the worbla and extended the chin piece. I used the existing bend of the cardboard packaging to maintain the squared look of the chin. Adding side cuts and bending the top of the new chin inward made a compound bend that I think looks nicer.
TronHelmet_021.JPGTronHelmet_022.JPGTronHelmet_023.JPGTronHelmet_024.JPGTronHelmet_025.JPGTronHelmet_026.JPGTronHelmet_027.JPG
 
Back
Top