BriceGielgens
New Member
Hello, everyone!
I apologize ahead of time for the long post! I wanted to share a passion project of mine that has been a huge learning experience for the last few months, as I have been getting back into prop building and cosplay.
The Pistol from Hyper Light Drifter!
So I turned this:
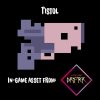
Into this:

This build was a huge creative challenge for me. First, there have been little to few full cosplays, a lot of which take a lot of creative liberties. This is due to wildly awesome inconsistencies in the game art, from the Kickstarter artwork, now-licensed fan art, and within the game itself. I chose to take references from screen-capping the intro animation and from the in-game menus found at the stores (which is where the most "detailed" versions of the costume is shown).
Next, I took the pixel measurements and did some scaled sketches. Realizing the trigger guard, trigger, and handle were in relatively impossible positions to hold, I used an airsoft pistol with a comfortable grip for scale reference and drew the rest of the body pieces around it, landing on this blueprint:
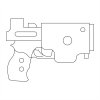
I did a quick EVA foam build, which helped me to visualize the overall scale and shape, which I was happy with. I opted for a vented muzzle as a creative liberty and just made up the rest of the shapes as I saw fit, as long as they fit the silhouette.

Not being 100% confident that it would hold up to close inspection, I started a 3D build (also hoping to be able to replicate it quickly and doing a lighted version later). I was acquainted with Maya in college, but no longer had access, so I tried 123D Design knowing I wanted to 3D print the original model. Most of the build went well, but 123D Design could not handle the whole file after a short time. I switched to Blender and relearned most of the operations I would need. This went well, until I realized I did not have a universal scale across the exported pieces (which is where I learned about DWG vs SVG file types). I switched again, using the trial of Fusion 360. I love Fusion 360 now.
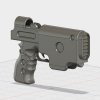
And here is a key diagram for the separate parts:
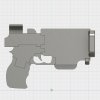
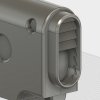
The parts were broken down for the print bed size on the 3D printer (an Ultimaker at a friend's shop), but I ended up using them for individual kit pieces. The keys were left at the same sizes as the connection points since I did not know the tolerances of the material (white PLA). It was printed with 15% inlay at a slightly thicker wall size, so I could sand them to fit.
The prints came out near-perfect. Here is the first test fit:

Next was bringing all the parts to a finish, using XTC-3D, 2-in-1 Filler Primer, Bondo Spot Putty, and a lot of sand paper, up to a 2000 grit (what I had on hand for high finish). It was all finished with a coat of Krylon Crystal Clear and molding began.


Most of the molds were made with Mold Star 20T. I had to use the rest of my Mold Star 16 Fast and Rebound 25 after I ran out of materials (2 molds failed with Mold Star 15, possibly a bad batch). Yet another learning experience, as it was my first series of successful 2-part, 3-part, and injection molds. There were a few remolds for the muzzle and slide arch. A small amount of sanding was needed again for the parts to fit, due to the Krylon coating, but only to the unseen keys.


The first test casts came out alright, as I had to learn how to properly rotocast by hand. I settled on Smooth Cast 300 for the small pieces and Smooth Cast 65D for the roto molds. The pieces came out much better (consistent wall thickness and minimal flashing).

I am now waiting for materials from SDP-SI to finish my first rotocasting machine. My shoulders were incredibly sore after 2 kits, but that was nearly 2 hours of rotating molds by hand over a day and a half.
After test fitting all pieces, I used 5-minute epoxy to connect everything and Apoxy Sculpt to fill all gaps. A layer of filler primer later, I wet sanded the pistol with 400 grit and hid my crimes with more spot putty. After some finesse, I used a silver “primer and paint” rattle can and after 24 hours, masked all my airbrush colors. I also tested the mustard masking technique on the muzzle and used a paint brush for the inlay circles.

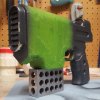

All of my acrylics were mixes of Model Master, thinned with distilled water and denatured alcohol. A little overkill, but it was what I had on hand and the result was nice. The tones are at least 3 shades darker than anticipated (roughly 2 shades originally), but it gets the job done well enough for my first try. This was sealed with Krylon Crystal clear again and lightly weathered with water-soluble oil paints for the final result.
If you have any feedback or questions, I am all ears! This entire process was just a culmination of experience (right and wrong) from different projects over the years and a whole lot of new processes. I just want to learn as much as possible!
Thank you!
I apologize ahead of time for the long post! I wanted to share a passion project of mine that has been a huge learning experience for the last few months, as I have been getting back into prop building and cosplay.
The Pistol from Hyper Light Drifter!
So I turned this:

Into this:

This build was a huge creative challenge for me. First, there have been little to few full cosplays, a lot of which take a lot of creative liberties. This is due to wildly awesome inconsistencies in the game art, from the Kickstarter artwork, now-licensed fan art, and within the game itself. I chose to take references from screen-capping the intro animation and from the in-game menus found at the stores (which is where the most "detailed" versions of the costume is shown).
Next, I took the pixel measurements and did some scaled sketches. Realizing the trigger guard, trigger, and handle were in relatively impossible positions to hold, I used an airsoft pistol with a comfortable grip for scale reference and drew the rest of the body pieces around it, landing on this blueprint:

I did a quick EVA foam build, which helped me to visualize the overall scale and shape, which I was happy with. I opted for a vented muzzle as a creative liberty and just made up the rest of the shapes as I saw fit, as long as they fit the silhouette.

Not being 100% confident that it would hold up to close inspection, I started a 3D build (also hoping to be able to replicate it quickly and doing a lighted version later). I was acquainted with Maya in college, but no longer had access, so I tried 123D Design knowing I wanted to 3D print the original model. Most of the build went well, but 123D Design could not handle the whole file after a short time. I switched to Blender and relearned most of the operations I would need. This went well, until I realized I did not have a universal scale across the exported pieces (which is where I learned about DWG vs SVG file types). I switched again, using the trial of Fusion 360. I love Fusion 360 now.

And here is a key diagram for the separate parts:


The parts were broken down for the print bed size on the 3D printer (an Ultimaker at a friend's shop), but I ended up using them for individual kit pieces. The keys were left at the same sizes as the connection points since I did not know the tolerances of the material (white PLA). It was printed with 15% inlay at a slightly thicker wall size, so I could sand them to fit.
The prints came out near-perfect. Here is the first test fit:

Next was bringing all the parts to a finish, using XTC-3D, 2-in-1 Filler Primer, Bondo Spot Putty, and a lot of sand paper, up to a 2000 grit (what I had on hand for high finish). It was all finished with a coat of Krylon Crystal Clear and molding began.


Most of the molds were made with Mold Star 20T. I had to use the rest of my Mold Star 16 Fast and Rebound 25 after I ran out of materials (2 molds failed with Mold Star 15, possibly a bad batch). Yet another learning experience, as it was my first series of successful 2-part, 3-part, and injection molds. There were a few remolds for the muzzle and slide arch. A small amount of sanding was needed again for the parts to fit, due to the Krylon coating, but only to the unseen keys.


The first test casts came out alright, as I had to learn how to properly rotocast by hand. I settled on Smooth Cast 300 for the small pieces and Smooth Cast 65D for the roto molds. The pieces came out much better (consistent wall thickness and minimal flashing).

I am now waiting for materials from SDP-SI to finish my first rotocasting machine. My shoulders were incredibly sore after 2 kits, but that was nearly 2 hours of rotating molds by hand over a day and a half.
After test fitting all pieces, I used 5-minute epoxy to connect everything and Apoxy Sculpt to fill all gaps. A layer of filler primer later, I wet sanded the pistol with 400 grit and hid my crimes with more spot putty. After some finesse, I used a silver “primer and paint” rattle can and after 24 hours, masked all my airbrush colors. I also tested the mustard masking technique on the muzzle and used a paint brush for the inlay circles.


All of my acrylics were mixes of Model Master, thinned with distilled water and denatured alcohol. A little overkill, but it was what I had on hand and the result was nice. The tones are at least 3 shades darker than anticipated (roughly 2 shades originally), but it gets the job done well enough for my first try. This was sealed with Krylon Crystal clear again and lightly weathered with water-soluble oil paints for the final result.
If you have any feedback or questions, I am all ears! This entire process was just a culmination of experience (right and wrong) from different projects over the years and a whole lot of new processes. I just want to learn as much as possible!
Thank you!

