FakeBritishAccent
Sr Member
***Please don't merge this thread with the other Mattel thread, Mods...you'll understand why in a moment***
I know there's an existing Mattel Hoverboard thread and I've been following it from day one...but it's so drawn out and overly negative that I decided to start THIS one for the people who actually LIKE their board. I'm sure within a day or two, even THIS thread will be filled with negative comments and accusations that I'm a Mattel plant (I'm not...check my past threads if you don't believe me. I've been here for awhile) but I just wanted to spread my love for the board and I know that as more boards are delivered, others may feel the same way.
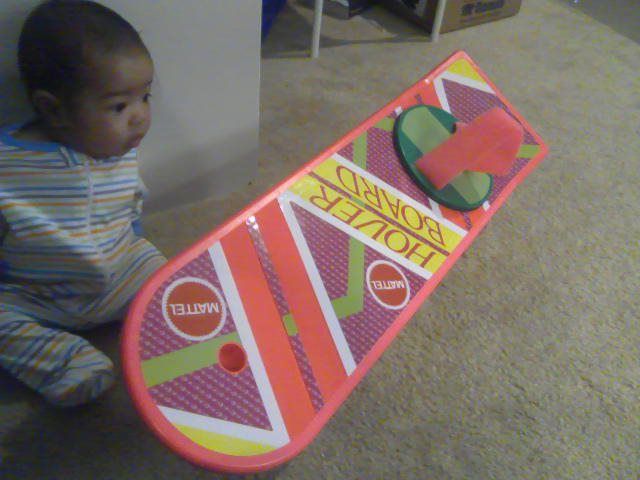
So I opened up my board this morning after I got home from work (a swipe straight through the glue with a butcher knife did the trick) and honestly? I ******* LOVE IT. All inaccuracies aside, I think it's just fantastic. I fully admit that I'm looking at the board with rose-colored, nostalgia-soaked glasses, but isn't love for the movies why we got into this hobby in the first place? When I was seven years-old, I waited in a line that wrapped around the movie theater to catch BTTF 2 opening night, and after it was done, the number one thing on my mind was "Hoverboard, hoverboard, hoverboard." Even though Mattel's doesn't fly, pulling that thing out of the box felt almost magical. The only way the feeling could get any better is if I had walked into Toys R Us, not knowing ANYTHING about a hoverboard release, and finding them stacked in neat rows on the showcase shelves near the front entrance of the store.
Quality-wise, it's solid as a rock and (like many have said before) constructed pretty beefily. It doesn't feel cheap in the least and I was even able to stand on it over carpet without feeling like it was going to snap in two. Thankfully, my decals were applied accurately and throughly, not a single air bubble or crease (maybe I got lucky?). There were two air bubbles visible through one of the top pink velcro sections and the green footpad velcro, but I was able to tamp them out. On the backside, I found a scratch on the silver section of the front magnet, and the black paint that encircles both magnets could use some work.
Functionwise, the hoverboard sound effects are great! Not only are they fairly loud and responsive, you can feel rumbling if you hold it by the back end. The "gliding" effiect would only be effective if you're a small child. A couple of years ago, I remember purchasing these carpet skates that the board reminded me of. The ball area of the shoe was textured and the idea was you could run on the balls of your feet and then lay your feet flat to glide across the carpet like 10 or 15 feet (think about that shot in "The Breakfast Club" when they all skid down the hallway trying to avoid Vernon). The boards pads would work the same way...but as solid as they are, I wouldn't try it myself (maybe I'll wait until my boy Jack is a bit older and see if HE can pull it off? I'll make sure he's wearing a Griff helmet just in case ;P ). Lastly, the display stand looks and works fine...but I kinda wanna put together a wire one like the one Bob Gale has.
No matter how happy I am with the board, I am planning upgrades:
1. Carefully remove the clear tape on the top of the board joining the decal halves together. I'm sure they were only temporarily neccessary during the application process fo the decal, so I doubt the decals will peel off if I get rid of them.
2. Replacing the green velcro strips on the footpad, but NOT adding the velcro strips on the rest of the board. Stepping on the board and playing around with it, I realized that the velcro strips are actually functional, serving as grip tape for your unsecured foot...but the pink velcro already serves that purpose.
3. Replacing the velcro footstrap for fur. This has more to do with the size of the velcro footstrap and less to do with film accuracy: The Mattel strap is WAY TOO LARGE to securely fit over any of my shoes.
4. Sanding down the copyright info and repainting the battery pack cover. Since it's a solid piece, it shouldn't be hard at all. Plus, a post on the other Mattel thread found a couple good matches for paint colors too.
5. Repainting the black outline of the magnets. I'll give it a few passes with some 400 grit sandpaper and then spray on some satin black.
6. Repainting the magnets. That scratch is going to bug me, I know it.
I'm still toying with the idea of replacing the "Hover Board" logo with Roland's, but for now, I'm fine with it. It'd would be awesome if Roland put together a Mattel upgrade version of his decal that fit the Mattel boards perfectly, but that's asking ALOT.
So that's that, everyone. I'll be posting my upgrade WIP shots here when I get to it, and I welcome others to do the same AND post their love for the board as well.
-Jonaas
I know there's an existing Mattel Hoverboard thread and I've been following it from day one...but it's so drawn out and overly negative that I decided to start THIS one for the people who actually LIKE their board. I'm sure within a day or two, even THIS thread will be filled with negative comments and accusations that I'm a Mattel plant (I'm not...check my past threads if you don't believe me. I've been here for awhile) but I just wanted to spread my love for the board and I know that as more boards are delivered, others may feel the same way.
So I opened up my board this morning after I got home from work (a swipe straight through the glue with a butcher knife did the trick) and honestly? I ******* LOVE IT. All inaccuracies aside, I think it's just fantastic. I fully admit that I'm looking at the board with rose-colored, nostalgia-soaked glasses, but isn't love for the movies why we got into this hobby in the first place? When I was seven years-old, I waited in a line that wrapped around the movie theater to catch BTTF 2 opening night, and after it was done, the number one thing on my mind was "Hoverboard, hoverboard, hoverboard." Even though Mattel's doesn't fly, pulling that thing out of the box felt almost magical. The only way the feeling could get any better is if I had walked into Toys R Us, not knowing ANYTHING about a hoverboard release, and finding them stacked in neat rows on the showcase shelves near the front entrance of the store.
Quality-wise, it's solid as a rock and (like many have said before) constructed pretty beefily. It doesn't feel cheap in the least and I was even able to stand on it over carpet without feeling like it was going to snap in two. Thankfully, my decals were applied accurately and throughly, not a single air bubble or crease (maybe I got lucky?). There were two air bubbles visible through one of the top pink velcro sections and the green footpad velcro, but I was able to tamp them out. On the backside, I found a scratch on the silver section of the front magnet, and the black paint that encircles both magnets could use some work.
Functionwise, the hoverboard sound effects are great! Not only are they fairly loud and responsive, you can feel rumbling if you hold it by the back end. The "gliding" effiect would only be effective if you're a small child. A couple of years ago, I remember purchasing these carpet skates that the board reminded me of. The ball area of the shoe was textured and the idea was you could run on the balls of your feet and then lay your feet flat to glide across the carpet like 10 or 15 feet (think about that shot in "The Breakfast Club" when they all skid down the hallway trying to avoid Vernon). The boards pads would work the same way...but as solid as they are, I wouldn't try it myself (maybe I'll wait until my boy Jack is a bit older and see if HE can pull it off? I'll make sure he's wearing a Griff helmet just in case ;P ). Lastly, the display stand looks and works fine...but I kinda wanna put together a wire one like the one Bob Gale has.
No matter how happy I am with the board, I am planning upgrades:
1. Carefully remove the clear tape on the top of the board joining the decal halves together. I'm sure they were only temporarily neccessary during the application process fo the decal, so I doubt the decals will peel off if I get rid of them.
2. Replacing the green velcro strips on the footpad, but NOT adding the velcro strips on the rest of the board. Stepping on the board and playing around with it, I realized that the velcro strips are actually functional, serving as grip tape for your unsecured foot...but the pink velcro already serves that purpose.
3. Replacing the velcro footstrap for fur. This has more to do with the size of the velcro footstrap and less to do with film accuracy: The Mattel strap is WAY TOO LARGE to securely fit over any of my shoes.
4. Sanding down the copyright info and repainting the battery pack cover. Since it's a solid piece, it shouldn't be hard at all. Plus, a post on the other Mattel thread found a couple good matches for paint colors too.
5. Repainting the black outline of the magnets. I'll give it a few passes with some 400 grit sandpaper and then spray on some satin black.
6. Repainting the magnets. That scratch is going to bug me, I know it.
I'm still toying with the idea of replacing the "Hover Board" logo with Roland's, but for now, I'm fine with it. It'd would be awesome if Roland put together a Mattel upgrade version of his decal that fit the Mattel boards perfectly, but that's asking ALOT.
So that's that, everyone. I'll be posting my upgrade WIP shots here when I get to it, and I welcome others to do the same AND post their love for the board as well.
-Jonaas
Last edited:
