Lt Washburn
Sr Member
This is great. I don't know if you already talked about the white text at the bottom of the device? It's there in the BTS video images above.
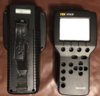
The Tektronix WFM-90 device that the prop was based on went through some subtle logo/badging changes in the 90's. While the devices themselves were functionally and physically identical, an earlier version was released with the "Tektronix" branding on the lower right face of the device as well as a slightly different logo above the screen. That's the version that was used in the film. Mine is a slightly later release that does not have the branding on the lower face of the device.This is great. I don't know if you already talked about the white text at the bottom of the device? It's there in the BTS video images above.
Thanks! I honestly wouldn't have been able to finish this properly without your help! The behind-the-scenes information and measurements you provided made all the difference!Outstanding work! I'm very impressed how close you were able to replicate the original prop that I built. Your version is significantly better as it is a completely stand alone device. Things have certainly gotten easier for building props like this!
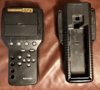
As reference for those that want it, here's the housings for original prop, and the backup unit, side by side. Unfortunately, I wasn't able to keep the working internal components, as those were loaned to us by Tektronix.
The antenna, and external BNC connecters may still be around... in a tub, or drawer. I think that I probably reused some components for other projects.
Keep on building!
Hi, Emablg. The sun hood is from a JVC brand video camera, model GR-SV7.nice job!!! What is the name of your sun hood 4"? i don't find it!
I have the JVC GR-SV7(U), with the hood, and can send along any pictures you like. The hood is detachable, and I don't have any particular attachment to it, so if you want it, it's yours.LCD HOOD UPDATE:
Ok, I was able to find a few photos of the JVC GR-SV7 camcorder, and the sun hood on it looks pretty much exactly like the hood on the Marksmann GPS prop! It only took 2 years, but I think I've finally identified the proper sun hood! (NOTE: The photo of the camcorder below has been flipped horizontally for comparison)
View attachment 978895
Now, I just need to find one of these camcorders for sale in the US. This specific camcorder seems to be very hard to find. The photos I found were from a French online auction site.
Or, perhaps there is a French RPF member who might be able to help me figure out how to purchase the camcorder on that auction site?
Though, it looks like you got your hands on one already.I have the JVC GR-SV7(U), with the hood, and can send along any pictures you like. The hood is detachable, and I don't have any particular attachment to it, so if you want it, it's yours.
") Just wanted to say thanks for all the updates you've made over the past few years on this. I was trying to figure out how to do the display until you mentioned rasperry pi and then I was like "Hello common sense" lol. Anyway, thanks dude
Just wanted to say thanks for all the updates you've made over the past few years on this. I was trying to figure out how to do the display until you mentioned rasperry pi and then I was like "Hello common sense" lol. Anyway, thanks dude