Ninlhil
New Member
Been chipping away at this project for some time, just haven't posted anything til this point so I wouldn't keep Necromancing the thread.
When I got my job at a bronze sculpture foundry, I decided I wanted a replica of the bronze sword used by Brad Pitt as Achilles in Troy. Figuring out how to sculpt it and actually doing so has been a bit of a process. I decided to sculpt the sword as a half, then make two waxes to attach together to form the final was for the casting process.
First thing to do was get a good clear drawing of the sword. One thing I ran into while researching through all the references is that there seems to be no definitive version of it. Hero swords are slightly different than Stunt swords which are slightly different than Effects swords, etc. So I decided to cherry pick the bits and pieces of each version to get something fairly representative of the whole.

Once a that was done and properly sized according to what info I could find, I printed out the template and glued it to Styrene sheeting, which I then cut out and shaped on a wheel sander.


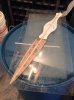
I glued all of those pieces down to a piece of glass, as I wanted a truly flat surface for when I made my mold. With the central profile spine in place, I started building up the blade with Bondo.


For the raised decorations on the ricasso I made a second set of that template on thicker styrene sheet and removed the lower areas.


Finally hit my first goof. Realized that I couldn't lay down the ricasso pieces properly without removing some of the lower layer, so I did. Used some cut down wooden shims along the center ridge to provide support under the styrene.


Filled in the gaps at the edges and against the bondo portion with green airplane filler putty.


Ditto on the other side, then filled in some rough patches on the blade and added the Spine of the blade with a piece of triangular Balsa wood, which I then also skinned in putty and shaped the point of the blade.


This about got the blade to where I was happy with it, so I started working on the grip. Sculpted it out of Sculpy, then would use more sculpy or milliput to fill in the gaps.


At this point, I realized that my original plan of making the mold in one piece would mean a lot of wasted rubber as the handle is so much thicker than the blade, I removed the handle from the original base and put it on it's own. Also realized I had screwed up those holes on the grip, so I decided to place the raised rings on the grip and I would remove the holes in wax.

Bit more sanding and filling, then hit the whole thing with grey primer and now should be ready for the rubber mold to be made.


Sorry for the janky photography. Should update soon.
When I got my job at a bronze sculpture foundry, I decided I wanted a replica of the bronze sword used by Brad Pitt as Achilles in Troy. Figuring out how to sculpt it and actually doing so has been a bit of a process. I decided to sculpt the sword as a half, then make two waxes to attach together to form the final was for the casting process.
First thing to do was get a good clear drawing of the sword. One thing I ran into while researching through all the references is that there seems to be no definitive version of it. Hero swords are slightly different than Stunt swords which are slightly different than Effects swords, etc. So I decided to cherry pick the bits and pieces of each version to get something fairly representative of the whole.
Once a that was done and properly sized according to what info I could find, I printed out the template and glued it to Styrene sheeting, which I then cut out and shaped on a wheel sander.
I glued all of those pieces down to a piece of glass, as I wanted a truly flat surface for when I made my mold. With the central profile spine in place, I started building up the blade with Bondo.
For the raised decorations on the ricasso I made a second set of that template on thicker styrene sheet and removed the lower areas.
Finally hit my first goof. Realized that I couldn't lay down the ricasso pieces properly without removing some of the lower layer, so I did. Used some cut down wooden shims along the center ridge to provide support under the styrene.
Filled in the gaps at the edges and against the bondo portion with green airplane filler putty.
Ditto on the other side, then filled in some rough patches on the blade and added the Spine of the blade with a piece of triangular Balsa wood, which I then also skinned in putty and shaped the point of the blade.
This about got the blade to where I was happy with it, so I started working on the grip. Sculpted it out of Sculpy, then would use more sculpy or milliput to fill in the gaps.
At this point, I realized that my original plan of making the mold in one piece would mean a lot of wasted rubber as the handle is so much thicker than the blade, I removed the handle from the original base and put it on it's own. Also realized I had screwed up those holes on the grip, so I decided to place the raised rings on the grip and I would remove the holes in wax.
Bit more sanding and filling, then hit the whole thing with grey primer and now should be ready for the rubber mold to be made.
Sorry for the janky photography. Should update soon.