Stormtrooper Helmets on Spikes

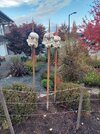
I dremmeled some damage into the helmets and added some acrylic brown and sand paint where I thought dirt would build up.
View attachment 1579174View attachment 1579172

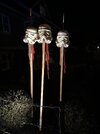
A couple of rounds of adding grime and removing grime with isopropyl alcohol until I was happy with the result and then I added some overspray with Montana Sahara Beige, building up heavy in areas that were more exposed. I added a few random brush strokes and paint splatter with a tooth brush and sealed everything with clear matte varnish.
View attachment 1579173

This was a quick build, the lenses were done in an evening and paint work was a couple of hours.
AWESOME JOB! Very nice!
 
Damn, I wish I had seen those pics a couple of days ago, the spikes are just square wood stakes! I couldn't make that out in the reference pics I found online.

I may change these at a later date, I have another project I can use the conduit for.
 
Ok so I couldn’t leave well enough alone. I purchased a couple of 2x4s and cut them down to 1 1/4” square and then tapered the ends on a bandsaw. I gave them bc a quick coat of stain and set them aside to dry.
9E1E14FA-2440-48C5-B21E-DCF98B7E6155.jpeg
After looking at the reference pics from the Mandalorian Experience I decided to add a bit of a blood wash to a couple of the helmets. I just used some watered down acrylic.
6CDB4A9C-F76D-40BE-85F7-9DDF3E186798.jpeg
I used my dremmel to change the holes I made to 1” square holes.
79F2082D-1F14-4387-847A-1CEB857274B9.jpeg
I dyed some cheese cloth brown and scarlet red. I used hotmelt and glued one of each color into the helmet.

02FF7BD7-1C42-4525-BF41-9696BCF79DC1.jpegC8EC7303-CF87-4AF1-B273-A3FE3ABF8C28.jpeg

And this is where I am at. I will add some weathering to the spikes and fabric and still need to add some wraps to the bottom of the spikes.
1B3AD5ED-8A94-4834-9F0B-02138BF812AE.jpeg
 
This is the end, I promise!
I did a dusty coloured wash on the spikes to take the newness out of them and ripped up an old sheet for the rags and wrapped the spikes.
938A86EA-9082-476F-B588-6F448010065B.jpeg72741F81-587E-4226-A23A-03A8901CB7E8.jpeg
I gave the rags a bit of a wash to dirty them up and while they were still wet brushed a layer of modge podge matte to act as an adhesive so the wraps won’t come loose.

BDB63A5A-661A-4C86-8CB7-5DC0DC326AA5.jpeg

After looking at my posted pics and comparing with reference I could see my helmets looked too clean, so I did another round of acrylic weathering and went heavier than I normally would.
B26EE086-D602-40D3-8DBB-7FAB4E8F9DE1.jpeg


And I am calling these done! For sure this time!
8219B8C9-4750-4C54-88D1-8CAF19689B8C.jpeg
 
Good job on reproducing that particular scene... (y) (y) My only critique, seeing the pics from Celebration, is that the wooden stakes are too clean.
If you look closely at the real ones, the edges are not clean, some are banged-up and even scorched on the tips.
A trick I was using to weather wood was using a mix of ammonia & Drano. Of course, safety is your priority while mixing/using those 2 products.
Do it outside with goggles + heavy rubber gloves and protective clothing. Use an old brush and baste your poles thoroughly.
Rinse with water afterward. Light sanding (320 grit) and voilà!...old wooden spikes;)
 
It is hard to tell how weathered they are in the celebration pics. This is what I was going by.
B119FF2A-E22B-4F5B-BF3C-4D766B6F8259.jpeg

I’ll probably ding up the edges as suggested and I can make them look more faded with another acrylic wash when I weather the next project.
Thanks for looking!
 
Back
Top