STAR WARS (Samurai Darth Vader)

Alright so bad news, the midnight blue 550 cord has not come yet. I'm guessing with the holidays UPS and USPS are working a nightmare so hopefully I will receive it today (hopefully...)
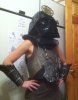
Anyways since last night wasn't so cold and had a little humidity and warm winds from the last rain fall I got some painting done after a lot of sanding and smoothing and dusting. I also attached all the chin flaps together since the cord will just be looped through, unlike knotting each one individually like the Boba Fett/ pain in my ass. So I decided to go with a matt black rustoleum spay, 3 light coats and then a very generous coat of automotive rustoleum clear coat gloss to give it that subtle dark lord shine. I gave it a 45 minute dry time in between each coat and let it sit for about 3 hours before I gave it a clear coat treatment. Overall I was pretty satisfied with how it turned out.
photo 1 (1).JPGphoto 2 (3).JPGphoto 1 (3).JPGphoto 4 (1).JPG
So it start to get a little colder out later into the night, and I ended up with some cracking issues "I hate these seasonal Months!!!". Luckily I didn't use any plasti dip so I sanded the cracks with fine grit sand paper (just a little) and repainted, also used some black acrylic some one told me its good for covering up cracks it seemed to work.
photo 3 (3).JPGphoto 2 (4).JPG
Before I gave it the clear coat I wanted all details included, so I took a good look at Takayuki Takeya original sculpture and noticed the chin grill has some dark gold accents so I mixed some acrylics and gave it some detail.
photo 1 (4).JPGphoto 5 (1).JPGphoto 2 (5).JPGphoto 3 (4).JPGphoto 4 (2).JPGphoto 5 (2).JPG
The Last few pics are after the clear coat, time to draw out new templates for the back flaps and as I like to call it the Feudal Imperial Emblem. If I'm lucky the 550 cord will come tonight and I can also get started on that. So hopefully more updates later this week hope you all enjoy;).
 
So the 550 cord came in last night and its the perfect color Midnight Blue was the perfect choice. As soon as I opened the package I started to get to work and I think I will still have enough for the body, I purchased 2 1000 yard spools. so here are some pics was able to finish lacing the neck panels and attach to the chin hope you enjoy!
photo 1.JPGphoto 3.JPGphoto 4.JPGphoto 5.JPG
And here is my fiancé wearing her helmet she couldn't wait lol, even with the smell of chemicals...
photo.JPG
Once I install the eye covers and mouth guard behind the grill it will look more appealing but there is the progress so far, any feed back would be great.
 
Okay another quick update before the long weekend ahead of me, luckily I will not be attending any conventions so my time will be spent on this project...
So for the past 2 days I was able to make the back flaps had to make the stencil from eye was originally going to use a darth vader foam file and just cut it up into 5 pieces but I wasn't sure if it would come out as good. I'm pretty satisfied with the final result. It was quite a task sitting there with my drill bit getting all those holes ready for the 550 cord. Anyways I was able to get 2 coats of plasti dip on last night so tonight I will start the painting process and hopefully the 550 cord weaving which I know will drive me insane.
photo 1 (1).JPGphoto 2.JPG
Did the same technique with the neck flaps and added worbla for stability underneath.
photo 3 (1).JPGphoto 4 (1).JPGphoto 5 (1).JPGphoto 1 (2).JPGphoto 2 (1).JPG
Wanted to do a test fit to make sure it attached to the helmet perfectly and I think we have a winner, although my fiancé said if you glance at it for a second it looks like a gremlin haha but she still loves it.
photo 3 (2).JPGphoto 4 (2).JPGphoto 5 (2).JPG
Hopefully Ill have the majority of this complete by Monday and the eye lenses should be coming in any day so, keep your eyes out for that ;). Until next week Gentlemen!
 
Last edited:
So I finally finished the flaps, no easy task goes unrewarded. But fingers sure do hurt pulling the 550 cord through all those damn holes :(, totally worth it though.
I'm really satisfied with the final result when I attached the flaps to the helmet.
photo 1.JPGphoto 2.JPG
And here are both helmets with minor details missing, soon to be complete.
photo 1 (1).JPGphoto 2 (1).JPGphoto 3.JPGphoto 4.JPG
This week I will be focusing on the eye lenses for Darth and that Gold Imperial symbol that lays on his forehead, and I still need a big red cord for the chin harness, 550 is to thin so I'll have to find some other means. Wish me luck;).
 
Okay so after a long week of company Christmas party's, and buying all my family's gifts for Christmas I got a chance to sit down at my work station for some quality me time....
I only worked on the gold imperial emblem, my fiancé is currently searching for red rope that can be used for the chin, and the eye lenses aren't coming till after Jan 5th :cry yet another delay. but I was able to make some progress. I drew up templates at my job on computer paper, and used layers of 3mm foam and the circle is 1/2 inch foam which I will be dremmeling down tonight. Hopefully the weather clears up tonight and I can start the painting process on all excess parts that haven't been attached yet. But here is the emblem, let me know what you guys think.
photo 1.JPGphoto 2.JPGphoto 3.JPG

Also considering on making a second one and using it as the star for our Christmas tree haha.
 
So this Bucket is almost complete just the eye lenses and red rope, Let me know what you guys think. will be starting on the torso and lightsaber hilt next week.
photo.JPG

Also hope everyone has a happy holiday!!!
 
So I must Apologize for holding off on this thread for so long, Anyways been hard at work on the Ronin Boba Fett blaster, hoping to have a mold and get some cast made by late march. Anyways managed to get some down time this weekend, and also have my wife sit still for more than 5 minutes so I could measure her for the torso piece...
Got the basis for the piece and did some layering hoping to have the surrounding neck piece done tonight as well and start working on the gauntlets. I think with the winter months ahead of us I'm strictly sticking with shaping cutting and layering pieces together. I've dealt with paint jobs in these cold months and they never work out. So I must play the waiting game and that's fine with me. Also "Good News Everyone!!!" I was finally able to shape and attach the eye lenses to Vader's Bucket! so a lot done this weekend hopefully I'll have more to show by the end of the week.

photo 1.JPGphoto 2.JPGphoto 3.JPG

I think I might have to lose a panel or 2 form the neck part on the helmet, I really didn't account for how small she was... My wife is 5 ft tall by the way (sigh) that or I'll put some padding in the top of the helmet to have it sit higher on her head.
 
Got some work done on the neck/ upper chest piece, not sure what to call it, but my wife made the comparison that it looks like that dinosaur that killed Wayne Night's (Newman...) character in Jurassic Park. Anyways tried to shape it and I think I need to use a little more pressure after the heat gun to have sit where I need it to, but its coming along. Tonight I'm going to have a go at the gauntlets and then laser cut some minor pieces.
photo 1.JPGphoto 2.JPG
 
Alright so the Gauntlets came out perfect better than I could hope for! They also fit my wife's super tiny arms I was actually not expecting them to come out as good as they did so I am very pleased. Anyways I first started with 1/2 inch foam piece that would surround her forearm, because her arms are so tiny I needed to bulk them up just a little and then proceeded with a 6mm foam sheet as the basis. Added the top layer with 1/2 inch and made slits and formed with a heat gun. They came out pretty decent...
photo 3.JPGphoto 4.JPGphoto 5.JPG

At first it looked a little ugly but nothing a little layering cant fix, started with 6mm foam strands.

photo 1 (1).JPGphoto 2 (1).JPG
Finally I finished it off with some more strands and it came out much better than I could hope for. Now I really cant wait to paints these suckers, But I have time because I still have the legs and waist belt and flaps to work on which will be quite the challenge.
photo 2 (2).JPGphoto 3 (1).JPGphoto 1 (2).JPG
 
Okay so I know I said I wasn't going to paint these until the weather was better, but my wife has unloaded a new talent on me. Apparently she is very good at painting and detailing, and decided to withhold this information until now haha. Anyways while I was working on some parts for my Ronin Boba Fett she sat down and got to work on her armor. We have been coating everything with about 5 coats of deluded Mod Podge and it is a wonderful sealer and gives it a nice hard flat coat, we didn't want to use palsti-dip because it creates to many blemishes and it has ruined many of our projects in the past. So we went to with a different option on this one, anyways she used a flat black primer and then detailed it with a silver acrylic. She will be doing touch-ups tonight along with a black wash, I cant wait to see how it comes out because honestly they are coming out perfect no dripping no cracking she really surprised me on this one.

photo 1 (1).JPGphoto 2 (1).JPGphoto 3 (1).JPG
 
Sorry I've been away for so long on this thread, been hard at work on the Ronin fett progress is moving along slowly but surly. So with some nice weather in hand this week I took advantage and started painting some parts, I would've had more pieces built but I cant get my wife to sit still for to long :facepalm. Anyways was able to finish the painting the chest and neck pieces last night I weathered them but I might've overkilled it on the rust color on the chest, So my wife will fix that tonight while I work on the legs. Also she needs to do touch ups on the neck because as you can tell there was minor cracking when I peeled the tape off the silver parts on the neck.
photo 1 (2).JPGphoto 2 (2).JPG
Tonight we will be buying a black flight suit, seems like the closest thing to what he wears under there and also 200 silver studs for the shoulders got a good deal for $3 for a bag of 100 studs always good to buy in bulk and we need 180.
 
Alright so lots of progress in the last week, I was hoping to get the shins done this week but got held up on the waist panels... Thankfully my wife assisted me in the hole punching process, 1520 holes to be exact not the most exciting task , but well worth it. Currently we are notching them with 550 midnight blue cord we've only completed 2 so far there are 7 wrapping around the dark lords waist. We also used a black gloss for the paint on these because on the action figure the only 2 shiny parts of his armor are the helmet and these. Everything else is getting flat coat.
photo 1.JPGphoto 2.JPG20160318_000226.jpg20160318_000255.jpg

We also hand painted the cord on the sides because we couldn't find the color cord online. It was more of a crimson rusty kinda red on the action figure, then the bright red that I see on most people's representation of this costume.
Also did a test fit with everything that we made so far, and I think it looks pretty good. We had some complications with the helmet and the neck panels, had to loose two strips cause it hanged way to low. I also think we will be adding more padding so the helmet sits higher on my wife's tiny head. But let us know what you think, would love some feed back ;).
photo 3.JPGphoto 4.JPG
We also ordered a black flight suit and 200 1/2 inch metallic studs for the shoulder's, at least that's what the shoulders look like to me and my wife, and its about 90 studs on each shoulder. Hoping to have this done by either April or May so wish us luck!
 
Amazing work so far. I'm in the complete noob stages of foam building, but my plan is to eventually work up to something similar. Thank you for sharing this build!!!
 
Got some downtime this weekend and worked on some stuff, so some minor setbacks. We received the black flight suit but it doesn't fit my wife it was a children's large, so now we have to downgrade to a medium ughhh I love my tiny wife but sometimes sizing for her is a hassle :facepalm... Also we ordered what we thought we're leather swatches for the skirt around the waist, what they failed to mention on the website that it was leather print on cotton so we are trying to get our $40 bucks back. I mean seriously who charges 40 for cotton and a crappy print at that plus their description of the item is totally fubar. But not a total failure this week, we did receive the 200 1/2 inch silver plated studs for her shoulders so can't wait to start working on those!
Well at least we got the shins finally done well half way, got all the pieces in place and put together just waiting for my wife's magnificent mod podge skills then we can paint.
photo 1 (1).JPGphoto 2 (2).JPGphoto 5.JPG

Forming those knees and getting the perfect shape was the tricky part on this other then that no complaints. And I did finally get some painting done this weekend, I finally got some colors and sat down with the chest piece to finish it off.
photo 4 (1).JPGphoto 2.JPG

Well that's the update stay tuned guys the real exciting stuff is gonna start soon with the strapping and fitting of stuff.
 

Attachments

  • photo 4.JPG
    photo 4.JPG
    120.5 KB · Views: 142
All right so this weekend was an absolute success, I was finally able to sit down with this and knock out some very necessary fabricating that I have been holding off for way too long. So lets go down the checklist here. First off my wife manage to finish modpodging everything, including our bed sheets:facepalm good thing it was on her side haha but it gave me time to paint some things we managed to finish painting her shin armor.

photo 3.JPG
I have to take a better picture ltr because I did weather the silver/ metal parts. Also manage to get started on the waist armor which I was very reluctant about because of all the sizing involved, luckily it wasn't as difficult as I thought more layering of things correctly over all and everything fit perfectly. This week we will definitely finish the paint job on it and assembly as well. And yes that is the force awakens playing in the back, that's how you build star wars armor!
photo 5 (1).JPGphoto 1 (1).JPGphoto 4 (1).JPGphoto 5.JPGphoto 2 (1).JPG
And last but not least I was able to fabricate the shoulder armor which was a difficult task at best, We ordered 200 1/2 inch studs but we need 100 more so I was only able to complete 1 but it looks amazing. I wasn't expecting to turn out so well but I got lucky on this one as usual.
photo 1.JPGphoto 2.JPG
I'm having a little trouble though deciding whether or not to paint the studs a darker silver, let me know what you guys think because my wife has me set on darker but I honestly can't make up my mind. So I leave it in the hands of you fine gentlemen, comment and let us know what you think.
 
Tonight will be the night! Even if it kills me, I will finally be attaching panels to panels and strapping stuff together hopefully the paint dries on everything and I don't have to give it another coat but I will be strapping all the waist pieces together and attaching them to the torso and hopefully we will have our first test fit (hopefully a successful one tomorrow night!

So make sure you stay tuned for more updates;), for now here are some update shots on the items and panels that will be weathered tonight and then assembled.
photo 1 (4).JPGphoto 2 (1).JPGphoto 2 (4).JPGphoto 3 (2).JPGphoto 4 (3).JPG
 
Back
Top