CobraStrike525
New Member
I began working on this project a few months back. It's taken a while to finish it as I have to work around my hectic life, but the project turned out well.
First off here are the source photos. I think its only fair to include these for people who are trying to make their own props for Star Lord or GOTG.


At this point I should include a note for anyone who is just starting a Star Lord project that there are a lot of photos out there of the pre-movie blaster designs. Yes they developed a design, took photos, those photos got on forums, and then they used a different design for the movie. Be careful avoid these as, if you use them, your prop will not be movie accurate and people will complain. I almost made this mistake. I have included one inaccurate photo below.
NOT ACCURATE PHOTO

PHOTO NOT ACCURATE
Note that the coloring is wrong in a few spots and that the barrel length was decreased for the film. The film version also has a lot more wear. It is not nearly so shiny.
Now that that is out of the way....
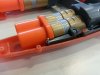
I started by looking around for a good starter prop. Unfortunately GOTG has not had the hell merchandised out of it like other Marvel films. I didn't want to start from scratch on this gun because of all the odd shapes but it was hard to find a good starter prop (read: toy guns).
Finally I found this at Toys-R-Us
View attachment 432828
Its obviously the wrong colors but it has the shapes right.
View attachment 432829
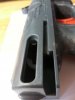
I began by taking off all the orange exterior pieces. For anyone who plans to use the same toy, or wants to use this thread to make their own prop, I have included the disassembly photos with screw locations and sizes below. Note that the gun is off-brand Nerf.
View attachment 432832
View attachment 432833


Now it should be noted that when taking this gun apart there are few unique things. Firstly there are two triggers. The lower one retracts the two forward barrel casings. This is so that the gun can fire four bullets instead of four. If the barrel casings didn't move there would only be space for 2 barrels to fire. The second thing is that the two rear orange components are the slides. Consequently there are springs in them that make re-assembly difficult.
The last thing to note is that the lower barrel cover has a metal pin to hold it to the release mechanism. This pin is very small and I nearly lost it when I disassembled the gun. DONT LOOSE IT. It makes the Nerf part of the gun work. See photos below for details.

After disassembly I began to paint the pieces individually. The pains can be seen below. They are both pretty old, I have had them about a decade now.


After getting a solid silver coat I laid out the sections that would need a black coating.


I then removed the painters tape and began to reassemble it. I decided not to take apart or paint the core for two reasons. The mechanism seemed more complicated than other Nerf guns I have disassembled and I didn't want to be unable to get it working again. Also I had already spent a lot of time on the project.

Ok, now its half way done! Just got to do all the detailing. I worked to scuff the edges I knew would get worn on a real weapon. The back edges I sanded off the black paint to reveal the silver underneath. I did this on most of the black edges.


As you can see I also did other detailing work on the rest of the black areas. I went to my tool box and picked out a pair o needle-nosed pliers and a pair of vice grips. The vice grips made the large, wide scratches by running the head sideways on the gun. The needle-nosed pliers made long thin scratches with the needles. All over I used sand paper to give it a coat of wear.
Finally I took the gun apart again and coated all the painted parts in a clear coat which would give the gun a more metallic shiny feel and keep the paint job from being unintentionally damaged.


You might notice the bright orange barrels are now wrapped in gaffers tape/electrical tape.


Tada, a finished project. Took me about a month and a half but for anyone with time on their hands it should only take a few days. I could only paint 2-3 times a week and each color was 3-4 coats. Questions? Comments? Leave them below and thanks for reading.
I would like to thank this thread for the help on my project:
http://www.therpf.com/f78/star-lord-w-lights-sound-hair-blaster-progress-221724/
And here are some other good ones to check out:
http://www.therpf.com/f78/star-lord-helmet-accessories-helagak-208660/index9.html
http://www.guardthegalaxy.com/2013/09/cool-stuff-star-lords-guns-replicas.html
http://www.adafruit.com/blog/2014/09/03/an-awesome-lady-star-lord/
First off here are the source photos. I think its only fair to include these for people who are trying to make their own props for Star Lord or GOTG.
At this point I should include a note for anyone who is just starting a Star Lord project that there are a lot of photos out there of the pre-movie blaster designs. Yes they developed a design, took photos, those photos got on forums, and then they used a different design for the movie. Be careful avoid these as, if you use them, your prop will not be movie accurate and people will complain. I almost made this mistake. I have included one inaccurate photo below.
NOT ACCURATE PHOTO
PHOTO NOT ACCURATE
Note that the coloring is wrong in a few spots and that the barrel length was decreased for the film. The film version also has a lot more wear. It is not nearly so shiny.
Now that that is out of the way....
I started by looking around for a good starter prop. Unfortunately GOTG has not had the hell merchandised out of it like other Marvel films. I didn't want to start from scratch on this gun because of all the odd shapes but it was hard to find a good starter prop (read: toy guns).
Finally I found this at Toys-R-Us
View attachment 432828
Its obviously the wrong colors but it has the shapes right.
View attachment 432829
I began by taking off all the orange exterior pieces. For anyone who plans to use the same toy, or wants to use this thread to make their own prop, I have included the disassembly photos with screw locations and sizes below. Note that the gun is off-brand Nerf.
View attachment 432832
View attachment 432833
Now it should be noted that when taking this gun apart there are few unique things. Firstly there are two triggers. The lower one retracts the two forward barrel casings. This is so that the gun can fire four bullets instead of four. If the barrel casings didn't move there would only be space for 2 barrels to fire. The second thing is that the two rear orange components are the slides. Consequently there are springs in them that make re-assembly difficult.
The last thing to note is that the lower barrel cover has a metal pin to hold it to the release mechanism. This pin is very small and I nearly lost it when I disassembled the gun. DONT LOOSE IT. It makes the Nerf part of the gun work. See photos below for details.
After disassembly I began to paint the pieces individually. The pains can be seen below. They are both pretty old, I have had them about a decade now.
After getting a solid silver coat I laid out the sections that would need a black coating.
I then removed the painters tape and began to reassemble it. I decided not to take apart or paint the core for two reasons. The mechanism seemed more complicated than other Nerf guns I have disassembled and I didn't want to be unable to get it working again. Also I had already spent a lot of time on the project.
Ok, now its half way done! Just got to do all the detailing. I worked to scuff the edges I knew would get worn on a real weapon. The back edges I sanded off the black paint to reveal the silver underneath. I did this on most of the black edges.
As you can see I also did other detailing work on the rest of the black areas. I went to my tool box and picked out a pair o needle-nosed pliers and a pair of vice grips. The vice grips made the large, wide scratches by running the head sideways on the gun. The needle-nosed pliers made long thin scratches with the needles. All over I used sand paper to give it a coat of wear.
Finally I took the gun apart again and coated all the painted parts in a clear coat which would give the gun a more metallic shiny feel and keep the paint job from being unintentionally damaged.
You might notice the bright orange barrels are now wrapped in gaffers tape/electrical tape.
Tada, a finished project. Took me about a month and a half but for anyone with time on their hands it should only take a few days. I could only paint 2-3 times a week and each color was 3-4 coats. Questions? Comments? Leave them below and thanks for reading.
I would like to thank this thread for the help on my project:
http://www.therpf.com/f78/star-lord-w-lights-sound-hair-blaster-progress-221724/
And here are some other good ones to check out:
http://www.therpf.com/f78/star-lord-helmet-accessories-helagak-208660/index9.html
http://www.guardthegalaxy.com/2013/09/cool-stuff-star-lords-guns-replicas.html
http://www.adafruit.com/blog/2014/09/03/an-awesome-lady-star-lord/