I've had some time to visit this project and I 'm starting the thread over with some additional content and pics of the build.
This thread is covering the creation of a Super Dimension Cavalry Southern Cross A.T.A.C. armor suit.

I wanted to push my foam building skills and thought this would be a great challenge. I want to create the entire suit in foam - no resin casts, no 3D printing, all foam.
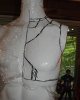
I began with the chest and will, for the most part, work my way down. I'm making all the templates for the pieces myself - no pre-designed files - so I got started by making a tape cast of my form and sketching out the rough details for the chest and neck pieces.


I cut the neck pieces first. The front and back pieces (and rough estimates of the sides) were cut from 1/4" craft foam. The bevel details were cut into the pieces and they were then heated and shaped. The pieces were taped together on the form to rough out the area where the rest of the chest armor needed to fit.


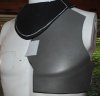
The base pieces for the chest were cut from 1/2" EVA foam mats. I wanted to test using a few seams as possible on this project, so the front is cut in 2 pieces and the back is one solid piece. I drew out the lines on the template that mapped the lines where the chest curves needed to be. I then used under cuts on the back side of the foam to create the chest lines without having to use separate pieces. The pieces were then heated and shaped over my form to create the right fit. The back was heated in the oven and shaped over the form to create the center back curve as well as the curves on the sides and upper back.


I then used 2mm craft foam to cut and contact cement the details pieces onto the chest and back. The angular tabs on the sides of the front were cut from 1/2" EVA. and glued in place.


This thread is covering the creation of a Super Dimension Cavalry Southern Cross A.T.A.C. armor suit.

I wanted to push my foam building skills and thought this would be a great challenge. I want to create the entire suit in foam - no resin casts, no 3D printing, all foam.
I began with the chest and will, for the most part, work my way down. I'm making all the templates for the pieces myself - no pre-designed files - so I got started by making a tape cast of my form and sketching out the rough details for the chest and neck pieces.


I cut the neck pieces first. The front and back pieces (and rough estimates of the sides) were cut from 1/4" craft foam. The bevel details were cut into the pieces and they were then heated and shaped. The pieces were taped together on the form to rough out the area where the rest of the chest armor needed to fit.


The base pieces for the chest were cut from 1/2" EVA foam mats. I wanted to test using a few seams as possible on this project, so the front is cut in 2 pieces and the back is one solid piece. I drew out the lines on the template that mapped the lines where the chest curves needed to be. I then used under cuts on the back side of the foam to create the chest lines without having to use separate pieces. The pieces were then heated and shaped over my form to create the right fit. The back was heated in the oven and shaped over the form to create the center back curve as well as the curves on the sides and upper back.


I then used 2mm craft foam to cut and contact cement the details pieces onto the chest and back. The angular tabs on the sides of the front were cut from 1/2" EVA. and glued in place.


Attachments


Last edited:


") Eager to see the next update!
Eager to see the next update!


