CSMacLaren
Sr Member
An RPF Vader-Centric Exclusive
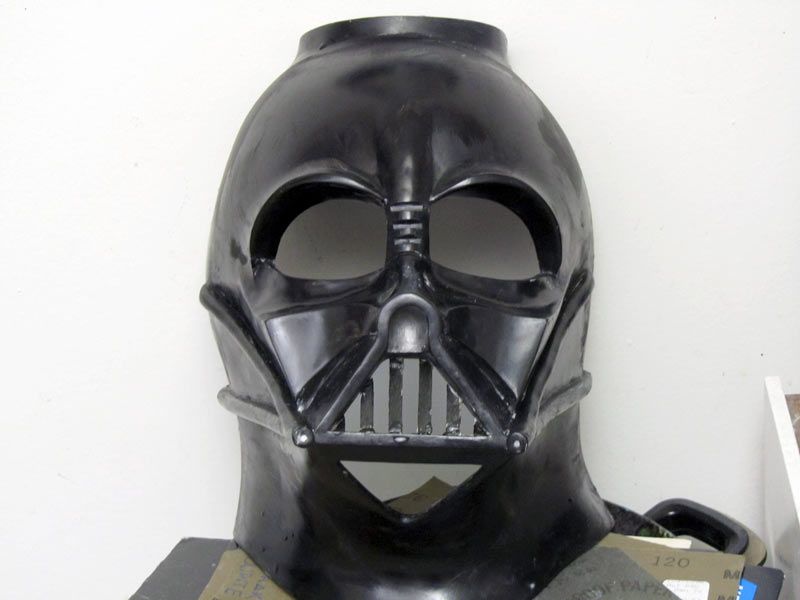
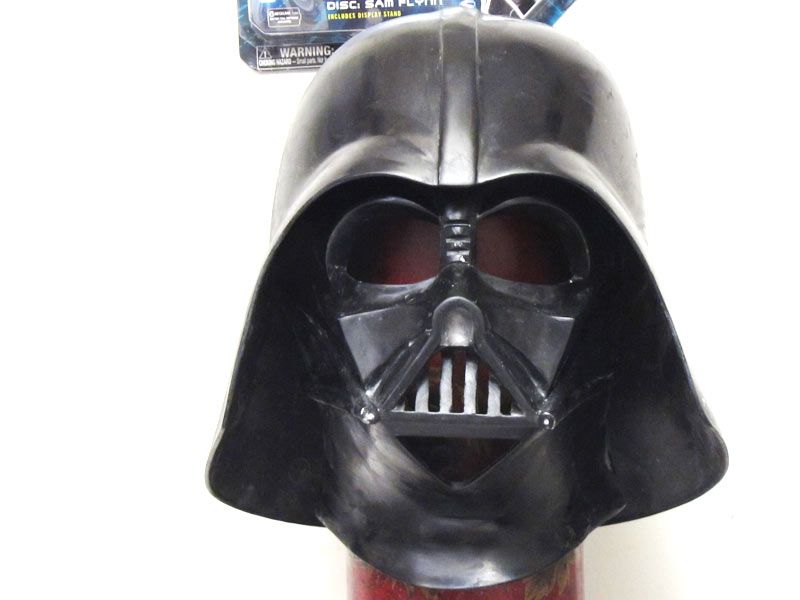
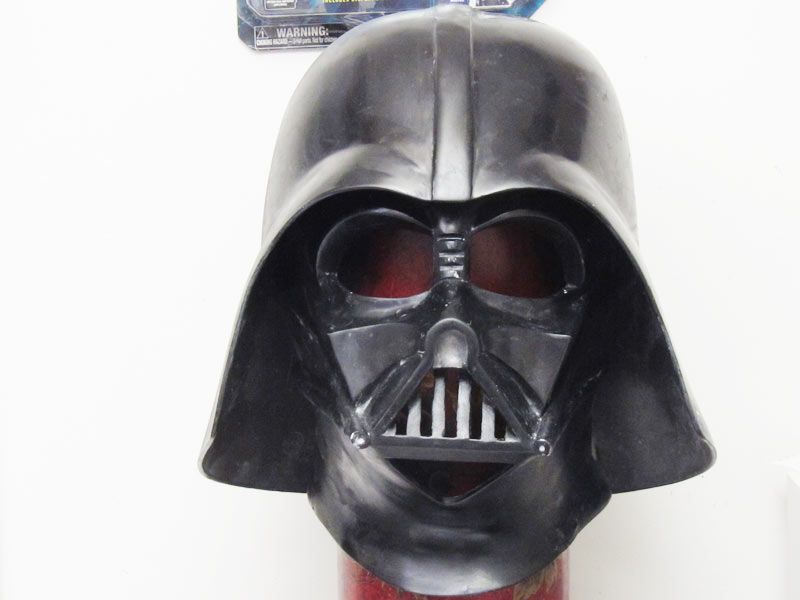
So hello! If I were to show you a face like this, could you guess what it was? Cast off original? 20th Century? Don Post Deluxe? Better? Worse?
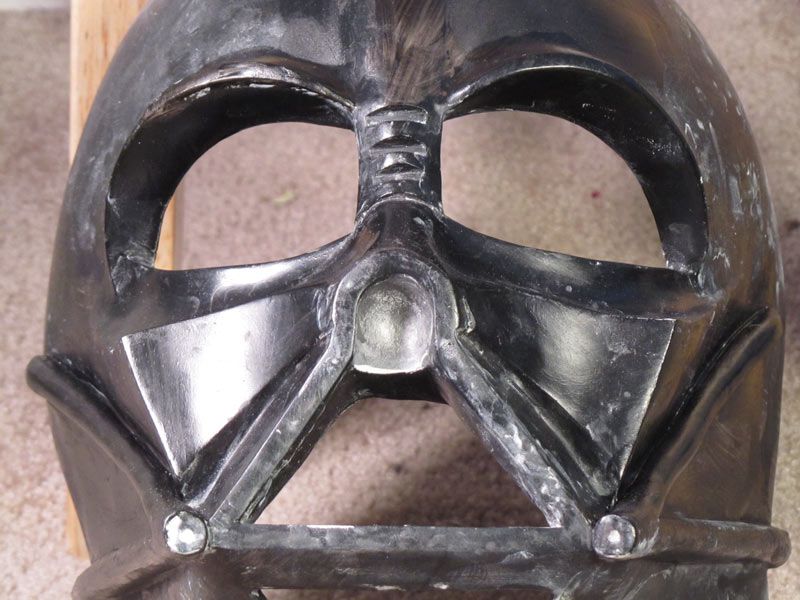
The above is a face resculpt over the plastic abortion known as the Rubie's Supreme Vader. It's technically also the Rubie's Deluxe Vader but nobody calls is that because, as part of the complete Darth Vader Supreme costume by Rubie's Costume Company, it's been nicknamed the "Rubie's Supreme."
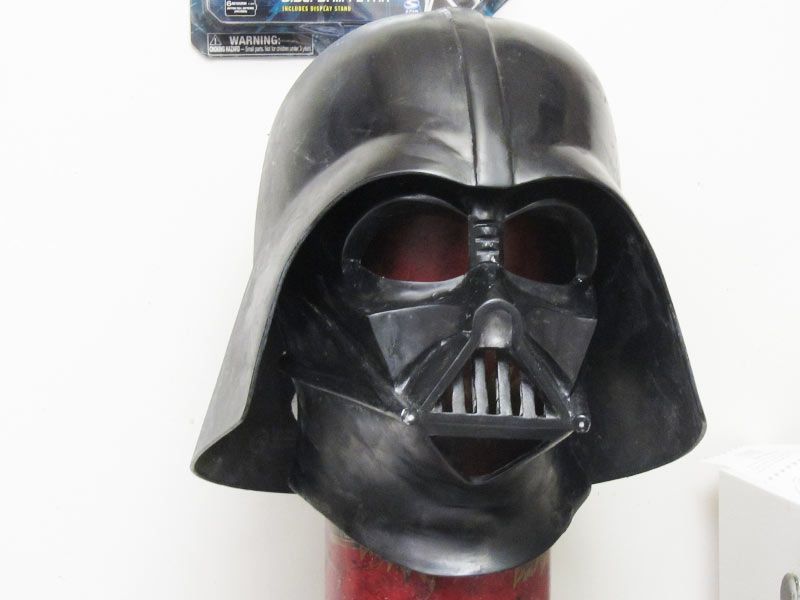
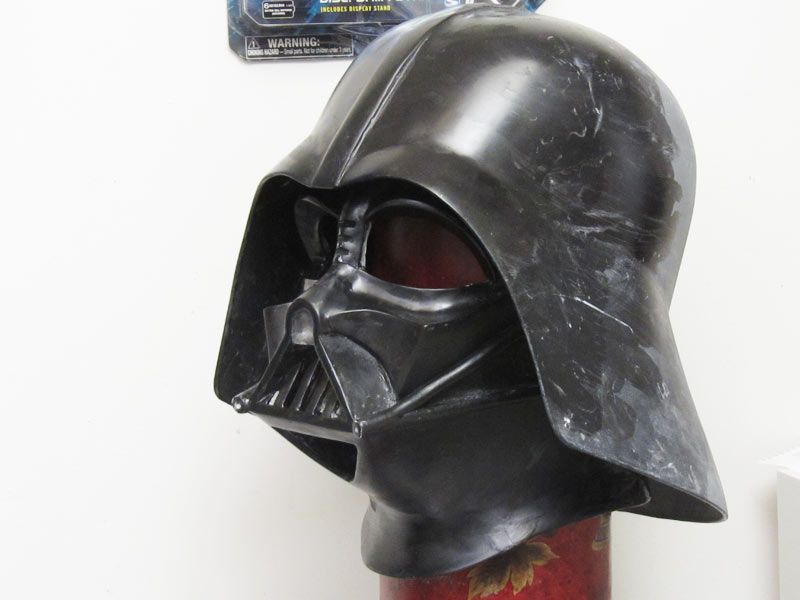
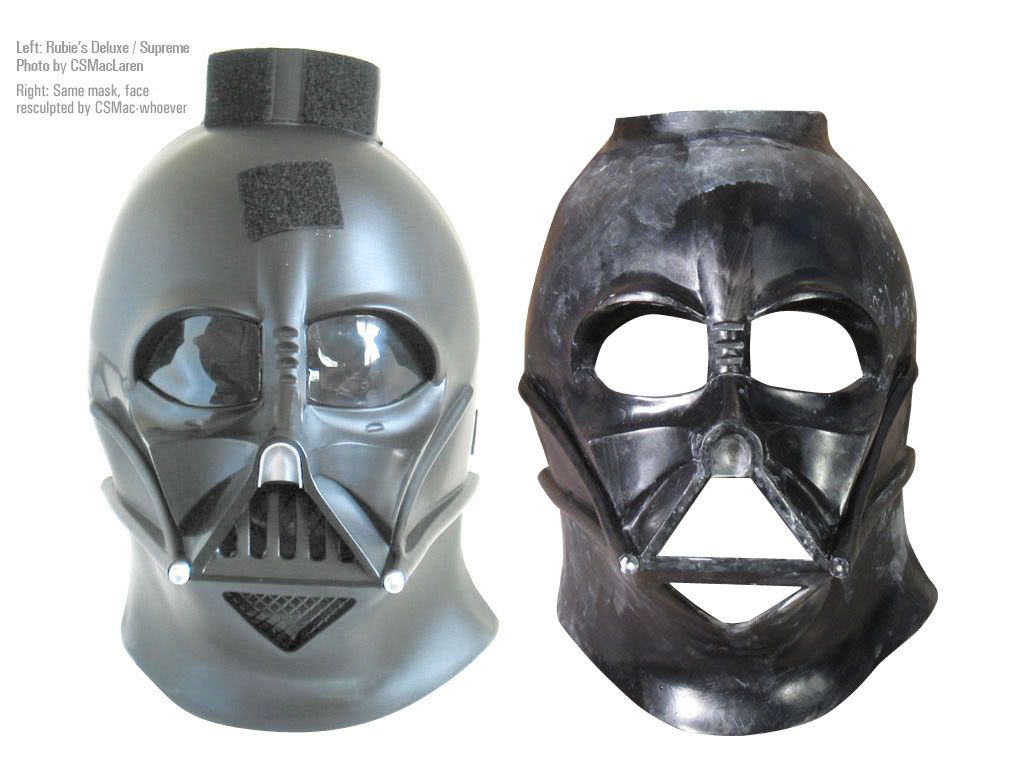
Still don't believe me? Here is a side by side comparison with a stock condition Rubie's:
THE STORY
I was about to throw this mask away until a friend spoke up and said he wanted it. I was originally doing a ROTS conversion to it, but my scratchbuilt ROTS (thread here: http://www.therpf.com/f62/sculpting-rots-vader-159885/) really started to take off, and now it's far accurate than how the Rubie's which is now far more accurate than the Rubies could ever be. I also learned a LOT about the ROTS and my work to make the Rubie's approximate the ROTS was crude in comparison.
My buddy marveled at it and asked, "What if this could be turned into a Halloween helmet?" I told him it WAS a Halloween helmet, but he said, "One that lightweight but with some accurate features."
Oh no... the Dark Side of the Force started reaching out to me. You guys know how much I hate this plastic. It gets everywhere. It doesn't wash down the kitchen sink nicely. But something about this appealed to me.
Now you know me... mere modification doesn't do it for me.
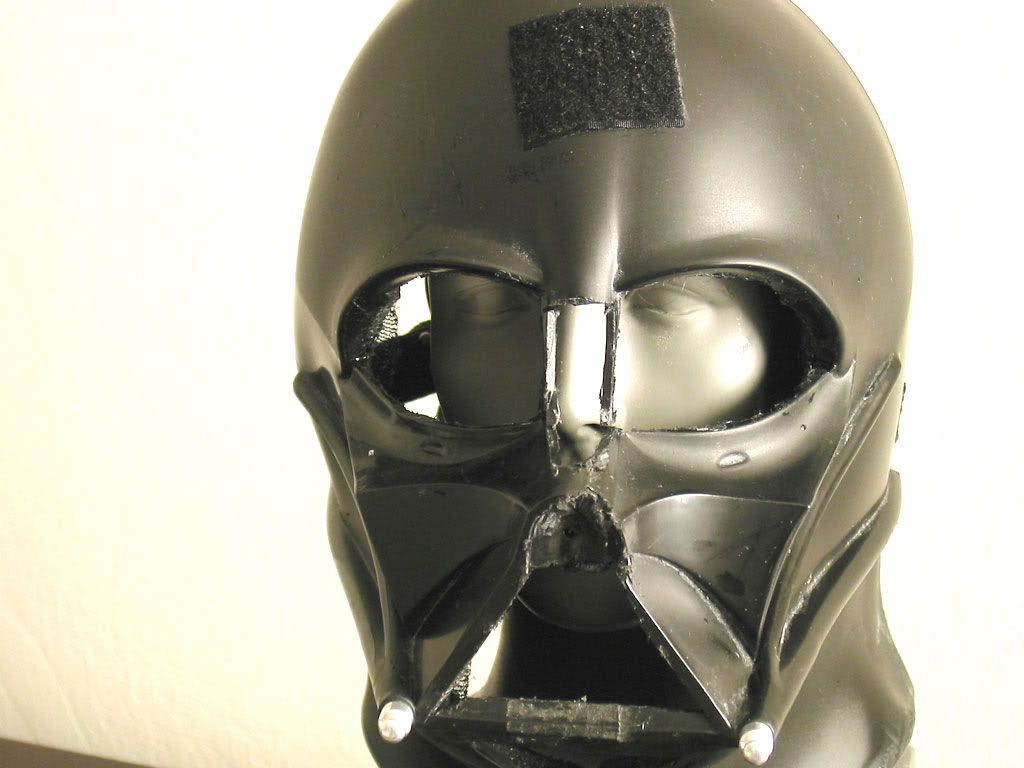
So I started using the ol' Dremel disc and got rid of the teeth bars, whiskers, etc.
Current progress:

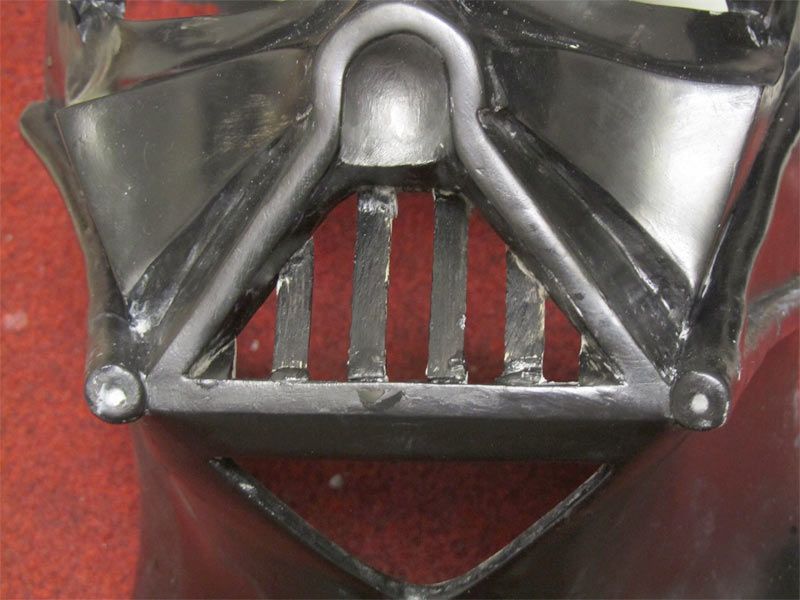
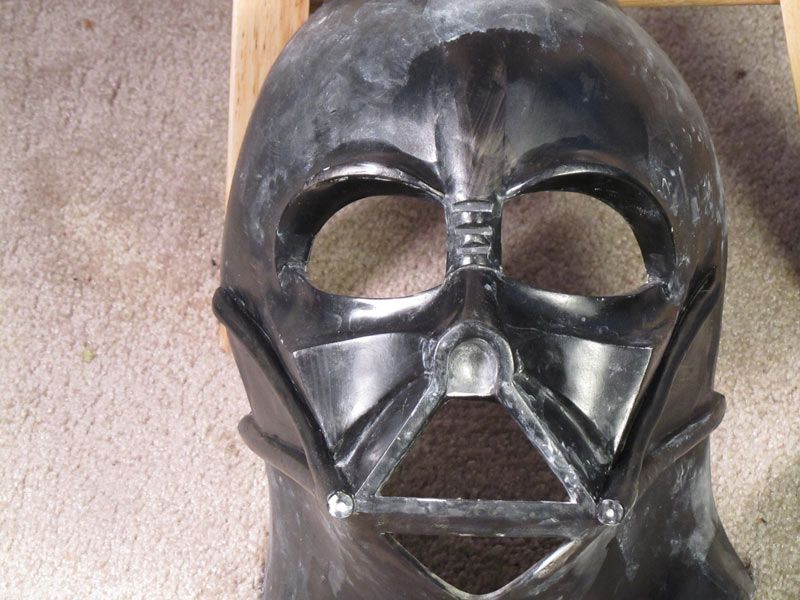
So that you interpret the photo above properly, the face is essentially replaced and sculpted over. As I sand and sculpt, I found it helpful to use some acrylic paint. While it unfortunately adds texture that needs to be sanded, it gives me a chance to see if the surface looks right without the toxicity of automotive paint. However, I only wet sanded a touch to show you white on black. Some of my previous generation rework is black. Black on black can be misinterpreted. Moreover, I did not fully wet sand all the surfaces. Those areas that show white are still under black paint. But you get the idea. There are 15 areas addressed (see list below).
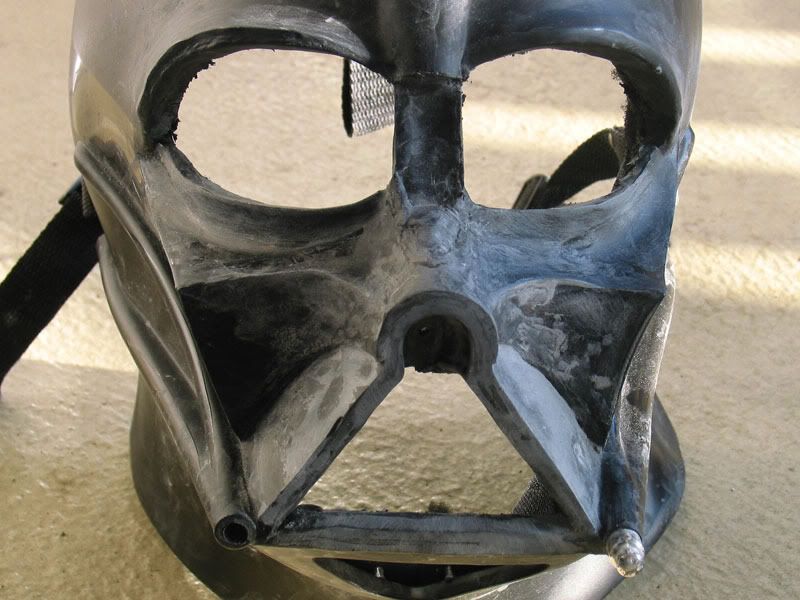
As you can see from the above thumbs, I had already ground out a lot of plastic and replaced it with black two-part clay. Then I went back to undo the ROTS work to convert it back to OT.
Areas impacted:
1. Eyebrows - Surprised look is now angry look
2. Frown bump - Bumparoo
3. Nose bridge - Resculpted
4. Nose arch - Resculpted
5. Nose "U" tip - Resculpted
6. Upper cheeks - More kissable.
7. Forward-facing cheeks & whiskers - Brand new!
8. Cheek-to-nose-side transition - Resculpted
9. Mouth walls - Proper thickness
10. Teeth - WIP, making new teeth
11. Chin Triangle - Resculpted
12. Neck - Made more elegant (left it wide as I have no idea what armor it will be paired with)
13. Side of face - Resculpted
14. Upper Tubes - Resculpted
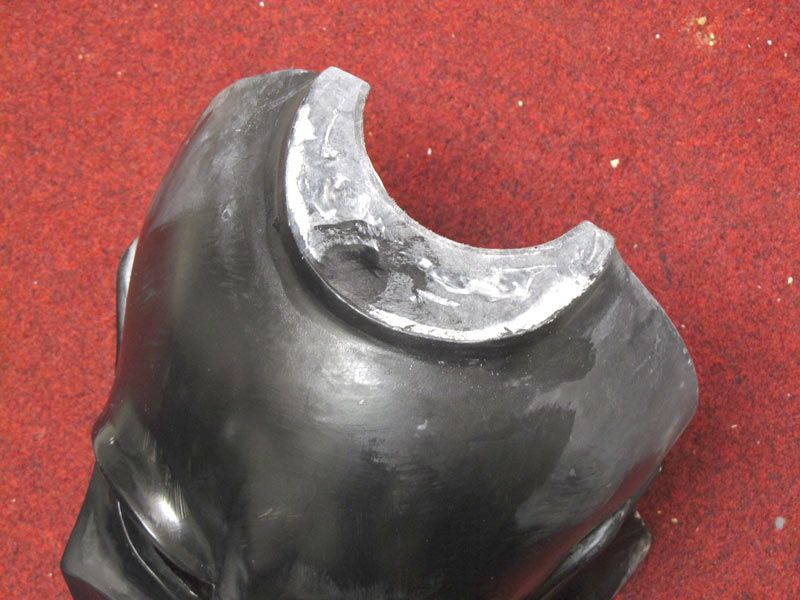
15. Mounting system - Cut down mount and added material around the stump. For now....
I'm making the point of this being a resculpt in key areas because the original surface has been gone, so I'm outright replacing the original structure. I felt in certain cases such as the whiskers and eyes that the original structure became difficult to work with, and I might as well do it so it can have a more organic look.
I love the results! I'm not really trying to restore it to a Don Post or a 20th Century, although I keep a 20th Cent around and the ESB Promo Poster Vader (which is an ANH configuration) as a quick reference, so undoubtedly these two will have some influence as I work.
I have thus far left the lower tubes in. My original extensive modification involved cutting those tubes away so that they didn't reach the rear opening. However, that means the plastic has a break or discontinuity, and if flexed, it can harm the two part clay and break off. I've left that in there for now. My buddy loves my accuracy work, but what people don't see when the mask is under the dome won't kill anyone....
Oh yes, the dome. I kinda threw it away. No, actually, I threw it away, period. But fortunately t I managed to find a Rubie's helmet in the Classifieds so let's see if that pairs okay. I have not yet figured out the dome mounting system just yet.
Next on Mac: scratch-building the teeth! :facepalm
(P.S. I know we call this a "Rubies Supreme Vader" but I just looked the company up on the website, and there's an actual apostrophe in "Rubie's").
So hello! If I were to show you a face like this, could you guess what it was? Cast off original? 20th Century? Don Post Deluxe? Better? Worse?
The above is a face resculpt over the plastic abortion known as the Rubie's Supreme Vader. It's technically also the Rubie's Deluxe Vader but nobody calls is that because, as part of the complete Darth Vader Supreme costume by Rubie's Costume Company, it's been nicknamed the "Rubie's Supreme."
Still don't believe me? Here is a side by side comparison with a stock condition Rubie's:
THE STORY
I was about to throw this mask away until a friend spoke up and said he wanted it. I was originally doing a ROTS conversion to it, but my scratchbuilt ROTS (thread here: http://www.therpf.com/f62/sculpting-rots-vader-159885/) really started to take off, and now it's far accurate than how the Rubie's which is now far more accurate than the Rubies could ever be. I also learned a LOT about the ROTS and my work to make the Rubie's approximate the ROTS was crude in comparison.
My buddy marveled at it and asked, "What if this could be turned into a Halloween helmet?" I told him it WAS a Halloween helmet, but he said, "One that lightweight but with some accurate features."
Oh no... the Dark Side of the Force started reaching out to me. You guys know how much I hate this plastic. It gets everywhere. It doesn't wash down the kitchen sink nicely. But something about this appealed to me.
Now you know me... mere modification doesn't do it for me.
So I started using the ol' Dremel disc and got rid of the teeth bars, whiskers, etc.
Current progress:
So that you interpret the photo above properly, the face is essentially replaced and sculpted over. As I sand and sculpt, I found it helpful to use some acrylic paint. While it unfortunately adds texture that needs to be sanded, it gives me a chance to see if the surface looks right without the toxicity of automotive paint. However, I only wet sanded a touch to show you white on black. Some of my previous generation rework is black. Black on black can be misinterpreted. Moreover, I did not fully wet sand all the surfaces. Those areas that show white are still under black paint. But you get the idea. There are 15 areas addressed (see list below).


As you can see from the above thumbs, I had already ground out a lot of plastic and replaced it with black two-part clay. Then I went back to undo the ROTS work to convert it back to OT.
Areas impacted:
1. Eyebrows - Surprised look is now angry look
2. Frown bump - Bumparoo
3. Nose bridge - Resculpted
4. Nose arch - Resculpted
5. Nose "U" tip - Resculpted
6. Upper cheeks - More kissable.
7. Forward-facing cheeks & whiskers - Brand new!
8. Cheek-to-nose-side transition - Resculpted
9. Mouth walls - Proper thickness
10. Teeth - WIP, making new teeth
11. Chin Triangle - Resculpted
12. Neck - Made more elegant (left it wide as I have no idea what armor it will be paired with)
13. Side of face - Resculpted
14. Upper Tubes - Resculpted
15. Mounting system - Cut down mount and added material around the stump. For now....
I'm making the point of this being a resculpt in key areas because the original surface has been gone, so I'm outright replacing the original structure. I felt in certain cases such as the whiskers and eyes that the original structure became difficult to work with, and I might as well do it so it can have a more organic look.
I love the results! I'm not really trying to restore it to a Don Post or a 20th Century, although I keep a 20th Cent around and the ESB Promo Poster Vader (which is an ANH configuration) as a quick reference, so undoubtedly these two will have some influence as I work.
I have thus far left the lower tubes in. My original extensive modification involved cutting those tubes away so that they didn't reach the rear opening. However, that means the plastic has a break or discontinuity, and if flexed, it can harm the two part clay and break off. I've left that in there for now. My buddy loves my accuracy work, but what people don't see when the mask is under the dome won't kill anyone....
Oh yes, the dome. I kinda threw it away. No, actually, I threw it away, period. But fortunately t I managed to find a Rubie's helmet in the Classifieds so let's see if that pairs okay. I have not yet figured out the dome mounting system just yet.
Next on Mac: scratch-building the teeth! :facepalm
(P.S. I know we call this a "Rubies Supreme Vader" but I just looked the company up on the website, and there's an actual apostrophe in "Rubie's").