Rogue One Moroff

jeddz

New Member
Hi i am jeddz member of the Southern Cross Garrison downunder, i dont usually post much stuff outside of my usual spots but have seen some great threads here and posts and thought why not share a little.

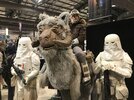
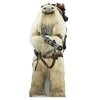
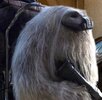
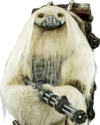
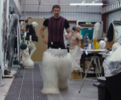
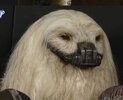
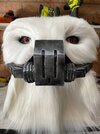
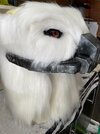
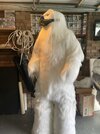
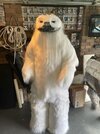
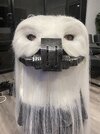
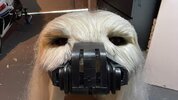
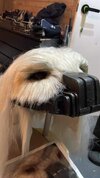
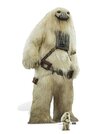
So after building my full scale Tauntaun that i troop in as Han Solo on Hoth i realized that i enjoyed the creature build side of things a lot and the challenge of doing new things and the unknown. So while there were many creature options in the galaxy i was drawn to Moroff after his brief appearance in Rogue One and then a cameo in Solo. The character itself to me was a mix between a Wampa which we already have 1 of in the garrison so no need for 2 and our beloved Chewie which we also have.

I have a lot of left parts, foam, wood, aluminum and fur and leather and bolts and list goes on from Tammy (Tauntauns name) so to use this up it was time to go Moroff.

Now i started with all the scouring of the internet like anyone else does and got as much reference material as possible and images, information and sat down to work this out. At the time there were no other Moroffs (now there are 1 or 2) but i wanted to do the build and keep as close to the screen version as possible.

So the way i set out about it -

1) height how to get to 7ft plus
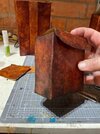
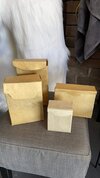
2) materials to use for frame - consider light weight and malleable
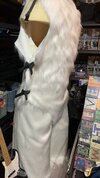
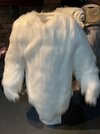
3) Materials for covering
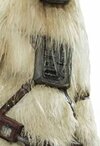
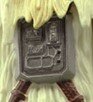
4) materials for greeblies and props
5) weathering
6) and so on as it changed so many times.

Concept -

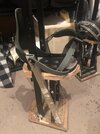
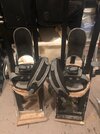
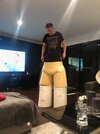
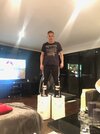
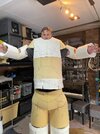
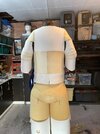
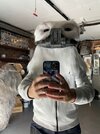
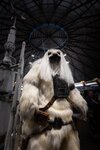
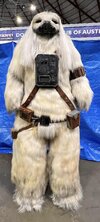
Moroff stood at 7ft 7inches once put together with actor and some additional padding, i am 5'10 at a push so i had to come up with a way to add almost 2 more feet. So the stilts were going to be the first and only option. Luckily i had a pair that i fabricated myself that were first attempt for Tauntaun but did not suit but for this worked well. They are very strong plenty of support at base for stability and some strapping around shins, very similar style to that used by wookies.

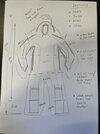
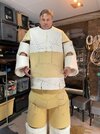
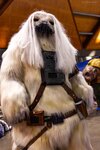
I did a mud map of what i thought would be best way and what materials in each section. Had to take into consideration putting on legs/stilts, then a full body followed by head. The use of soft foams and stiff foam in different sections was going to be key.

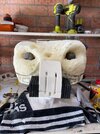
So lets start building
 

Attachments

  • IMG_9610.JPG
    IMG_9610.JPG
    3.1 MB · Views: 263
  • stilts.JPG
    stilts.JPG
    98.8 KB · Views: 133
  • stilts3.JPG
    stilts3.JPG
    97.4 KB · Views: 121
  • concept.jpg
    concept.jpg
    44.2 KB · Views: 132
Just some of the many reference pics i use as a template and ideas for the build. Can see actor in the leg test as separate section with body to be added, gave him alot of movement.

Fur was pure white before production weathering and color which is what i followed.
 

Attachments

  • Whyte-Costume.png
    Whyte-Costume.png
    95.6 KB · Views: 127
  • moroff chest box 2.jpg
    moroff chest box 2.jpg
    10.4 KB · Views: 116
  • Moroff.png
    Moroff.png
    289.8 KB · Views: 110
  • moroff side view.jpg
    moroff side view.jpg
    39.2 KB · Views: 114
  • Moroff 2.jpg
    Moroff 2.jpg
    39.8 KB · Views: 123
Definitely following this thread. A always thought Moroff, and really a lot of the background characters in Rogue One, needed more love. How Moroff hasn’t gotten a Black Series figure yet is beyond me.

Also, that’s a top notch job on the Hoth Han!
 
Definitely following this thread. A always thought Moroff, and really a lot of the background characters in Rogue One, needed more love. How Moroff hasn’t gotten a Black Series figure yet is beyond me.

Also, that’s a top notch job on the Hoth Han!
Agree completely, looking to pick up the box set of Moroff and Shoretrooper for reference but i also troop as a Shoretrooper which is cool
 

Attachments

  • 51013915317_e950cf4008_o.jpg
    51013915317_e950cf4008_o.jpg
    1.4 MB · Views: 71
So next update, I have made a couple of adjustments to the stilts after some consideration o how i put these on when complete.

My fear is if i have the legs as one complete part when i go to put on stilts and do up straps i may not be able to reach them and secure properly so what i decided to do is surround the lower half of stilts with solid foam then the upper thighs to hips as a soft foam sculpt. This will allow me to have the flexibility to get to straps without any problem, may change later when test full fits occur.
The plan is to have the fur cover the hips and thighs glued and in place permanently but the lower half be free. This is same type of setup as Chewie legs and stilts and will also give the flex i need when walking. The hips and thighs will be attached to a belt and brace style setup taking the weight similar to that of the real actor setup.
First test fit and movement was good, very stable and easy to stand and relax, without brace yet hips made walking tough but if lifted by hand to give space between lower and upper much easier. Also added permanent boots to stilts that fit tightly around foot as found with just shoes and straps didnt give me that snug fit.
 

Attachments

  • lift & hips.JPG
    lift & hips.JPG
    496.2 KB · Views: 98
  • lifts2.JPG
    lifts2.JPG
    407.3 KB · Views: 119
  • Whyte-Costume.png
    Whyte-Costume.png
    95.6 KB · Views: 102
Working on the shape and fit of Moroff, scale is going to be an important part of the process also. So with the legs being good i was happy with the weight, shape and fit. I will be adding the brace to hips soon but for the bulk of the body i went with a hard foam for the shoulders which gives me a good structure and also allows the form to sit on my own shoulders. FOr the gut i went with a soft foam which gives me some bend and movement if i need to move or bend over. the arms are a mix of rigid foam for main sections with soft foam again at the joint allowing bend.

Overall the fit is good so far and happy with the shape. Putting on the body is a real struggle as needs to slide over but very tight. Dont want to split this or have a joint as may cause some weakness or break in shape.

When i walk currently the hips are banging on the legs and make it harder to move, the straps should help this.

Not really that much in the way of form or build to this point as quite big and bulk but getting fur right will be the kicker that sets off the look. Have started to look into furs and covering.
 

Attachments

  • body build 3.jpg
    body build 3.jpg
    251.8 KB · Views: 80
  • body build 2.jpg
    body build 2.jpg
    268.4 KB · Views: 77
  • body build 1.jpg
    body build 1.jpg
    263.6 KB · Views: 89
So decided to some work on the head and get away from body and foam for a while. Looking at the size and shape of the head i could not see a way to create this using any existing props, masks etc so had to start from scratch.

First thing i considered was how would fit my head and be stable and solid, so using a bike helmet i cut out inners and scalped the top to give it a lower profile as Moroffs head is very flat and wide. Second option was how to give him his snout as this will be key with shape and having the decoder mask that he wears. I took some aluminum flat strips and was able to bend and shape to a basic shape. Have to keep in mind the adding of foam and fur, hair etc in the mix otherwise could end up too big.
Using some small rigid foam create a basic shape and scale for the mask that i was happy with. Sits well on the head and also stable, i have considered a few options for the actual head itself and what material and think i will go with an expanding foam. With this i feel i can get a good surround on the head and carve as required to shape and sand. Also thinking this will be very lightweight, last thing that i am keeping in mind is vision? how will i see through this as it comes together. i think at this stage will be easier to build and work out by removing sections verse trying to put something in at the start to find in wrong locations or don't give right visibility.
 

Attachments

  • moroff face 2.jpg
    moroff face 2.jpg
    10.7 KB · Views: 78
  • moroff face 3.jpg
    moroff face 3.jpg
    19.3 KB · Views: 72
  • Moroff face.jpg
    Moroff face.jpg
    19.4 KB · Views: 70
  • head 1.jpg
    head 1.jpg
    97.8 KB · Views: 83
  • head 2.jpg
    head 2.jpg
    64.3 KB · Views: 92
  • head 3.jpg
    head 3.jpg
    65.4 KB · Views: 75
Using expanding foam i placed the head frame in a box and filled with spray foam and let dry. This gave me a solid square to carve the required shape on. Worked very well and gave me the ability to cut easily and work slowly and safely. Trick i found was to go very slow and not remove too much at once, also had to keep in mind that fur and hair would add another level.
After having the basic shape and size i worked on the eyes, here i just punched out the holes for placement then used plastic domes as the eye and slid behind. I used some black leather as the eyelids as gave a more realistic look and feel, the reference materials showed eyeballs as being black with a brown eye, this was also seen in the production model.
Started working on the shape of the decoder mask and how this would fit to the frame itself, still keeping in mind during build and test fits where i might be able to see from. At this point the head sits so that if i position the mask right i will see through the 2 slits on the mask.
 

Attachments

  • head 4.jpg
    head 4.jpg
    62.9 KB · Views: 62
  • head 5.jpg
    head 5.jpg
    74.8 KB · Views: 50
  • head 6.jpg
    head 6.jpg
    72 KB · Views: 60
  • head 7.jpg
    head 7.jpg
    71.1 KB · Views: 63
  • head 8.jpg
    head 8.jpg
    85.2 KB · Views: 85
So have added the fur to the head except for scalp as will need to find a wig or hair that is long enough to flow from top of scalp to past shoulders. Once i have the whole build together will get a better idea of what length is required to achieve complete look.

When putting on the fur was essential to follow the direction of fur so that it sits nicely on the face and follows the contours to give it that more detailed look and also when styling to match the screen images from production. The neck covering will also be trimmed up once i can do a full fit with body so to have only the length needed to hide my neck behind.

Fitting was good and snug with the bike helmet inside and vision worked out really well as i can see directly through both the 2 slits in the decoder mask and also from below the mask where there is 2 mesh holes as seen in the production images and also where the crew used to blow air into suit between takes.
 

Attachments

  • Fur head 1.jpg
    Fur head 1.jpg
    67.6 KB · Views: 87
  • Fur head 2.jpg
    Fur head 2.jpg
    70.5 KB · Views: 81
  • Fur head.jpg
    Fur head.jpg
    65.5 KB · Views: 68
  • moroff face 2.jpg
    moroff face 2.jpg
    10.7 KB · Views: 74
For a bit of a change from foam and fur i thought would look at the chest box, based on research there were 2 versions of this box, or one version but with a slight difference. Neil Scanlon originally had a small screen on the chest box with a voice modulator that reacted to sounds around it and gave a soundwave look. This was changed later and the section with the screen was just given a flat look.
I will be going for the soundwave version as i think this will give an extra touch to the design and was the original design.

I used a cooking tin for the bulk of the box as gave the strength and right shape. I put some mdf board around the edges to give the lip and shaped corners. Look at the reference materials online as best as possible i tried to recreate the same knobs and lines as seen and think it came out well. I have the ability to have the screen if wanted or just the flat base (possibly a level 2 add on)

Trick will be adding the strapping also and how it all fits together on the body and scaled.
 

Attachments

  • chestbox 2.jpg
    chestbox 2.jpg
    189.5 KB · Views: 58
  • chestbox 3.jpg
    chestbox 3.jpg
    99.1 KB · Views: 53
  • chestbox 4.jpg
    chestbox 4.jpg
    81.9 KB · Views: 57
  • chestbox.jpg
    chestbox.jpg
    253.2 KB · Views: 74
  • production chest.jpg
    production chest.jpg
    14.5 KB · Views: 74
  • toy chest.jpg
    toy chest.jpg
    4.2 KB · Views: 51
So i have learnt a new skill, sewing and using a machine! LOL

I have gotten some white 3inch white fur from a local fabric shop after many searches and trials this seems to be the best option. Its actually called bigfoot fur so kind of fits the build. As Moroff is so big it was about the best method of putting on the fur and having it suitable for movement and wear. I have gone for 2 options, firstly i will be creating patterns from scratch to create the over suit/skin which will sit over the foam structure. Secondly i decided to glue the fur in only a few areas. Reason for this is in some areas when i bend of move i want the fur to be able to shift and move with this, if it is glued everywhere then i will lose the flexibility. i will be gluing the fur at the top of the arms to prevent sleeves slipping down but leave the rest free so bend at elbows is good. Top of legs and hips glued with leg sleeves to slide over stilts. The entire body is free and has been stitched like a t-shirt for movement.
Creating the patterns was a challenge and had to make several adjustments to get assistance i purchased a 5XXXL tshirt from a store and cut that up, used this as a starting point but worked well.
Overall Moroff will be in 5 pieces, Head, arms, body, hips and legs, the arms detach, hips and legs can be seperate pending fit and wear.
 

Attachments

  • fur fit.jpg
    fur fit.jpg
    185.9 KB · Views: 57
  • moroff body & legs furred.jpg
    moroff body & legs furred.jpg
    59 KB · Views: 61
  • moroff body furred side.jpg
    moroff body furred side.jpg
    49.5 KB · Views: 65
  • moroff body furred.jpg
    moroff body furred.jpg
    51.5 KB · Views: 68
So now i have the framework of the body and foaming, the fur attached and put in place and head almost complete (waiting on 100cm hair for top) thought was time for a fitting and test for comfort and flexibility.

Actually not too hard to get in and out of, very stable standing, cannot bend too well at the mid section so going to work on how i can make this more flexible and easier to wear. Overall good fit, shoulders sit perfectly on my own and head is firm and does not move around. Vision is also good through the created holes and slits in mask.

i will be moving to the weathering soon but will do some tests on what is the best way to get the desired look of wear and tear, have t get this right as dont want to ruin fur and start again.

Also will be moving to pouches and strapping now that i have the main body to use for scale and look as reference.
 

Attachments

  • test fit.jpg
    test fit.jpg
    68.7 KB · Views: 59
  • test fit 3.jpg
    test fit 3.jpg
    62.7 KB · Views: 55
  • strapping 8.jpg
    strapping 8.jpg
    57.7 KB · Views: 59
So luckily i had some left over leather from my Tauntaun build and was able to cut it into enough straps that should cover what i need for whole strap system. I also had some rawhide which was left, i soften the rawhide in some water and once soft i used some paper templates of the required pouches and cut out the patterns. I then folded hide into shape and let dry.
Once dry i cut tabs and glued them into final form, then i dyed them using a mix of dye, boot polish and paint for weathering. Pouch sizing was based off scale now i have full body in shape and can eyeball what size i think i need.
There are 4 pouches in total, a rear pouch (this will be designed to be removed so pack can be put on) the speaker pouch for his translator, a hip pouch which hangs on leg and the front side pouch with a metal type framing on. Tough to get real sizing and close up images based on reference images on the internet but think they turned out ok now just to work on the strapping.
 

Attachments

  • pouches.jpg
    pouches.jpg
    76.7 KB · Views: 31
  • pouches 5.jpg
    pouches 5.jpg
    315.7 KB · Views: 31
  • pouches 4.jpg
    pouches 4.jpg
    109.5 KB · Views: 31
  • pouches 3.jpg
    pouches 3.jpg
    61.5 KB · Views: 35
  • pouches 2.jpg
    pouches 2.jpg
    86.6 KB · Views: 33
  • strapping.jpg
    strapping.jpg
    327 KB · Views: 32
With the straps they are a cross over to the chest plate infront, the 2 shoulder straps go up over the shoulders and then to a 'Y' shape brace at the back with a large steel ring. 2 bottom straps join waist belt infront behind pouches.
Once i cut the straps i sewed a stitch line along each edge just to give a little more character and realism. Straps were joined to belts with split pins and some leather parts i bought. The studs and press studs were also belt pieces i bought from a local leather supply store, these seem to match what i can see and make it realistic.
Plan is to have whole strap system buckle at the back when kitting up, looking at options as building would not be able to have straps on body permanently as when putting on body they would become a problem. Belt straps go over shoulders the belt is brought round to back where belt is slide into back loop and press studs to fasten.
Chestbox sits nicely but has be kept in position to stop sliding, scale of chectbox is based off of the images from Neal Scanlan studios using an iphone as the screen on front for voice wave.
 

Attachments

  • crl back pouch.jpg
    crl back pouch.jpg
    55 KB · Views: 47
  • crl back.jpg
    crl back.jpg
    57.4 KB · Views: 53
  • hip pouch crl.jpg
    hip pouch crl.jpg
    75.3 KB · Views: 71
  • speaker pouch crl.jpg
    speaker pouch crl.jpg
    85.5 KB · Views: 39
  • strapping 5.jpg
    strapping 5.jpg
    69.8 KB · Views: 35
  • strapping 6.jpg
    strapping 6.jpg
    58.7 KB · Views: 42

Your message may be considered spam for the following reasons:

If you wish to reply despite these issues, check the box below before replying.
Be aware that malicious compliance may result in more severe penalties.
Back
Top