About a month ago I started this project. I have always wanted to build a Boba Fett costume and have been a Fett fan since I was a kid. I am also a long time Ralph McQuarrie concept art fan. My son and I are really into building Lego together. So why not combine Lego and Star Wars. So I searched Boba Fett Lego mini figure and came across CGS1’s build for his 6 year old son on the Dented Helmet.
I figured since he had already done an amazing Lego version, why not do something slightly different. Most (non-RPF)people aren’t aware of the McQuarrie concept version of the Boba Fett suit that is all white like the Stormtrooper. My son thought this idea was awesome. Now I was pumped.
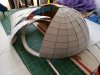
I figured if I started small it would either make it or break it, so I started building the helmet. I couldn’t find the right cardboard so I used cereal boxes(later I found the cardboard at an office supply store) . I found some great free plans online and printed out the pieces for layout. I used lots of paper and rubber cement.
I made the dome and then the lower portion of the helmet securing all of the pieces with hot glue. I used Foam-core for the side panels and for the port that holds the rangefinder to the helmet. I was constantly checking my helmet with the mini-figure for reference. Once the helmet was all solid and dry, I spoke to some friends about fiberglass. They suggested using short strand epoxy fiberglass for rigidity. My first batch of epoxy cured almost instantly. The second was a little better with les hardener. Once the shell had cured overnight I sanded the helmet and used Bondo to fill in all of the small holes. I sprayed the inside of the helmet black so you couldn’t tell it was made from cereal boxes.
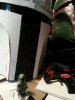
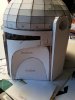
I went to a local Auto Tint shop and they donated a piece of window tint for the visor. I had explained what I was making and he was convinced it was really for me. I cut out the top of the T slot so I could see how it looked on.
The range finder I made from a egg carton, a paper towel tube, foam core and some hockey tape all hot glued together. Then epoxied, Bondo’ed and painted with primer.
Next was the body and legs. I took an old shipping box and made a mock up body, and used oak tag for the leg outer pieces, I had my son try it on to get the dimensions correct. I found ½ inch Foam-core at Michael’s that would work perfectly for the body. I glued all the pieces together with construction adhesive and let it cure overnight. I then used the epoxy fiberglass to strengthen all of the edges. After sanding, I used Bondo to fix the inconsistencies. Then painted multiple layers of white primer.
I used the same process for the legs. The legs I used construction insulation foam and foam-core. The insulation foam was nice to form with sand paper. I also used the foam for the jetpack. I found some Ice Tea bottles that looked perfect for the rocket boosters. The jetpack body was mainly foam-core that sandwiched foam. I used a swimming noodle for the 3 rockets and hand formed the rocket cones from foam. Lots and lots of sanding.
When the legs were done I sprayed them with Rustoleum flat white and forgot about the self-etching primer. On contact it started to dissolve the foam. DO NOT USE THIS ON FOAM without a layer of primer. I learned this the hard way and had to fill all of the sinkholes with epoxy and Bondo. What a mess!!
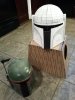
I painted everything with the white primer. The helmet had so much Bondo on it that the spray finish worked perfectly. I hot glued in the visor and painted the red triangle.
The armor on the chest I laid out on a piece of oak tag. After drafting all of the dimensions, I outlined everything in sharpie and then used a wide sharpie to get the wide dark look.
I tried to use the Lego style for the cape and cut a piece out of what fleece, not exactly to the Lego shape.
The hands were probably the hardest pieces. I went to the local home improvement store and found some large rubber pipe adapters that were cylindrical so they were the perfect dimensions. I cut them up and used some other adapters to make the wrist tubes and fit them together. I had seen some other people use drink cozies, but wasn’t able to find any. I spray painted the Lego hands white and sprayed some matte clear to seal them.
This was my first attempt at a costume of this scale. There are a few things I would do differently next time but all together it was a awesome experience. I know I need to work on the finer details and finishes. In the end, my son was psyched. To me that is all that matters. I know I have some things to work on when I start the next build.
About me: I am an artist, welder and creator. I make my kids a costume every year and have taught myself how to sew. I was also working on a costume for my daughter during this Fett build. Hers was totally different. She wanted to be Shoe the Boxtroll.
Most of my costume builds I will print out pictures or draw rough ideas for reference and inspiration. This way I can go back to them if something isn’t working and correct it. The Boba Fett costume I had a ton of reference material. With the Boxtroll costume I never saw the movie so all I had for reference were images available online.
It’s being a hero in your children’s eyes that make it all worth it. I‘m looking forward to the next project.


I figured since he had already done an amazing Lego version, why not do something slightly different. Most (non-RPF)people aren’t aware of the McQuarrie concept version of the Boba Fett suit that is all white like the Stormtrooper. My son thought this idea was awesome. Now I was pumped.
I figured if I started small it would either make it or break it, so I started building the helmet. I couldn’t find the right cardboard so I used cereal boxes(later I found the cardboard at an office supply store) . I found some great free plans online and printed out the pieces for layout. I used lots of paper and rubber cement.
I made the dome and then the lower portion of the helmet securing all of the pieces with hot glue. I used Foam-core for the side panels and for the port that holds the rangefinder to the helmet. I was constantly checking my helmet with the mini-figure for reference. Once the helmet was all solid and dry, I spoke to some friends about fiberglass. They suggested using short strand epoxy fiberglass for rigidity. My first batch of epoxy cured almost instantly. The second was a little better with les hardener. Once the shell had cured overnight I sanded the helmet and used Bondo to fill in all of the small holes. I sprayed the inside of the helmet black so you couldn’t tell it was made from cereal boxes.
I went to a local Auto Tint shop and they donated a piece of window tint for the visor. I had explained what I was making and he was convinced it was really for me. I cut out the top of the T slot so I could see how it looked on.
The range finder I made from a egg carton, a paper towel tube, foam core and some hockey tape all hot glued together. Then epoxied, Bondo’ed and painted with primer.
Next was the body and legs. I took an old shipping box and made a mock up body, and used oak tag for the leg outer pieces, I had my son try it on to get the dimensions correct. I found ½ inch Foam-core at Michael’s that would work perfectly for the body. I glued all the pieces together with construction adhesive and let it cure overnight. I then used the epoxy fiberglass to strengthen all of the edges. After sanding, I used Bondo to fix the inconsistencies. Then painted multiple layers of white primer.
I used the same process for the legs. The legs I used construction insulation foam and foam-core. The insulation foam was nice to form with sand paper. I also used the foam for the jetpack. I found some Ice Tea bottles that looked perfect for the rocket boosters. The jetpack body was mainly foam-core that sandwiched foam. I used a swimming noodle for the 3 rockets and hand formed the rocket cones from foam. Lots and lots of sanding.
When the legs were done I sprayed them with Rustoleum flat white and forgot about the self-etching primer. On contact it started to dissolve the foam. DO NOT USE THIS ON FOAM without a layer of primer. I learned this the hard way and had to fill all of the sinkholes with epoxy and Bondo. What a mess!!
I painted everything with the white primer. The helmet had so much Bondo on it that the spray finish worked perfectly. I hot glued in the visor and painted the red triangle.
The armor on the chest I laid out on a piece of oak tag. After drafting all of the dimensions, I outlined everything in sharpie and then used a wide sharpie to get the wide dark look.
I tried to use the Lego style for the cape and cut a piece out of what fleece, not exactly to the Lego shape.
The hands were probably the hardest pieces. I went to the local home improvement store and found some large rubber pipe adapters that were cylindrical so they were the perfect dimensions. I cut them up and used some other adapters to make the wrist tubes and fit them together. I had seen some other people use drink cozies, but wasn’t able to find any. I spray painted the Lego hands white and sprayed some matte clear to seal them.
This was my first attempt at a costume of this scale. There are a few things I would do differently next time but all together it was a awesome experience. I know I need to work on the finer details and finishes. In the end, my son was psyched. To me that is all that matters. I know I have some things to work on when I start the next build.
About me: I am an artist, welder and creator. I make my kids a costume every year and have taught myself how to sew. I was also working on a costume for my daughter during this Fett build. Hers was totally different. She wanted to be Shoe the Boxtroll.
Most of my costume builds I will print out pictures or draw rough ideas for reference and inspiration. This way I can go back to them if something isn’t working and correct it. The Boba Fett costume I had a ton of reference material. With the Boxtroll costume I never saw the movie so all I had for reference were images available online.
It’s being a hero in your children’s eyes that make it all worth it. I‘m looking forward to the next project.

")


