Podracer desert diorama

HMR

Active Member
Wanted to share a bit after being away for a while. So many posts to view and read up on! Seems like you people have been busy. :)

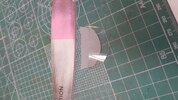
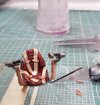
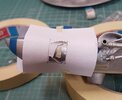
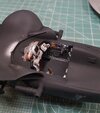
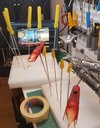
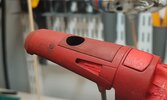
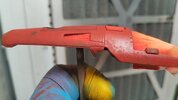
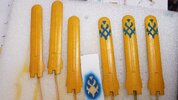
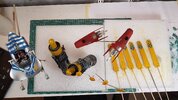
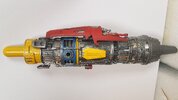
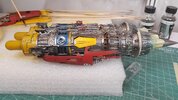
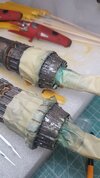
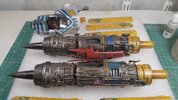
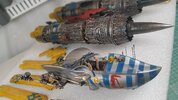
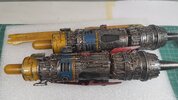
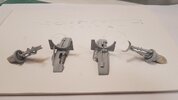
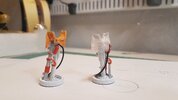
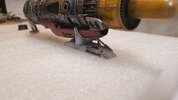
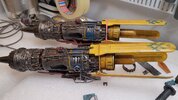
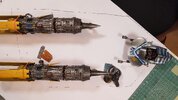
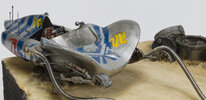
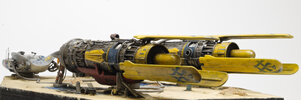
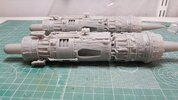
Got a really nice .stl file in late January 2021 to run my then new Anycubic Mono X through its paces, after dialing it in. I have to say, looking back at these pics it did a great job and turned out much cleaner than I expected and remembered.

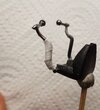
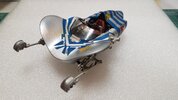
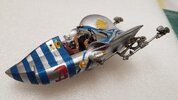
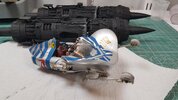
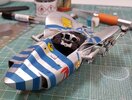
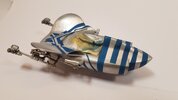
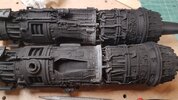
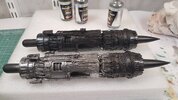
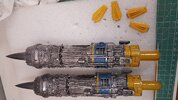
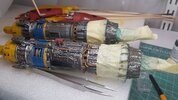
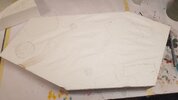
This build was a bit on and off for a long time. Finally got it done and had to pack it up for moving. I finally unpacked it last evening to get some photos. That led me to sort and backup years of other pictures and I found the pics from the build, that's slowly being transferred while I am typing.


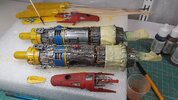
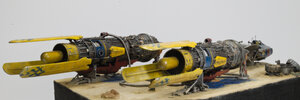
Hope you enjoy, more to come!
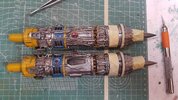
 

Attachments

  • 1 (1).jpg
    1 (1).jpg
    2.6 MB · Views: 126
  • 1 (2).jpg
    1 (2).jpg
    2.6 MB · Views: 119
  • 1 (3).jpg
    1 (3).jpg
    2.6 MB · Views: 116
  • 1 (4).jpg
    1 (4).jpg
    3.1 MB · Views: 115
  • 1 (5).jpg
    1 (5).jpg
    3.3 MB · Views: 139
Here's a bunch of pictures from painting and detailing the pod. I remember (and can clearly see) the small markings really kicked my ass. I went with making stencils from paper and maskingtape and did some freehand. :cautious: 
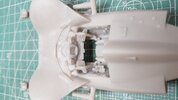
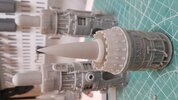
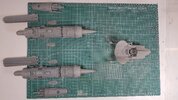
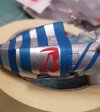
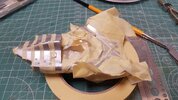
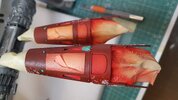
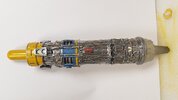
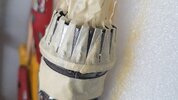
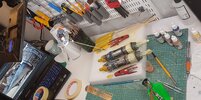
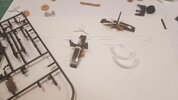
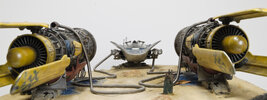
The results definately could have been better.

Had fun with all the buttons in the cockpit, trying not to overdo it. I later added wires and used guitar strings to resemble studs for the instrumentpanel.
I misted the now masked pod with a very precious hairspray.. got yelled at and had to go out and get my own. :rolleyes:

Made the windshield from a plastic bottle, with the printed one as a guide. Fit like a glove. The controls have what look like textile covers, so I made those from a layer of paper towel and soaked it with thinned PVA glue. Did the same to the seat.

I'm happy overall with the result and the resemblance to the real pod, but some lessons in there for sure.

Thanks for looking!
 

Attachments

  • 2 (35).jpg
    2 (35).jpg
    3.1 MB · Views: 113
  • 2 (38).jpg
    2 (38).jpg
    869.5 KB · Views: 107
  • 2 (40).jpg
    2 (40).jpg
    3.1 MB · Views: 99
  • 2 (43).jpg
    2 (43).jpg
    2.6 MB · Views: 106
  • 2 (44).jpg
    2 (44).jpg
    1 MB · Views: 91
  • 2(45).jpg
    2(45).jpg
    2.2 MB · Views: 101
  • 2 (33).jpg
    2 (33).jpg
    924.5 KB · Views: 107
  • 2 (31).jpg
    2 (31).jpg
    853.5 KB · Views: 106
  • 2 (27).jpg
    2 (27).jpg
    932.6 KB · Views: 92
  • 2 (25).jpg
    2 (25).jpg
    684.8 KB · Views: 87
  • 2 (24).jpg
    2 (24).jpg
    2.1 MB · Views: 85
  • 2 (18).jpg
    2 (18).jpg
    2.8 MB · Views: 83
  • 2 (15).jpg
    2 (15).jpg
    3.3 MB · Views: 88
  • 2 (10).jpg
    2 (10).jpg
    928.3 KB · Views: 98
Very cool! That windscreen turned out great!
The markings look great to me! Well done all around.

Thank you for the encouragement! :)


After the pod, the engines front and rear parts got joined. Required a fair bit of filing and sanding in and around other stuff. This is the worst kind of filing and sanding! Primed them with Mr Surfacer 1500 black and got some gloss clearcoat on with a lot of variance in the sheen... totally intended for the effects down the road, totally. Then shot all parts with some Alclad steel, polished aluminium and burnt metal where I imagined things would cook.

Everything was skewered, masked, hairsprayed and salted while the hairspray was sticky. This adds much flavour and many aromas to the hobbyshop. I grind table salt and seasalt to different granularities and go all mise en place on it... for the chipping, you know? This is getting weird.
If the salt is fine enough, the paint melts it and it leaves a kind of rough or crackled surface that takes weathering nicely, and adds to the (c)rust or worn paint effect.

I referenced and got inspiration from this fantastic model in César Villar Toro's album. Also got some stills from the movie for a nice blend. I usually don't gather enough reference material beforehand and waste benchtime searching around.

Anyways, thanks for stopping by!
 

Attachments

  • 1.jpg
    1.jpg
    2.8 MB · Views: 88
  • 4.jpg
    4.jpg
    2.4 MB · Views: 87
  • 7.jpg
    7.jpg
    2.4 MB · Views: 79
  • 8-1.jpg
    8-1.jpg
    1.1 MB · Views: 63
  • 9-1.jpg
    9-1.jpg
    518.6 KB · Views: 72
  • 10.jpg
    10.jpg
    2.5 MB · Views: 63
  • 12.jpg
    12.jpg
    2.7 MB · Views: 67
  • 17.jpg
    17.jpg
    3.6 MB · Views: 71
  • 18.jpg
    18.jpg
    3.3 MB · Views: 75
  • 20.jpg
    20.jpg
    3.5 MB · Views: 78
  • 21.jpg
    21.jpg
    1.3 MB · Views: 63
  • 22.jpg
    22.jpg
    2.4 MB · Views: 65
  • 23.jpg
    23.jpg
    2.4 MB · Views: 67
  • 24.jpg
    24.jpg
    3.8 MB · Views: 75
  • 25.jpg
    25.jpg
    2.7 MB · Views: 68
  • 26.jpg
    26.jpg
    3.4 MB · Views: 64
  • 27.jpg
    27.jpg
    897.3 KB · Views: 60
  • 28.jpg
    28.jpg
    2.8 MB · Views: 77
  • 29.jpg
    29.jpg
    3.3 MB · Views: 68
  • 30-1.jpg
    30-1.jpg
    1.2 MB · Views: 77
  • 31.jpg
    31.jpg
    3.2 MB · Views: 94
Here are the pictures from the last part of the build. I dreaded and postponed gluing the long fins on the front of the engines. The supports seemed very fragile and the fit was loose. Did not want them to go on crooked or droop in any way, so went with 5min epoxy and some rubber bands instead of CA, to be able to adjust them before it set.

After weathering, I got stuck on the idea of a pitstop or outdoors garage area, so I thought some stands or jacks were in order. A few evenings of kitbashing, and a pair I liked showed up.
I apparently did not get any pictures from making the base, only the rough layout. Tried different layouts, but all ended up feeling to long or wide, so I went with an odd shape to mitigate that a little bit. Made a few passes with the heatgun to get some "dunes" going.

Next up are the final shots.

Thanks for looking!
 

Attachments

  • 1.jpg
    1.jpg
    3.1 MB · Views: 83
  • 2.jpg
    2.jpg
    2.6 MB · Views: 91
  • 3.jpg
    3.jpg
    3.2 MB · Views: 83
  • 4.jpg
    4.jpg
    2.1 MB · Views: 75
  • 5.jpg
    5.jpg
    2 MB · Views: 75
  • 6.jpg
    6.jpg
    2.3 MB · Views: 75
  • 7.jpg
    7.jpg
    2.2 MB · Views: 85
  • 9.jpg
    9.jpg
    2.9 MB · Views: 85
  • 10.jpg
    10.jpg
    2.2 MB · Views: 67
  • 11.jpg
    11.jpg
    907.8 KB · Views: 72
  • 12.jpg
    12.jpg
    2.4 MB · Views: 77
Took me a second, lots of projects lately, but here are some of the final shots.
I'm quite pleased with the results overall.

Thanks for stopping by.
 

Attachments

  • 1.jpg
    1.jpg
    504.2 KB · Views: 127
  • 2.jpg
    2.jpg
    732.4 KB · Views: 120
  • 3.jpg
    3.jpg
    953.4 KB · Views: 116
  • 4.jpg
    4.jpg
    1.2 MB · Views: 114
  • 5.jpg
    5.jpg
    754.8 KB · Views: 111
  • 6.jpg
    6.jpg
    824.4 KB · Views: 124
Wow, great job, the whole thing looks very impressive. I am one of those few that actually love episode one. Great job.
 

Your message may be considered spam for the following reasons:

If you wish to reply despite these issues, check the box below before replying.
Be aware that malicious compliance may result in more severe penalties.
Back
Top