monker67
Well-Known Member
Hello All,
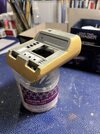
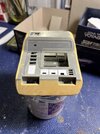
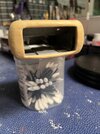
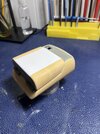
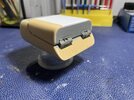
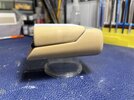
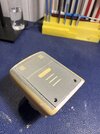
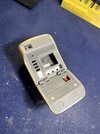
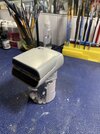
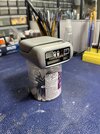
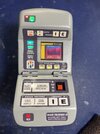
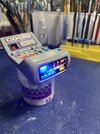
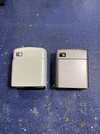
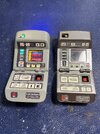
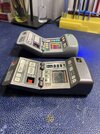
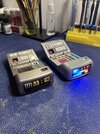
I have finished making my Playmates TNG Tricorder more accurate to the screen used prop. First thing was to disassemble and gut the tricorder body, once done the back panel was cut out and the battery cover cut into 2 pieces and one piece glued to the back panel. I assembled the main body and used Tamiya 2 part epoxy to re-contour the body. After lots of sanding painting was done with Tamiya spray paint then misted with silver and gloss coated for protection. I added an electronics kit I picked up on EBay and attached the lid. The final step was adding the graphics with double sided tape and I was done. I hope you enjoy the pictures.
I have finished making my Playmates TNG Tricorder more accurate to the screen used prop. First thing was to disassemble and gut the tricorder body, once done the back panel was cut out and the battery cover cut into 2 pieces and one piece glued to the back panel. I assembled the main body and used Tamiya 2 part epoxy to re-contour the body. After lots of sanding painting was done with Tamiya spray paint then misted with silver and gloss coated for protection. I added an electronics kit I picked up on EBay and attached the lid. The final step was adding the graphics with double sided tape and I was done. I hope you enjoy the pictures.
Attachments
-
 IMG_6836.jpeg1.6 MB · Views: 282
 -
 IMG_6837.jpeg1.6 MB · Views: 222
 -
 IMG_6840.jpeg1.5 MB · Views: 202
 -
 IMG_6852.jpeg2 MB · Views: 194
 -
 IMG_6854.jpeg2 MB · Views: 194
 -
 IMG_6853.jpeg1.8 MB · Views: 184
 -
 IMG_6858.jpeg1.7 MB · Views: 192
 -
 IMG_6856.jpeg2.3 MB · Views: 192
 -
 IMG_6867.jpeg2.1 MB · Views: 201
 -
 IMG_6868.jpeg2.2 MB · Views: 213
 -
 IMG_6870.jpeg1.7 MB · Views: 234
 -
 IMG_6871.jpeg1.6 MB · Views: 249
 -
 IMG_6873.jpeg2.7 MB · Views: 281
 -
 IMG_6874.jpeg2.5 MB · Views: 287
 -
 IMG_6875.jpeg2.2 MB · Views: 291
 -
 IMG_6876.jpeg2.2 MB · Views: 306