Rhoniland
New Member
My predator costume is based on the armor of the original 1987 movie. I'm only 5'1" so this is a pretty short predator and larger folks may have to use larger sheets of foam. I used very simple materials and methods to keep costs down. I'm all about "making it work" so I sought out my budget supplies and worked with what I had. I bought several large foam sheets (11"x14" or largest from craft stores) of different thickness. I ordered a cheap jumpsuit (about $8) and chose my skin color scheme based on it to reduce the amount of body suit painting. I bought several odds and ends from Dollar Tree (sunglasses, 2 small battery led string lights, 1 white, 1 blue; foam knee pads; long shoe laces; costume hockey mask; small three-led light keychain; plastic Halloween skull; mini skulls and bones if you can find it; mesh tube ribbon in black). Other materials I bought or pulled together were old ballet flats; wire hangers; plastic clasps (2); jute rope; stiff cardboard tubes; foam pipe insulation or foam noodles; thick nylon belting; suede like fabric (1/4 yard); 1 inch elastic; toy reticulated wood snake; heavy duty Velcro; plastic spoons; stuffing; and beans/rice/bead for filler. This costume is lots of foam sheets, hot glue, and paint.
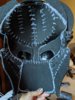
I started with the mask out of a Dollar Tree costume hockey mask, foam sheets, air dry clay, and thin coffee stirrer straws. This is a half mask (no back) so the proportions and angles aren't quite accurate but I feel like it is close enough so you can guess who it's supposed to be. Air dry clay is not the lightest or most durable material for a costume mask but it was the best I could think of and it was very easy to shape. In the future I may try to sculpt spray foam or use upholstery foam like other builds. First I used wire to add a slight curve to the mask, to mimick the shape of going around my head. The mask was very flat and since the air clay is not flexible, it reduces the likelihood of cracking or the clay pulling away from the mask once it dried. I cut out arches from thin foam to make the forehead more oblong and fans around the eyes, and used thicker foam to create the jaws. It also cut down on the amount of clay I would use to get the shape I desired. (Wet clay is heavy!) The foam pieces were glued into place with hot glue then covered with a thin layer of air clay, just enough to give the desired texture and shapes. Before the clay dried, I cut the coffee stirrers in an angle about an inch long to be the spikey hairs. I just put them straight in the clay so they could dry in place. I reenforced it once everything was dry with gorilla glue. I let it dry for several days before I started painting.
For the dreads, I decided to make my own using black thin foam sheets cut into narrow long rectangle pieces. I cut angles on one end to give it the tapering and hot glued along the long side. I decided to make the dreads this way as the backer rod most folks use were not available at my hardware store at the right thickness and ordering it online was more expensive. Since I only made a half mask, I only needed about a dozen dreads and a couple sheets of thin craft foam was sufficient. I put the heavy filler (rice, small beans, or plastic bead fill) first to give weight to the dread, then a small amount of stuffing to just keep the dreads shape round. I made different length dreads with the longest used in the middle and shorter on the sides. I followed the instructions from here minus the latex painting: Foam Matt Latex Dread
Dreads were hot glued to the mask. I painted electrical tape gold and wrapped around randomly on each dread.
Next I started on the armor. This is based on the P1 armor. I did not use templates so it was trial and error. I would recommend testing with cardstock to reduce waste of foam. The chest and back are made of 1/4 thick foam sheets. I was able to use one large sheet for my back and half a large sheet for the single breasted chest piece. I cut the back piece first, roughly covering the top half of my back and with cutouts for arms and neck. I cut a small piece for the front shoulder strap and a long breast plate, falling a little lower than the back plate. I measured out the nylon belting and added the plastic buckle before machine sewing directly on the thick foam sheets. Details of layered metal and buttons are thin foam sheets glued on top.
The shoulder pieces were a lot of trial and error to get the right scale and shape. For the half circle pieces, it is two layers of thin foam, the bottom layer I added darts and a piece of wire hanger so it had stiff curves, the top layer covering the seams of the darts and added detail. The other shoulder was several rectangle pieces scalloped on one long edge, glued and pinched in the center, then layered and glued the scalloped corners to the straight edge of the next piece like a fan to create the curve. The edges are framed with flat pieces on the front and back to complete the shape. Each shoulder piece was attached to a short piece of nylon belt glued onto the main chest and back armor. Details of the cuts and pieces here.
Every seam was glued along the edge of the foam and reenforced in the back with perpendicular lines of glue.
The faux buckle is foam and beads of hot glue glued onto the plastic buckle.
The loin cloth is scrap faux suede cut into two half ovals sewn together, front piece cut down the middle and fringed. I sewed it to go around a garter so it could be a stretchy belt. The garter is sewn to another plastic buckle. I created a faux buckle and cod piece that I hot glued to the plastic buckle. The thigh pieces are hand sewn to the cloth.
The shin guards are a double layer of foam sheets built into the foam knee pads. I used the knee pads because they had a sturdy strap and I thought would help keep everything straight on my legs. First I carved the shape of the predator knee pads then cut one sheet of foam so that I could hot glue it onto the knee pads. I used two layers of foam to get the detailing similar to the predator armor as well as hide the darts I cut to get the curvature of my calves. The top layer keeps everything looking smoother. I used the hot tip of the glue gun to carve damage marks. Once everything was glued together, I used a hole punch to make holes for laces, reenforcing the foam with a circular bead of hot glue around each hole. I painted before I added the laces.
The blade gauntlet was scrap cardboard box and 1/4 inch foam sheets. I cut two blades, using the back of a knife to add the indentions in the blade. I made a five sided small box roughly the width of my forearm and a comfortable length between my wrist and elbow. With the box opening facing down, I made two slots on a narrow end of the box to slide one blade in each. I hot glued it in place and added foam to help keep them separated. More thick foam to create the wrap around the arm. Flat, the foam is shaped a little like a trapezoid so the space around the wrist can he tighter than the part by the elbow. I carved shapes into the foam to give texture and detail. Hot glue to the outer side of the box and on the inner side, used Velcro to keep it together.
The computer gauntlet is simple and just for looks. I would have liked it more Blinky and accurate but don't have the tech to do all that. I did want to be able to place my phone in it so when you flip it open, I can use my phone. To create the flip, I found a plastic case about the size of my phone's face, this one happens to be from a pill organizer. I wanted the hinge so I could open and close and the clasp to keep it closed. The pill case was flat so I used foam to create the dome shape then cut windows to match up with the look of the predator computer. I used clear plastic from packaging then used markers to color in the light details. I wasn't very particular here so the lines are a little crooked and uneven. Glue the plastic light screens to the windows in the foam. Before I glued the foam dome to the front of the pill case, I made a small hole to the top of the pill case to feed the clear string lights through then glued the lights around the light holes on the foam dome. This let me access the battery pack and switch on the inside of the pill case when I opened it. Glue foam dome to top of case. I cut out a rectangle on the lower side of the pill case so I could access the touch screen of my phone. The phone is in a small cardboard shelf under the pill case accessible when you take off the wrap. Attach arm wrap in similar fashion as used for blade gauntlet.
The plasma gun is a tube of cardboard, a little narrower than a paper towel roll, I think this came from gift wrapper. The cardboard roll is then shoved into a hole at the center of a four inch length of pool noodle or a wider tube of cardboard (I think this one came from a thick ribbon). I used blue led string lights for the plasma, gluing each light to the inside of the skinnier tube. The battery pack and switch is shoved inside the larger tube and covered with foam to keep the switch and batteries accessible. I covered the whole thing with thin sheets of foam to give it the shape and detail.
The back pack is a cardboard and wire hanger frame bent and cut to shape. The gun is attached to the back pack by a piece of the wire hanger frame. It attaches to the back and shoulder of the chest armor with heavy duty Velcro. I made it removable for portability and driving around. Cover the cardboard with cut foam sheets for the desired detailing.
I wanted the biomask to sit on top of my predator clay mask so I created a frame using a wire hanger. This helped maintain the shape of the foam so it didn't squish the quills of hair. Since my predator mask had an open mouth, I had to play with layers of foam sheet to get the desired shape and angles. Everyone kept thinking it was black panther before the paint and final shape. I'll show you pictures of the progress so you can see where I started. I would have liked to get the forehead smoother because the seam of my darts to create the curve were very messy. They sell foam filler but I was too cheap. After I finished my mask I saw epoxy filler at Dollar tree and would have liked to try that (don't know if epoxy is sandable, I was guessing it was). I think the mask looks close enough to guess it's predator. I would say accentuate the forehead/brow and cheekbones, and avoid cat eyes. I built up the muzzle and cheekbones with sheets and tubes of foam then covered it with thin sheet foam to smooth it out. Pop the lenses out of some wraparound sunglasses and glue them inside the biomask. The three led keychain light is cased in a foam tube with a few sheets of red translucent plastic covering the end.
The feet are an old pair of flats with fingers of foam glued on. I melted the foam and added beads of hot glue to add wrinkly texture. Each nail is half of a spoon filed to shape.
The body suit started out as a mocha fitted jumpsuit. I had my sister airbrush it while I wore it to create abs and the predator markings. She is an experienced airbrush artist so I trusted her abilities over my own. I could have painted it by hand but airbrushing is definitely faster. The paints used are white and black, with a little yellow and orange for the muscle details. I did not do a fishnet suit because I didn't want the extra layer of clothes to get out of (think bathroom breaks) but the jumpsuit is fitted enough to have fishnets worn over it.
The neck is a rectangle piece of fabric fastened together with Velcro. I hot glued black mesh Tobe ribbon to cover the whole thing. The skull and spine is a plastic skull with a wood snake shoved into a small hole at the base of the skull. The snake gave the wiggly movement of vertebrae. I painted the whole thing in black and red. I drilled small holes in the tiny plastic skulls to make the bone jewelry.
I used silver and black for the armor paint.
I took my time putting this costume together but it's probably 40 hours construction time and eight hours of paint. Planning, researching, and designing was more time consuming. I would guess this costume cost under $50 for materials. It also took a lot of hot glue stick and reused a lot of scrap materials from home. It was a really fun project! I may have to try more versions because I really had a lot of fun. I'll update the post when I get to wear it. I can't wait! I hope this is helpful to someone and you all like it too!
Attachments
Last edited: