Part 5: The Sword
From the outset, I knew that the sword was going to be a complete mixed media project. As the two references that I had were slightly different, some design decisions were also going to have to be made.

Clearly, the most difficult part of the build was going to be the blade edge, and the fact that I wanted to make it light up didn’t help matters. But more on that later…
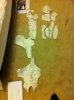
Back to the design of the sword itself, looking at the details, it appeared to be a modern version of a katana. The blade was curved, the handle proportionately long for a sword (fitting far more than 2 hand widths), and it lacked a pommel. The crossguard also appeared quite oval in shape. In my opinion, the additional tubes and blocks on the handle appeared decorative. The last clue was in the border between the green of the blade and the grey of the metal. This jagged line is very reminiscent of the curving line that is present on the blades of true katanas, denoting the division between different steel types.

(Pic from
https://en.wikipedia.org/wiki/Katana#/media/File:Antique_Japanese_katana.JPG)
The sword type having been decided, I then had to decide on its size. Unfortunately, the two reference pics don’t provide much in terms of clues. I tried to measure the width of my hands and used that a scale to try and measure the length of the sword. Sadly that didn’t work out as Genji’s hands are slightly angled in the pic.
Spending time researching katana blades in order to get an idea of how to build the structure of the sword, I discovered that blade lengths depend on the height of the wielder. Using this information, I decided instead to make a sword that would look natural for my height instead of having fantasy sci-fi proportions.
Now that I had a length, I had to figure out what type of curve to employ. With true katanas, the shape of the blade follows a parabola instead of a circular arc. Thus the peak of the curve can occur on various portions of the blade, from close to the handle to close to the tip. From the side view that I had, it look like this peak was close to the tip, but the question arose of how exactly to trace it.
The solution turned out to be quite simple. Using Google’s Sketchup, I initially drew a single line to denote how long the blade would need to be from tip to crossguard. Next the reference pic was pasted into the programme and adjusted match the line. From there, the reference line was deleted and the outline of the blade and sword was traced with vectors. After removing redundant information, I was left with a very basic blueprint that could be printed out on a home printer and stitched together.


With some of the dimensions now set, it was time to decide on how to build the sword. Sadly the internet is deficient on how to great good looking cosplay katanas, and no matter how hard I looked, I could find no tutorials on how to make a blade light up (short of lightsabers, but those are very specific builds).
Using what information I had at my disposal, mostly from Bill Doran and Kamui Cosplay, it was decided that the core would be made of a wooden dowel, covered in foam, with a PVC pipe forming the handle.
Now came the problem of bending the dowel. Again the internet wasn’t of much help, so I decided to get creative. Lacking a 2m long steam oven, I decided to submerse the dowel in our swimming pool for 48 hours in order to moisten the fibres. After that the dowel was placed between two solid supports, and a weight attached to the centre point, causing it to bow. This curve was made about a twice a severe as it needed to be, as the wood would rebound a bit when released. After 3 days of drying, I release the wood and had a curved dowel.
The dowel was then placed on the blueprint and moved until the curves matched up (more or less). It was then trimmed to the required length.

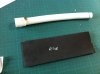
Next was the core of the handle. As this would foreseeably need to hold some batteries, it needed to be hollow. So in this case I used a PVC elbow connection. This was heated using a heat gun and then manipulated into the correct curve. Once the curve was correct, the entire tube was flattened slightly to give it an oval shape in cross section. This manipulation also strengthened the shape.

The one end piece was left in place, as it would be hidden under the crossguard section of the handle. The other end was sawn off to length, but once that was done, a quirk presented itself. I found that the offcut, turned around, was able to slide over the cut. In effect, it made its own endcap. This was great, as I still hadn’t found a way to incorporate a battery compartment lid into the design, and this solved that problem.
So now onto the problem of the blade edge:
Inspiration for the build of this blade came from Kamui Cosplay and her build of Shadowmourne. The link to the video is below:
https://www.youtube.com/watch?v=McB0fSMyBWs
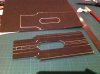
Following her method, the first thing to do was to get a 3D model of the weapon. As the character had not even been announced, nevermind the game being released, a direct model rip was impossible. As I have no experience in 3D modeling, I turned to Sketchup. Using the original blueprints, I arbitrarily decided to make the blade 20mm thick. I manipulated the blueprints to create one half of the blade, and then painfully exploded, reorientated and then stitched together all the facets into 2 long 2D drawings.


These were then printed out, and traced onto the same transparent plastic that I used for the visor. After cutting out the pieces, using Scotch tape, I stuck the entire thing together, eventually landing up with a beautiful hollow blade (minus the top). Additionally, I cut a strip of transparency for the back of the blade.


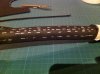
Now knowing the final dimensions of the blade, I could start on the foam for the interior. These were 12mm thick foam strips that had a groove carved into the back surface and got attached to the dowel rod with contact cement. Thereafter, the LED strip could be measured and cut to size, and was stuck onto the foam. The entire setup fit nicely into the hollow blade.


During the dry fit, the square foam had difficulty sliding into the PVC handle, so that was rounded until it fit very snugly.

Then came time for the silicon injection. Thankfully I had my father there to assist, which made life easier. I started injecting the silicon into the tip, and worked my way down from there, making sure to keep the nozzle under the surface in order to prevent bubbles.
After filling (actually overfilling) the length of the blade, I then slowly inserted the foam core, starting from the tip and lowering it towards the handle end. This process displaced the excess silicon towards the opening at the bottom of the blade. As all of this was going on, we also attached the transparency forming the back of the blade was also stuck into place, so that there wouldn’t be overlaps or areas that were sunken in.

Once all the excess silicon was cleaned off, the blade was left for 7 days in the shade outside next to the pool. This was to allow for the fastest cure time. Unlike other chemicals, silicone caulk actually uses water in order to cure, so placing it in a high humidity environment helps to speed up this process. However, I would not recommend submersing it underwater – I in fact tried this with some test pieces and the results were better with air-curing.
Whist the blade was doing its thing, I worked on the handle. First to be done was the end, where the pommel would traditionally sit. A few scrap pieces of foam were glued together, the shape of the endcap traced and the entire thing cut out with a scroll saw. This end piece was then glued to the end cap. The shapes were then marked and rough cut with the scroll saw, and then I used the dremel to round everything off nicely. This was then covered with a single layer of foam to neaten it.


")