Mordor Brass
Active Member
Hi there!
Here my conversion from a Nerf gun toy to a display prop. Not 100% accurate but i think it looks good. It was a funny job.
The toy gun.

I covered the space with thin foamed pvc. Then some bondo, sanding and priming.

I cutoff the toy canon.

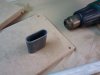
The new canon was made with a pvc pipe heated and sqeezed. The spaces under the canons was covered with pvc piece too. Then more bondo, sanding and priming.

The spaces around the canon was covered with thin foamed pvc.

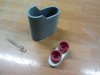
The second canon was made with a lathered resin piece.

The new resin second canon.

Pieces primered and ready to paint.

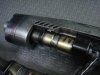
I bought a cheap machinegun toy with sound and light module, then I extracted It and reinstalled it into the blaster. I added blue leds and a rumble motor.

The final paint job. For the main hilt, I used a spray silver base coat. I masked the future scratch with liquid mask them I sprayed satin black. Once dry the black, the mask of the scratch was peeled.
For the carbon effect i painted one by one the rectangles with dark gun metal acrylic paint.
For the metallic effect, I used Alclad paints.
Them some weathering with airbrush and washes with acrylic dark brown and....tachán!! Finished. Ready to display.


If you would like to watch the light and sound effect, you can see it here:
https://www.flickr.com/photos/mordorprops/15976187863/
I hope you enjoy with the conversion.
Here my conversion from a Nerf gun toy to a display prop. Not 100% accurate but i think it looks good. It was a funny job.
The toy gun.
I covered the space with thin foamed pvc. Then some bondo, sanding and priming.
I cutoff the toy canon.
The new canon was made with a pvc pipe heated and sqeezed. The spaces under the canons was covered with pvc piece too. Then more bondo, sanding and priming.
The spaces around the canon was covered with thin foamed pvc.
The second canon was made with a lathered resin piece.
The new resin second canon.
Pieces primered and ready to paint.
I bought a cheap machinegun toy with sound and light module, then I extracted It and reinstalled it into the blaster. I added blue leds and a rumble motor.
The final paint job. For the main hilt, I used a spray silver base coat. I masked the future scratch with liquid mask them I sprayed satin black. Once dry the black, the mask of the scratch was peeled.
For the carbon effect i painted one by one the rectangles with dark gun metal acrylic paint.
For the metallic effect, I used Alclad paints.
Them some weathering with airbrush and washes with acrylic dark brown and....tachán!! Finished. Ready to display.
If you would like to watch the light and sound effect, you can see it here:
https://www.flickr.com/photos/mordorprops/15976187863/
I hope you enjoy with the conversion.