You are using an out of date browser. It may not display this or other websites correctly.
You should upgrade or use an alternative browser.
You should upgrade or use an alternative browser.
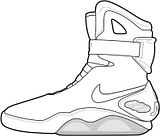
NIKE MAG Patterns
- Thread starter cavx
- Start date
Re: Nike mag patterns with Tutorial part 1 pg 1 post 7
The picture is broken.
The picture is broken.
Re: Nike mag patterns with Tutorial part 1 pg 1 post 7
I don't think you got the patters right.

I don't think you got the patters right.
Last edited:
cavx
Master Member
Re: Nike mag patterns with Tutorial part 1 pg 1 post 7
Which part?
Don't worry about the toe on the last patterns I sent you. in fact, delete them.
Revision 7 was not enough and I've started revision 8 which should correct the issue I am having?
I don't think you got the patters right. Sorry the picture is so big.
Which part?
Don't worry about the toe on the last patterns I sent you. in fact, delete them.
Revision 7 was not enough and I've started revision 8 which should correct the issue I am having?
Re: Nike mag patterns with Tutorial part 1 pg 1 post 7
Basically the whole top part of the upper. Everything above where the laces start. A good idea would be to use the picture I posted and convert it into a template. Obviously excluding everything that isn't the upper.
Which part?
Don't worry about the toe on the last patterns I sent you. in fact, delete them.
Revision 7 was not enough and I've started revision 8 which should correct the issue I am having?
Basically the whole top part of the upper. Everything above where the laces start. A good idea would be to use the picture I posted and convert it into a template. Obviously excluding everything that isn't the upper.
Last edited:
Re: Nike mag patterns with Tutorial part 1 pg 1 post 7
And I'm not sure who made the picture, but it is 100% what the real shoe looks like.
And I'm not sure who made the picture, but it is 100% what the real shoe looks like.
cavx
Master Member
Re: Nike mag patterns with Tutorial part 1 pg 1 post 7
With sounding like I am offended by this, consider the following -
1. All images (including drawing or photos) are 2D and they do not truly represent the curves of the shoe that ONLY a 3D model will show.
2. I used this exact drawing (mine has inverted colours, so white on black background) to make the uppers of this current pattern. I then had to alter a few lines after converting the 2D pattern back into a 3D shape to get it to sit the way it does in the 2D images.
Until you work this shoe in 3D, the two drawing are nothing more than a guide.
Again for 2D. Does not work for true 3D conversion.
Basically the whole top part of the upper. Everything above where the laces start. A good idea would be to use the picture I posted and convert it into a template. Obviously excluding everything that isn't the upper.
With sounding like I am offended by this, consider the following -
1. All images (including drawing or photos) are 2D and they do not truly represent the curves of the shoe that ONLY a 3D model will show.
2. I used this exact drawing (mine has inverted colours, so white on black background) to make the uppers of this current pattern. I then had to alter a few lines after converting the 2D pattern back into a 3D shape to get it to sit the way it does in the 2D images.
Until you work this shoe in 3D, the two drawing are nothing more than a guide.
And I'm not sure who made the picture, but it is 100% what the real shoe looks like.
Again for 2D. Does not work for true 3D conversion.
Re: Nike mag patterns with Tutorial part 1 pg 1 post 7
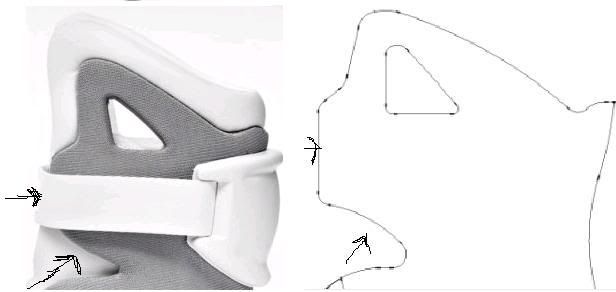
I'm sorry that I offended you. I don't have any experience with this stuff so I wouldn't know. My apologies. But the one thing that I know for sure that is a little off is the pull hole. The ones on the real shoes are angled in the front, but yours is straight.
With sounding like I am offended by this, consider the following -
1. All images (including drawing or photos) are 2D and they do not truly represent the curves of the shoe that ONLY a 3D model will show.
2. I used this exact drawing (mine has inverted colours, so white on black background) to make the uppers of this current pattern. I then had to alter a few lines after converting the 2D pattern back into a 3D shape to get it to sit the way it does in the 2D images.
Until you work this shoe in 3D, the two drawing are nothing more than a guide.
Again for 2D. Does not work for true 3D conversion.
I'm sorry that I offended you. I don't have any experience with this stuff so I wouldn't know. My apologies. But the one thing that I know for sure that is a little off is the pull hole. The ones on the real shoes are angled in the front, but yours is straight.
Last edited:
cavx
Master Member
Re: Nike mag patterns with Tutorial part 1 pg 1 post 7
It is ok. I am still learning this as I go as well, so unless someone with the required knowledge wants to suddenly chime in and answer all the questions I have, then it is a slow trial and error process.
I'm sorry that I offended you.
It is ok. I am still learning this as I go as well, so unless someone with the required knowledge wants to suddenly chime in and answer all the questions I have, then it is a slow trial and error process.
Re: Nike mag patterns with Tutorial part 1 pg 1 post 7
On pictures of the RD mags, the part of the upper where the strap goes over doesn't pass the slope where the laces are below it and it looks smaller. Is that because it's pushed in from the strap? Also there's another thing I noticed about that part. On your pattern, the part where the strap goes over has an inverted part where it should be popping out.
On pictures of the RD mags, the part of the upper where the strap goes over doesn't pass the slope where the laces are below it and it looks smaller. Is that because it's pushed in from the strap? Also there's another thing I noticed about that part. On your pattern, the part where the strap goes over has an inverted part where it should be popping out.
Last edited:
cavx
Master Member
Re: Nike mag patterns with Tutorial part 1 pg 1 post 7
Your bottom arrow points to the tongue which further increases this outward push. The strap holds it all in, but now the collar begins to form round and not the flat the way just the shell will.
Also edges that appear rounded on the real deal have fabric stretched over it. This tends to change the look as well.
My cloth over foam was looking very different after stretching cloth than it does as a blue foam frame.
As soon as you attach the cuff (white part at the top), the way the shoe's collar sits will change. This is because the cuff which sewn flat wants to remain that way, so it tends to push out against the collar.On pictures of the RD mags, the part of the upper where the strap goes over doesn't pass the slope where the laces are below it and it looks smaller. Is that because it's pushed in from the strap? Also there's another thing I noticed about that part. On your pattern, the part where the strap goes over has an inverted part where it should be popping out.
Your bottom arrow points to the tongue which further increases this outward push. The strap holds it all in, but now the collar begins to form round and not the flat the way just the shell will.
Also edges that appear rounded on the real deal have fabric stretched over it. This tends to change the look as well.
My cloth over foam was looking very different after stretching cloth than it does as a blue foam frame.
hoverboard
Well-Known Member
Re: Nike mag patterns with Tutorial part 1 pg 1 post 7
I admire your ability to stick with a project and problem solve the issues that are coming up. I'm looking forward to when you finish a shoe that you are satisfied with. Making my own pair of Mags is definitely on my long to-do list.
I admire your ability to stick with a project and problem solve the issues that are coming up. I'm looking forward to when you finish a shoe that you are satisfied with. Making my own pair of Mags is definitely on my long to-do list.
Re: Nike mag patterns with Tutorial part 1 pg 1 post 7
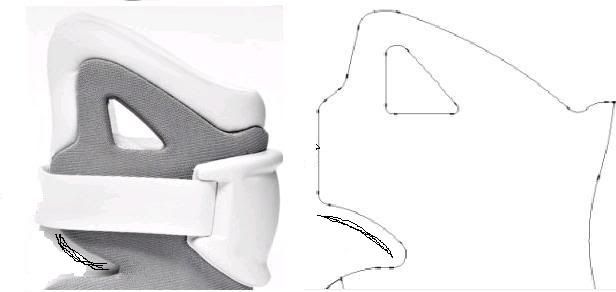
I don't think you know what I'm talking about. Look at the curves.
Your bottom arrow points to the tongue which further increases this outward push.
I don't think you know what I'm talking about. Look at the curves.
Last edited:
cavx
Master Member
Re: Nike mag patterns with Tutorial part 1 pg 1 post 7
Thanks hoverboard") I am about 90% done with the pattern now. It finally fits my foot without distorting and has no tight spots, so happy with that. Just need to sort the finer detaills Mitas has just brought up.
I am about 90% done with the pattern now. It finally fits my foot without distorting and has no tight spots, so happy with that. Just need to sort the finer detaills Mitas has just brought up.
Like I said yesterday, sometimes straight lines on a 3D shape appear to bend on a 2D image. The shape of the actual foam (if you pulled the MAG apart) part is probably straight and not curved at all. I used a different image to make my patterns, so why it appears different to the example you have posted.
Until about mid-night last night, my main concern was getting the actual 3D shape of the shoe sorted and it would appear I've done that now. So I can now go back and revise aspects like the curves you seem to think are so important. They are cream on the cake which is useless without the cake.
As I have said, I don't own, nor do I have access to a real MAG, so all of my work (which is 100% mine BTW) is based on 2D images. And I am left to assume these images were captured 100% on axis, otherwise, it becomes a bit of guessing game as to what the actual shape is.
I admire your ability to stick with a project and problem solve the issues that are coming up. I'm looking forward to when you finish a shoe that you are satisfied with. Making my own pair of Mags is definitely on my long to-do list.
Thanks hoverboard
I am about 90% done with the pattern now. It finally fits my foot without distorting and has no tight spots, so happy with that. Just need to sort the finer detaills Mitas has just brought up. I don't think you know what I'm talking about. Look at the curves.
Like I said yesterday, sometimes straight lines on a 3D shape appear to bend on a 2D image. The shape of the actual foam (if you pulled the MAG apart) part is probably straight and not curved at all. I used a different image to make my patterns, so why it appears different to the example you have posted.
Until about mid-night last night, my main concern was getting the actual 3D shape of the shoe sorted and it would appear I've done that now. So I can now go back and revise aspects like the curves you seem to think are so important. They are cream on the cake which is useless without the cake.
As I have said, I don't own, nor do I have access to a real MAG, so all of my work (which is 100% mine BTW) is based on 2D images. And I am left to assume these images were captured 100% on axis, otherwise, it becomes a bit of guessing game as to what the actual shape is.
Re: Nike mag patterns with Tutorial part 1 pg 1 post 7
I'm just trying to help this be as accurate as possible. And like I also said yesterday, I have no knowledge about 3D modeling and stuff. And adding in that this is 100% your work is kind of out of place. I know that already. And maybe you can send your patterns to cloneprops and see if he has any info you might need. Comparing your work and stuff.
Thanks hoverboard
Like I said yesterday, sometimes straight lines on a 3D shape appear to bend on a 2D image. The shape of the actual foam (if you pulled the MAG apart) part is probably straight and not curved at all. I used a different image to make my patterns, so why it appears different to the example you have posted.
Until about mid-night last night, my main concern was getting the actual 3D shape of the shoe sorted and it would appear I've done that now. So I can now go back and revise aspects like the curves you seem to think are so important. They are cream on the cake which is useless without the cake.
As I have said, I don't own, nor do I have access to a real MAG, so all of my work (which is 100% mine BTW) is based on 2D images. And I am left to assume these images were captured 100% on axis, otherwise, it becomes a bit of guessing game as to what the actual shape is.
I'm just trying to help this be as accurate as possible. And like I also said yesterday, I have no knowledge about 3D modeling and stuff. And adding in that this is 100% your work is kind of out of place. I know that already. And maybe you can send your patterns to cloneprops and see if he has any info you might need. Comparing your work and stuff.
cavx
Master Member
Re: Nike mag patterns with Tutorial part 1 pg 1 post 7
I am just playing with the mesh form now and it is interesting how it changes shape as I bend and curve it. I am prepared to say that that line on the base of the collar is actually straight in the raw foam version.
If you look at the lace section, and I've made that straight now, yet all the 2D images show it as concave. When I curved the side in as if it was following the contour of a foot, the material mimics the same concave shape.
I am therefore going to suggest the at the convex shape is due to -
1. the cloth over foam construction of the shoe and
2. the fact that the strap pulls the collar edges in.
The result is a convex shape or bowing of the straight line.
Not hard to change that now that I have the actual shape of the foot frame done.
I'm just trying to help this be as accurate as possible. And like I also said yesterday, I have no knowledge about 3D modeling and stuff. And adding in that this is 100% your work is kind of out of place. I know that already. And maybe you can send your patterns to cloneprops and see if he has any info you might need. Comparing your work and stuff.
I am just playing with the mesh form now and it is interesting how it changes shape as I bend and curve it. I am prepared to say that that line on the base of the collar is actually straight in the raw foam version.
If you look at the lace section, and I've made that straight now, yet all the 2D images show it as concave. When I curved the side in as if it was following the contour of a foot, the material mimics the same concave shape.
I am therefore going to suggest the at the convex shape is due to -
1. the cloth over foam construction of the shoe and
2. the fact that the strap pulls the collar edges in.
The result is a convex shape or bowing of the straight line.
Not hard to change that now that I have the actual shape of the foot frame done.
Re: Nike mag patterns with Tutorial part 1 pg 1 post 7
I feel like an ass. I'm sorry I doubted you. You're doing the whole Mag community a favor and I'm judging it negatively. I apologize...again :lol I thank you for your service.
I am just playing with the mesh form now and it is interesting how it changes shape as I bend and curve it. I am prepared to say that that line on the base of the collar is actually straight in the raw foam version.
If you look at the lace section, and I've made that straight now, yet all the 2D images show it as concave. When I curved the side in as if it was following the contour of a foot, the material mimics the same concave shape.
I am therefore going to suggest the at the convex shape is due to -
1. the cloth over foam construction of the shoe and
2. the fact that the strap pulls the collar edges in.
The result is a convex shape or bowing of the straight line.
Not hard to change that now that I have the actual shape of the foot frame done.
I feel like an ass. I'm sorry I doubted you. You're doing the whole Mag community a favor and I'm judging it negatively. I apologize...again :lol I thank you for your service.
Similar threads
- Replies
- 0
- Views
- 259
- Replies
- 4
- Views
- 1,168
- Replies
- 0
- Views
- 358