New Round 2 TIE Interceptor (Overview and Build *WIP*)

skahtul

Sr Member
RPF PREMIUM MEMBER
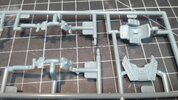
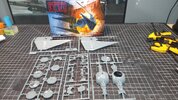
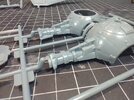
Not 100% sure when I will put this kit together but it should be a pretty quick and easy build. What I really wanted to post were some close-up pictures of the parts in case others were thinking about picking up this kit and might want to get a quick preview.

The one thing the kit does have going for it is the size, at about 1/48 or so it's a welcome change (for me at least) from most of the tiny Bandai kits which of course are amazing, but most of them are too small for my taste.

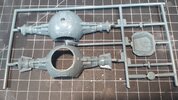
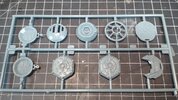
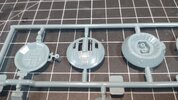
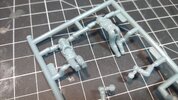
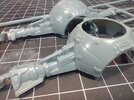
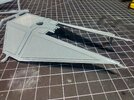
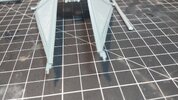
The negative of this kit is that for what I believe is new tooling, the details are pretty soft in some areas (pics actually make the details look better than they do in person) and both wings come pretty warped. If anyone has some pro tips on straightening those wings out, I am all ears.

Lastly, I am super excited about the new 1/32 TIE, I sure hope the quality is improved some across the board.

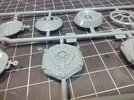
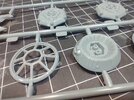
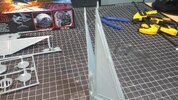
Let's meet the parts. They are attached as thumbnails at full size, enjoy!


Cover.jpg
 

Attachments

  • IMG_20230612_205841032.jpg
    IMG_20230612_205841032.jpg
    3 MB · Views: 159
  • IMG_20230612_205909559.jpg
    IMG_20230612_205909559.jpg
    3 MB · Views: 142
  • IMG_20230612_205927135.jpg
    IMG_20230612_205927135.jpg
    2.6 MB · Views: 149
  • IMG_20230612_205952919.jpg
    IMG_20230612_205952919.jpg
    2.8 MB · Views: 131
  • IMG_20230612_205959619.jpg
    IMG_20230612_205959619.jpg
    2.8 MB · Views: 126
  • IMG_20230612_210027358.jpg
    IMG_20230612_210027358.jpg
    3.2 MB · Views: 137
  • IMG_20230612_210056468.jpg
    IMG_20230612_210056468.jpg
    892.6 KB · Views: 110
  • IMG_20230612_210104486.jpg
    IMG_20230612_210104486.jpg
    927.8 KB · Views: 112
  • IMG_20230612_210114275.jpg
    IMG_20230612_210114275.jpg
    924.9 KB · Views: 128
  • IMG_20230612_210122275.jpg
    IMG_20230612_210122275.jpg
    933.1 KB · Views: 128
  • IMG_20230612_210140908_HDR.jpg
    IMG_20230612_210140908_HDR.jpg
    894.5 KB · Views: 142
  • IMG_20230612_210241329.jpg
    IMG_20230612_210241329.jpg
    2.7 MB · Views: 133
  • IMG_20230612_210338410.jpg
    IMG_20230612_210338410.jpg
    3.2 MB · Views: 139
A heat gun or possibly a hair dryer to straighten the wings. You could also try very hot water. Be careful, either way.
 
The main body is from the TIE twin pack—I’m not sure whether the wings are new or from the MPC interceptor molds but I think that was the idea—I’m interested to see how those were combined if so.
 
The main body is from the TIE twin pack—I’m not sure whether the wings are new or from the MPC interceptor molds but I think that was the idea—I’m interested to see how those were combined if so.
Yeah I think you're right. I just saw some pics of the old Interceptor kit and everything seems to match up.
 
Whipped out a copy of both original issues, confirmed it is indeed the MPC Interceptor kit's 'wings', with modified mounting holes to mate with the reissued AMT TIE "body" pieces. This actually is a 'kit-bash' I've had on the docket for quite a while ever since I picked up a bunch of the '2-in-1' AMT TIE kits at KayBee Toys discount outlets for a song. The MPC wing detailing, while generally correct and accurate (if soft), suffers from being on a wing with some proportion issues in the after half, namely being a wee bit too long. If you compare the kit to the studio model, this is evident in the "square-ish" vertical panel on the outside of the wing. I think I can improve it greatly just by sawing off the aft (trailing?) edges along the boundary of the cross-hatching and then sanding the cross hatch panels a bit to reduce their horizontal widths, approximately a 1/16th an inch or so, then reattaching the trailing edges. This will create problems with the interior panel details, but the cross-hatching areas there too need some help, so I'll likely end up scratch building new details on a thin sheet base and casting copies in resin. It was this in fact that lead me to put it aside until later...

Not an easy route to get there, but after you see that proportional error, it is hard to look away... though, you could just say it is depicting a different 'series block' with slightly enlarged wing panels and call it a day! Not any more difference than the enlarged horizontal tails on an F-16 (started with Block 10? or was it 20?).

Cheers!
Robert
I love this logic!
I feel like sometimes people forget they can be creative whilst creating. (I’m guilty of spending inordinate amounts of time obsessing over paint mixing ratios).
Also, George Lucas is an aviation nerd who clearly has a penchant for WWII aircraft, an era where aviation technology progressed rapidly, with aircraft sometimes having dozens of variants, many with clear visual differences. For example, the Mitsubishi A6M2 Type 21 Zero with its rounded wingtips looks different than the Mitsubishi A6M3 Type 32 with it’s square wingtips. (I used the Zero as the example because I always felt it was rather analogous with the TIE in that it had very little armor or self-sealing fuel tanks but was insanely maneuverable).
 
Whipped out a copy of both original issues, confirmed it is indeed the MPC Interceptor kit's 'wings', with modified mounting holes to mate with the reissued AMT TIE "body" pieces. This actually is a 'kit-bash' I've had on the docket for quite a while ever since I picked up a bunch of the '2-in-1' AMT TIE kits at KayBee Toys discount outlets for a song. The MPC wing detailing, while generally correct and accurate (if soft), suffers from being on a wing with some proportion issues in the after half, namely being a wee bit too long. If you compare the kit to the studio model, this is evident in the "square-ish" vertical panel on the outside of the wing. I think I can improve it greatly just by sawing off the aft (trailing?) edges along the boundary of the cross-hatching and then sanding the cross hatch panels a bit to reduce their horizontal widths, approximately a 1/16th an inch or so, then reattaching the trailing edges. This will create problems with the interior panel details, but the cross-hatching areas there too need some help, so I'll likely end up scratch building new details on a thin sheet base and casting copies in resin. It was this in fact that lead me to put it aside until later...

Not an easy route to get there, but after you see that proportional error, it is hard to look away... though, you could just say it is depicting a different 'series block' with slightly enlarged wing panels and call it a day! Not any more difference than the enlarged horizontal tails on an F-16 (started with Block 10? or was it 20?).

Cheers!
Robert
I dunno, I'm not seeing where it's too long in the aft section, though it does appear that the angle of the aft end of the "dagger" is too shallow by a couple of degrees, which means it's actually too short, not too long. Of course, my refs are all from Modeler Magic, so maybe you have a picture I don't, but holding the model up to the photos I have, it doesn't appear too long. Also, you'll want to carefully shave the greeblw

The real accuracy issue is in the details. They're generally correct, but there are a lot of just plain wrong details all over the wings (probably a fault of this kit being made in the 80's with little in the way of reference). While generally correct, the details that are there are too shallow and only vaguely resemble the subject. Also, it appears the masters weren't finished at the time of production, as I can see missing details on one wing that are present on the other. One of the most prominent is the extension on the back of the big square panel on the trailing edge, which is present on the starboard wing, but not the port wing. The starboard wing also has finished details on the greebles that are not present on the port wing's detailing, almost as though the port wing was the last area to be detailed and they had to rush to finish the masters for creating the molds.

Overall, this kit would make a great subject for someone wanting a kit to have fun detailing. I can see a lot of potential for shaving off a lot of the details and going to town with styrene stock and sheet, replicating the details from the original subject and correcting it. Even if you just replace the guns with better looking ones, you'll end up with a fine addition to your shelf.
 
I'll take another look... though looking at the molded details, I get the impression that the kit makers had access to the studio models. Just perhaps somewhat lacking in the execution of the detail, seems the kit team had access to decent references. The missing detail may actually be accurate for the studio model they were using, since much of the images we have today online are not contemporary with the time the kit was being made.
Regardless, it is a fine starting point to do just as much as one wishes.
Cheers, Robert
 

Your message may be considered spam for the following reasons:

If you wish to reply despite these issues, check the box below before replying.
Be aware that malicious compliance may result in more severe penalties.
Back
Top