Propcustomz
New Member
Back in August I finished my Groot costume for the premier of Guardians of the Galaxy. I LOVED Groot from the first time I had seen the trailer. Before that, I had never heard of GotG, but after one watch, I was absolutely hooked! So anyways, here are some picture (which is what we all want to see anyways).
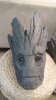
So I started with the mask, because with Groot, I felt that his face HAD to be right. Otherwise he is just a tree guy. So I started with the single piece of EVA foam that I eyeballed into the shape that would(hopefully) wrap around my head like a crown.

The I wrapped it into a cylinder and started carving into it with my trusty Dremel tool.

I wasn't getting the depth that I wanted in the eye sockets, so I cut them out and added pieces to the inside to carve into.
That's more like it!

Next, I didn't like the lips so I cut those down a little bit and added the top of the head. Regrettably I did not get any pictures of this as I was "in the zone" and simple spaced it. But What I did was take bits of EVA and cut "L" shapes out. Then I split the foam through the middle at the base and opened it up like a bowl. Then I glued that to the "dome" of the mask. I made the dome by putting a hood from a hoodie on my head and squeezing the mask on until it was in place. Then I had a helper glue the hood to the foam to create the top(dome" of the mask. Her is what it looks like when covered in the "L" shapes.

After a quick coat of spray Plasti-Dip now comes the fun part. The paint and moss!!! I base coated it in a light brown and used several custom mixed browns, grays, and greens to wash it with. In the second picture below, I knocked the vibrancy of the moss back a tad with some wash paint. I like how it came out so far.


Time for a test fit!

So at this point I was happy with the mask and wanted to move on to the body.
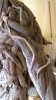
I started by making a mannequin of my own body and putting an under armour suit over it. Looking back, I would make the zipper go all the way down to my inseam instead of my lower back. Squeezing into this thing can be a pain. Once the undersuit was on the mannequin I was able to start with the body vines. How I chose to do this was to use pipe foam insulator tubes from my local hardware store. I started gluing to the suit with low temp hot glue. I tried following normal muscle flow as much as possible to keep it natural looking. I made some template of the bark plate to get a feel for the size that they needed to be.

At this point it was all about just adding more tubes of various lengths and widths to keep it non-uniform and organic looking. Also adding the rough cut bark plates after heat shaping them to curve with my body. With breaks in between for selfies.


So after all was said and done in the vine tube department, it was time for some texture. I was in an extreme time crunch and had to work with what I had. So I used kleenex dipped in tacky glue and kleenex to achieve a bark-like texture. Again, looking back I would have for sure used latex because it is more flexible and would stick the suit better. However, I did not have latex in-hand, so tacky glue it is!


I had to stop for a minute to give myself a hand....

Finally after some paint and some moss. I was nearing completion, just the stilts left to build then I was done!! I made some simple stilts out of wood and a cheap pair of Velcro shoes.


I had finished this thing the morning of the premiere, so lets hope it hold together!!


My favorite picture was captured by Sight Photography. I love how they captured me.....I am Groot.....I mean, I AM GROOT..

If you enjoyed this head over to my face book page HERE to see more of this build plus many more that you might like! I love answering questions and helping out, so if you have any shot them my way.
Propcustomz
So I started with the mask, because with Groot, I felt that his face HAD to be right. Otherwise he is just a tree guy. So I started with the single piece of EVA foam that I eyeballed into the shape that would(hopefully) wrap around my head like a crown.
The I wrapped it into a cylinder and started carving into it with my trusty Dremel tool.
I wasn't getting the depth that I wanted in the eye sockets, so I cut them out and added pieces to the inside to carve into.
That's more like it!
Next, I didn't like the lips so I cut those down a little bit and added the top of the head. Regrettably I did not get any pictures of this as I was "in the zone" and simple spaced it. But What I did was take bits of EVA and cut "L" shapes out. Then I split the foam through the middle at the base and opened it up like a bowl. Then I glued that to the "dome" of the mask. I made the dome by putting a hood from a hoodie on my head and squeezing the mask on until it was in place. Then I had a helper glue the hood to the foam to create the top(dome" of the mask. Her is what it looks like when covered in the "L" shapes.
After a quick coat of spray Plasti-Dip now comes the fun part. The paint and moss!!! I base coated it in a light brown and used several custom mixed browns, grays, and greens to wash it with. In the second picture below, I knocked the vibrancy of the moss back a tad with some wash paint. I like how it came out so far.
Time for a test fit!
So at this point I was happy with the mask and wanted to move on to the body.
I started by making a mannequin of my own body and putting an under armour suit over it. Looking back, I would make the zipper go all the way down to my inseam instead of my lower back. Squeezing into this thing can be a pain. Once the undersuit was on the mannequin I was able to start with the body vines. How I chose to do this was to use pipe foam insulator tubes from my local hardware store. I started gluing to the suit with low temp hot glue. I tried following normal muscle flow as much as possible to keep it natural looking. I made some template of the bark plate to get a feel for the size that they needed to be.
At this point it was all about just adding more tubes of various lengths and widths to keep it non-uniform and organic looking. Also adding the rough cut bark plates after heat shaping them to curve with my body. With breaks in between for selfies.
So after all was said and done in the vine tube department, it was time for some texture. I was in an extreme time crunch and had to work with what I had. So I used kleenex dipped in tacky glue and kleenex to achieve a bark-like texture. Again, looking back I would have for sure used latex because it is more flexible and would stick the suit better. However, I did not have latex in-hand, so tacky glue it is!
I had to stop for a minute to give myself a hand....
Finally after some paint and some moss. I was nearing completion, just the stilts left to build then I was done!! I made some simple stilts out of wood and a cheap pair of Velcro shoes.
I had finished this thing the morning of the premiere, so lets hope it hold together!!
My favorite picture was captured by Sight Photography. I love how they captured me.....I am Groot.....I mean, I AM GROOT..
If you enjoyed this head over to my face book page HERE to see more of this build plus many more that you might like! I love answering questions and helping out, so if you have any shot them my way.
Propcustomz
Attachments


Last edited by a moderator: