Winter is coming.
Peopoly offers a heater for their Moai printer which can be bought here:

 www.matterhackers.com
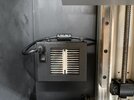
The purpose of the heater is to maintain the viscosity of your printer's resin. According to Peopoly/MatterHackers, "Some colder environments affect the resin, which can result in poor adhesion to the Build Plate, or simply generally poor curing during the printing process."
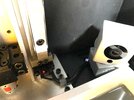
There is no heater for the Phenom.
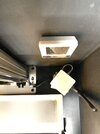
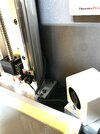
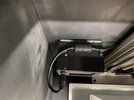
But there are some unused Screw mounts in the back wall of the Phenom, so I built an adapter that allows you to mount a Moai heater into the back of a Phenom.
Please note, you need to replace the 4 screws in the back of the heater with M3 X 8mm screws. The originals are too short. You also need two M3 X6mm screws with washers for the sides.
This is a pretty simple and straightforward piece that includes ventilation holes.
I have attached the print file below.


Peopoly offers a heater for their Moai printer which can be bought here:
Peopoly Moai Heater Module Kit
The Heater for the Peopoly Moai is here! Designed to keep the internal chamber over 25C, the Heater is sensor controlled and comes with its own power supply, separate from the Moai SLA printer. The Heater's internal thermostat will activate anytime the surrounding temperature is not within a...
The purpose of the heater is to maintain the viscosity of your printer's resin. According to Peopoly/MatterHackers, "Some colder environments affect the resin, which can result in poor adhesion to the Build Plate, or simply generally poor curing during the printing process."
There is no heater for the Phenom.
But there are some unused Screw mounts in the back wall of the Phenom, so I built an adapter that allows you to mount a Moai heater into the back of a Phenom.
Please note, you need to replace the 4 screws in the back of the heater with M3 X 8mm screws. The originals are too short. You also need two M3 X6mm screws with washers for the sides.
This is a pretty simple and straightforward piece that includes ventilation holes.
I have attached the print file below.