Merr-Sonn Power 5 blaster build

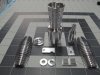
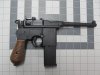
I've been assembling an imperial storm trooper officer costume and decided that a blaster would be a nice accessory. After researching the Merr-Sonn blaster I purchased a Umarex Legends Mauser C96 bb gun (rather than the Denix) because of importation restrictions of gun replicas into Canada. I've just completed machining a set of greeblies, heat sinks and flash arrestor and will start on the modifications and painting of the gun.
 

Attachments

  • complete greeblie set.jpg
    complete greeblie set.jpg
    146.9 KB · Views: 792
  • Mauser2.jpg
    Mauser2.jpg
    135 KB · Views: 700
First I shortened the barrel in anticipation of installing the flash suppressor and then attached the heat sink on the right side. The extended ammo magazine was removed (it normally houses the CO2 cartridge and BBs) and the base will be capped with a fitted piece of brass. Now it has the appropriate profile for the blaster.

Merr-Sonn assembly 1.jpg
 
Next I installed the power meter and stun setting switch greeblies using a general purpose 5 min epoxy. A barrel adapter was prepared from 0.75 in OD aluminum tube and mounted over the original barrel in preparation of installing the flash arrestor. To get a tight fit the tubing had to bored larger at one end than at the other to allow for the slight taper of the Mauser barrel. Alternatively a thin wall pipe could have been used and kept centered while glued into position.
Merr-Sonn assembly 3.jpg
 
Very cool looking blaster build, I love the Merr Sonn,

Very nice greeblies you've machined, wish I had the skills

Looking forward to seeing it finished :)
 
On with the build- next I mounted the left side greeblies which are a notched imperial disc and two circular details. I decided to use 0.5 in. aluminum rod rather than washers since it gave me more control over the surface finish. The flash suppressor is mounted temporarily until painting commences. The design of the flash suppressor and heat sinks were heavily influenced by various blaster build threads here on the RPF. Other details, such as the stun setting switch, are my own interpretation of greeblies shown in various Merr Sonn reference pictures.
Merr-Sonn assembly 5.jpg
 
I made a T mount which will fit into a corresponding slot on the bottom of the scope. This will provide some mechanical strength once the scope is epoxied in place.
Merr-Sonn assembly 6.jpg
 
The slot at the base of the scope can be seen here as well as the 4-40 set screw for holding the signal cable in place. Once mounted, the slot and retaining screw won't be seen.

Time to move on to the painting.....
scope detail.jpgscope with signal wire.jpg
 
Painting is completed!

I used a black primer, semi-gloss black and matt clear coat. The clear coat produced a slight hammer tone effect which I didn't expect but I'm satisfied with the results. I'll do some weathering by stropping exposed areas of the suppressor, heat sink fins, etc. with leather but it will have to wait until the paint is fully dried.
Merr-Sonn blaster progress 7a.jpgMerr-Sonn blaster progress 7b.jpg
 
Very nice job Don!! And the parts are really nice too!!!:thumbsup
The final assembly looks gorgeus!! Congrats!:cheers

Regards,

Alberto
 
Last edited:
Looks great! Any chance of you offering some of those machined parts for purchase?


Aren't the handles also supposed to be black too?
 
Back
Top