Master and Commander Jack Aubrey Captains Uniform

Beetroot

Active Member
It is now time for me to tackle one of my holy grail projects. From when I first started my Tusken Raider project 3 years ago the end goal was to always tackle this project. All other projects where to simply build up my sewing skills. I may have some sort of thing for Russel Crowe given last years build from Gladiator, however Master and Commander remains one of my all time favourite movies. This time in history has always fascinated me, with some of the most interesting adventure stories coming from this period.

Anyway enough of the background, it is time to start. I will be showing my build as much as I can, as other builds have assisted me along the way and I want to share my process. At the time of writing this post I have almost finished a rough "undress" version of the coat. It has some errors but it was only ever intended to be the practice run. I wanted to wait until I could see the finish line on the horizon, before I documented the build in case this became one of those "some day" projects. The goal is to replicate the Costume worn in the movie but if in doubt move to a more accurate historical version. Fortunately the costume is extremely period accurate.

Here is a quick sneak of it coming together.
21557997_1818203921804728_114946036720746930_n.jpg

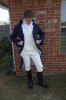
The process began with me purchasing a pattern for the Breeches. I decided to go with "Laughing Moon Mercantile #127 Men's Narrow Fall Breeches" and it is one of the best patterns I have ever purchased. The instructions are clear, the patterns are solid and even though I consider myself a novice I turned out an acceptable result. A few things to note about this pattern is that it is setup to primarily be sewed using a machine (even though machines were not invented until much later in the century) and thus uses some non-period techniques. Apart from this I could not fault this pattern in anyway and highly recommend it. My Breeches are slightly too big but I am hoping they will work. If attempting this costume it is important to remember that the fit of clothes at this time was quite different.

I used period appropriate linen as the lining and a cotton twill as the main fabric. The movie is slightly yellowed but I am unsure if this is the base colour or weathered. I am still unsure whether I will batch dye this piece to give a more yellowed appearance to match the movie or leave it to match the more historic look. Historical examples almost always used a wool but as that is difficult (and expensive) to find. The overall effect is good and they are quite comfortable.

Here is my version. The brass buttons will be replaced in some places with fabric covered version to better match the movie. This version in its current state replicates a museum version of the breeches that I was using as reference.
17436002_1746152739009847_2612262492630330921_o.jpg

Next I will tackle the waist coat.
 

Attachments

  • _DSC3553.JPG
    _DSC3553.JPG
    3 MB · Views: 956
Next on the list was the Waistcoat. For this pattern I used "Kannik's Korner" Man's Single-Breasted Waistcoat (KK-4202). While just as informative as the Laughing Moon Pattern this one seems to be more historically accurate, with a focus on hand sewing. While the hand sewing is tedious I found a weird satisfaction from the process.This waistcoat was completely hand sewn. I used scraps left over from the Breeches for the fabric and some simple brass buttons (just cheap version from the local fabric store and will hopefully replace). After spending a few hours finishing this off I realized something...
_DSC3842a.JPG
I realized that even though I replicated the pattern quite well, it is not really close to the version worn in Master and Commander. So I modified the pattern and then recreated it (this time I machined sewed where I could to speed up the process).
_DSC3835a.JPG
The red highlights the changes that I made to the pattern. After finishing the second Waistcoat I was happy with the result.
_DSC3844a.JPG
Next installment I will cover the shirt.
 
For the shirt I returned to Kannik's Corner for their Man's Shirt Pattern 1790-1830. Using a white linen purchased online I hand sewed a majority of it. The linen I used was a little thicker then I hoped so I would recommend purchasing in person. However this will just mean I am a little warmer when wearing the complete costume.

_DSC3845.JPG
As I was making this I ran into a small issue of what buttons to use. I decided on Dorset buttons as recommended in the pattern which were traditionally made using Dorset Ram horns. Since I was short on the Rams horns I used some suitably size pipe as I didn't wait for an online purchase.
_DSC3849.JPG
If interested in the making of the buttons check out this short video I made of the process (Not really a tutorial but a little bit of fun).

 
Last edited by a moderator:
Ok With Halloween over I have some time to finish off the details of this build.

Next the Jacket. With the jacket being the most important and most expensive item of the costume I decided to do this in two parts, especially as time was running out. Basically instead of making a muslin and then making the final "dress" jacket with the expensive wool and gold lace I decided to start with the "undress" version (the one without the gold trim). This would allow me to use cheaper fabrics and perfect the pattern and process. This was a good idea as the pattern I was using did need some significant changes to make it right and some decisions I made early on were terrifically incorrect.

To start with I used "#124 Laughing Moon Mercantile Men's Later Georgian Coat" for a majority of the pattern. I used Synthetic suiting material with a synthetic lining. This was ok as it was cheap and it looks the part. However the suiting fabric did have some stretch in it which made some of the build more challenging. I have no doubt that using authentic wool will make some of this process a lot easier (even if more expensive). The primary mistake I made was I chose to use the "Mariner" Cuff pattern which is how the "dress" uniform appears, however the "undress" uniform does not have this and has the basic cuff design. Although my jacket is less accurate it gave me good practice for when I get around to making the final version.

The main adjustment I need to make was to the front openings. In the Napoleonic version of the uniform (and the one portrayed in Master and Commander) these jackets are permanently buttoned in the opening position which meant i needed to pattern out the openings.
IMG_20170827_135910775.jpgIMG_20170827_141419289.jpg
These turned out well and for future versions I just need to make sure I have enough overlap to ensure the lining doesn't show through.
Moving onto buttons I had little luck finding a source until I came across a Canadian company that custom makes them. Historical Twist Store were a pleasure to work with and were the only source that i could find. Although the buttons are far from cheap and you need to order a minimum of 50 they add a level to the jacket that would be missed without it.
With the buttons added and all the buttons holes sewn I was overall happy with the result of the jacket. There are few minor issues that I should be able to fix on the final jacket when I get around to making it.
IMG_20171018_235708771.jpgIMG_20171112_160628821.jpg

The only part that I missed were the Epaulettes, post captain should have 2. At $250 each with a lead time of 3 months I wasn't in the right place (or time) to purchase them from my same source as the buttons. I will end up making these from scratch when I get around to making the final jacket.
 
Moving onto some of the extra bits and pieces of the costume I wanted to start with the boots. For movie accuracy (and historical too a point) you would need custom made Hessian boots. Since these run in excess of $400 the next best thing is Russian Riding boots. You can pick these up on ebay for less the $100 and work for a lot of different star wars costumes if you want something that has multiple use (think Han Solo or Imperial officers). With the boots you will need some stockings, alternatively you can use long white socks.I found mine here after some of my most bizarre internet searches.

Next is a cravat. For the best reference I would use this image from this auction site that sold part of the costume. For the most part it looks like an intricately tied thin piece of black silk. I used a cutoff from a cotton black sheet as this was the only fabric I had available of the correct color and weight. It actually turned out closer then I originally thought.
22814208_1835918920033228_2563464112443430390_n.jpg
After that you need are a hat and sword. I haven't got to these yet and will probably make them at my leisure. The hat is a Bicorne and I intend to use a felt blank and make the rest by hand. Finally there is the sword. The best details I can find are available here. Where it turns out the sword Russel Crow used was not the one he was intended to use as in the books Captain Jack prefers a Calvary Sabre. However the one used is based on a version at Royal Museums Greenwich which has been replicated at the Royal Sword and is referenced as a Gentleman's Naval Cutlass. When finished I intend to replicate this so it is Con safe.

- - - Updated - - -

Finally I want to end this build ... for now with some pictures I took with my son's Royal Marin Costume. I intend to return to finish this costume but I am happy to take a break for now.
22815401_1835918936699893_8041583741994387203_n.jpg22886343_1835918976699889_296709974101603458_n.jpg22815228_1835918926699894_9189830562997678950_n.jpg
 
Moving onto some of the extra bits and pieces of the costume I wanted to start with the boots. For movie accuracy (and historical too a point) you would need custom made Hessian boots. Since these run in excess of $400 the next best thing is Russian Riding boots. You can pick these up on ebay for less the $100 and work for a lot of different star wars costumes if you want something that has multiple use (think Han Solo or Imperial officers). With the boots you will need some stockings, alternatively you can use long white socks.I found mine here after some of my most bizarre internet searches.

Next is a cravat. For the best reference I would use this image from this auction site that sold part of the costume. For the most part it looks like an intricately tied thin piece of black silk. I used a cutoff from a cotton black sheet as this was the only fabric I had available of the correct color and weight. It actually turned out closer then I originally thought.
View attachment 772924
After that you need are a hat and sword. I haven't got to these yet and will probably make them at my leisure. The hat is a Bicorne and I intend to use a felt blank and make the rest by hand. Finally there is the sword. The best details I can find are available here. Where it turns out the sword Russel Crow used was not the one he was intended to use as in the books Captain Jack prefers a Calvary Sabre. However the one used is based on a version at Royal Museums Greenwich which has been replicated at the Royal Sword and is referenced as a Gentleman's Naval Cutlass. When finished I intend to replicate this so it is Con safe.

- - - Updated - - -

Finally I want to end this build ... for now with some pictures I took with my son's Royal Marin Costume. I intend to return to finish this costume but I am happy to take a break for now.
View attachment 772925View attachment 772926View attachment 772927
Outstanding stuff! I can't wait to see the final jacket! I love period correct costumes!

Sent from my SM-G950U using Tapatalk
 
This thread is more than 6 years old.

Your message may be considered spam for the following reasons:

  1. This thread hasn't been active in some time. A new post in this thread might not contribute constructively to this discussion after so long.
If you wish to reply despite these issues, check the box below before replying.
Be aware that malicious compliance may result in more severe penalties.
Back
Top