dsk001
New Member
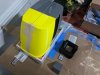
I am starting with the "finished" images (still need clear coat on a few places, and paint in others)


I started this a few weeks ago when I heard of the cosplay contest MakerFaire is hosting this Saturday
I immediately decided I wanted to join.
I started up Fusion 360 and started modeling


This is what I thought was my final design, when I was almost done with the prop I noticed I did not model one piece correctly and had to start that one all over again.

First 3D prints of my Prusa i3

Parts being glued together and holes filled with wood putty. Which I actually found out later is horrible for Wet sanding as it dissolves in water even after it is dry.

3D prints covered in XTC3D - a resin to help eliminate the layer lines in a 3d print. I also found it sands a lot better than PLA so it saves time too.

Sanded up to 400 grit and covered in primer

First parts painted

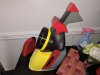
First test fit of the pieces, since I was working to a deadline I couldn't give myself the benefit of working on each piece until it was done. As one was being painted another was being printed

Much further along in the process

This is about when I realized I had mis modeled a piece.
I in this picture it is currently being re-printed
Here a few of the pieces has clear coat and decorative vinyl stickers made using my older 3D printer converted to a laser cutter

After this it would be what you see at the top.
about 3 weeks total start to finish.
Well thanks to my wife for allowing to move the 3D printer to the living room to allow almost 24 hour a day printing to reach the deadline.
I started this a few weeks ago when I heard of the cosplay contest MakerFaire is hosting this Saturday
I immediately decided I wanted to join.
I started up Fusion 360 and started modeling
This is what I thought was my final design, when I was almost done with the prop I noticed I did not model one piece correctly and had to start that one all over again.
First 3D prints of my Prusa i3
Parts being glued together and holes filled with wood putty. Which I actually found out later is horrible for Wet sanding as it dissolves in water even after it is dry.
3D prints covered in XTC3D - a resin to help eliminate the layer lines in a 3d print. I also found it sands a lot better than PLA so it saves time too.
Sanded up to 400 grit and covered in primer
First parts painted
First test fit of the pieces, since I was working to a deadline I couldn't give myself the benefit of working on each piece until it was done. As one was being painted another was being printed
Much further along in the process
This is about when I realized I had mis modeled a piece.
I in this picture it is currently being re-printed
Here a few of the pieces has clear coat and decorative vinyl stickers made using my older 3D printer converted to a laser cutter
After this it would be what you see at the top.
about 3 weeks total start to finish.
Well thanks to my wife for allowing to move the 3D printer to the living room to allow almost 24 hour a day printing to reach the deadline.