The Lightsmith
New Member
As many of us fans, I saw the Kylo Ren force fx Lightsaber and couldn't go home without it. XD I enjoyed it for a while, it made an interesting display for a little bit, then I started doing some light dueling( couldn't resist, the movie was only a month or so away) and I wasn't to happy with how it handled, or with the over all clean look of it. So I started with the paint, that was the first thing to go. Then I torn it apart and detailed the inner defusing plastic and painted that red to give it some more color and variation both on and off.


I thought that it was kind of pointless to have a Lightsaber that I couldn't use, so I started dueling more and more, until the blade broke. Which wasn't to upsetting(or suprising); I had been thinking about ways I could replace the blades, and make them removable, but also make it more duel worthy than before.
Over the past couple weeks, I've been slowly making some progress outside of class and other things in life. Haha I started tearing it down even further, taking parts like the mid section off, making the saber much more comfortable to hold. I also was inspired by Jamestan's work on his saber(if you haven't already seen it, you should check it out, and his black series helmet mod too), and how he made new quillions all together. And the cut away section always bugged me, it didn't look cut away at all; the "blue wires"were practically flush with the body of the saber in my case. The plastic back plate I still use, although I thought about making a metal one to replace it, hopefully with a different switch too(the other saber blade would sometimes slide down and turn the saber off... that was annoying. XD) I also got rid of the rubber wire.


With the Force Awakens release(which was amazing, to say the least!) and the new canon material like the visual dictionary and so on, I was re-inspired


After i had taken off the mid section piece, the saber looked a little funny, so I started cutting the sections surrounding the "heat vent/fins" evening out the pommel and giving a sleeker and more even look. I also cut into the top making the cut away real, which goes to the plastic parts holding the blade.


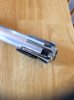
Today, I did some more weathering, some electrical, fabrication(if you can call it that). The blue wires in the cut away are the positive leads for the quillion lights(the negatives run down the back). I moved the sound board down a little ways, it's not a perfect fit, yet, but it's a work in progress. Doing that gave me more room for a blade(as of right now, there's about 3 inches of length for a blade to be secured, but a small section of the board goes into the blade, which I might be able to use that to my advantage, if all goes well. Interestingly the clash sensor is part of that section). In these pictures, I have a 2 inch section of blade(thick wall polycarbonate, translucent) and some greeblies from an old microscope which may become my blade plug(or I'll try something with a crystal like the dictionary). I found a solid wire with braided heat resistant insulation which I think looks way better than any other insulation I've found. The goal is to get a saber forge led to fit, which I'll most likely have to dismantle. Hopefully I'll remember to take more pictures of the changes and progress. If anyone has any suggestions or tips that would be great!
I thought that it was kind of pointless to have a Lightsaber that I couldn't use, so I started dueling more and more, until the blade broke. Which wasn't to upsetting(or suprising); I had been thinking about ways I could replace the blades, and make them removable, but also make it more duel worthy than before.
Over the past couple weeks, I've been slowly making some progress outside of class and other things in life. Haha I started tearing it down even further, taking parts like the mid section off, making the saber much more comfortable to hold. I also was inspired by Jamestan's work on his saber(if you haven't already seen it, you should check it out, and his black series helmet mod too), and how he made new quillions all together. And the cut away section always bugged me, it didn't look cut away at all; the "blue wires"were practically flush with the body of the saber in my case. The plastic back plate I still use, although I thought about making a metal one to replace it, hopefully with a different switch too(the other saber blade would sometimes slide down and turn the saber off... that was annoying. XD) I also got rid of the rubber wire.
With the Force Awakens release(which was amazing, to say the least!) and the new canon material like the visual dictionary and so on, I was re-inspired
After i had taken off the mid section piece, the saber looked a little funny, so I started cutting the sections surrounding the "heat vent/fins" evening out the pommel and giving a sleeker and more even look. I also cut into the top making the cut away real, which goes to the plastic parts holding the blade.
Today, I did some more weathering, some electrical, fabrication(if you can call it that). The blue wires in the cut away are the positive leads for the quillion lights(the negatives run down the back). I moved the sound board down a little ways, it's not a perfect fit, yet, but it's a work in progress. Doing that gave me more room for a blade(as of right now, there's about 3 inches of length for a blade to be secured, but a small section of the board goes into the blade, which I might be able to use that to my advantage, if all goes well. Interestingly the clash sensor is part of that section). In these pictures, I have a 2 inch section of blade(thick wall polycarbonate, translucent) and some greeblies from an old microscope which may become my blade plug(or I'll try something with a crystal like the dictionary). I found a solid wire with braided heat resistant insulation which I think looks way better than any other insulation I've found. The goal is to get a saber forge led to fit, which I'll most likely have to dismantle. Hopefully I'll remember to take more pictures of the changes and progress. If anyone has any suggestions or tips that would be great!