DONW999
Member
So, here are some details photos and maybe a thought or two of other things.


Im quite happy with how the Foo-Dog turned out, although, it seems a little too big because I don't have much space for Harmon. Live and learn.


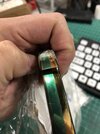
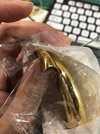
The blade was sanded down a bit too much, because I was impatient and worked on the blade before I bought the brass piece. so it is too big.


Funny thing about real ray skin. Allow me to ask if you have been to the dentist and have cavity drilled out? You know that special smell? It turns out, it is the same if you file the ray skin - calcium. And it is really hard, not unbreakable hard, but hard and abrasive enough to beat most files work on plastic.


 The sword itself fully disassembled or field stripped.


My wife was named after a piece of poem that her grand father was quite fond of, the four letters mean “all that pure energy of beauty and good gathered and give birth to such splandid child”... I might went over the board with translation a bit, but hey, she's my wife, I am allowed to give her all the compliments, right!!

So I also made a stand out of PVC pipes, screws and bolts. My one day build, hahaha.
It isn't difficult, not like at all expected. If you don't really care about precision that much.-_<, but a hole drill most definitely is helpful. Because I know its going to take a bit of weight, so I chose larger OD 35mm for the vertical, and 20mm for the horizontals. Originally, I was going to make a base out of cardboard, but it turns out, I didn't have any large enough and it may not be strong enough. So one section of the 40mm pipe, left over from the light saber build, was drafted and used a base stand. This way, it looks a bit like the Japanese Kendo court stands.
The long screws are really a good idea because, initially, I considered glue, but didn't go with as it is probably not going to be strong enough. "Strong enough" again, em... gotta think of something else to say.
Oh, yes, the shelves, can I call them that? I just hold them at an angle and drill the hole with 3mm drills and inserted screws. No need for special treatment and as long as the drill go through four layers, it is all Okey.

Added a few pieces of EVA foam on the shelves and on the back, because I don't wan the protruding bolt head scratching my wall and the it protests the goodies resting on them.
Don't worry, the "guns" are not real, just water gel pellets projectile shooters, like the Snobnose Blade Runner blaster. And they were bought for visual value than their shooting prowess.
There is little expendability at the bottom for one more shelf, but I want to leave it as it is for now and it can grow upwards if necessary, though, the base needs to be upgraded as well in that case.
It isn't too difficult to drill at an angle with a hole drill on PVC pile, that's how I did the bottom diagonal supports.

Well, we are at the end again. What do you think? Any suggestions?
I just bought a omni mecha arm for camera, hopefully can start making some videos. Would appreciate suggestions on that too.
Stay safe and good luck!
Im quite happy with how the Foo-Dog turned out, although, it seems a little too big because I don't have much space for Harmon. Live and learn.
The blade was sanded down a bit too much, because I was impatient and worked on the blade before I bought the brass piece. so it is too big.
Funny thing about real ray skin. Allow me to ask if you have been to the dentist and have cavity drilled out? You know that special smell? It turns out, it is the same if you file the ray skin - calcium. And it is really hard, not unbreakable hard, but hard and abrasive enough to beat most files work on plastic.
My wife was named after a piece of poem that her grand father was quite fond of, the four letters mean “all that pure energy of beauty and good gathered and give birth to such splandid child”... I might went over the board with translation a bit, but hey, she's my wife, I am allowed to give her all the compliments, right!!
So I also made a stand out of PVC pipes, screws and bolts. My one day build, hahaha.
It isn't difficult, not like at all expected. If you don't really care about precision that much.-_<, but a hole drill most definitely is helpful. Because I know its going to take a bit of weight, so I chose larger OD 35mm for the vertical, and 20mm for the horizontals. Originally, I was going to make a base out of cardboard, but it turns out, I didn't have any large enough and it may not be strong enough. So one section of the 40mm pipe, left over from the light saber build, was drafted and used a base stand. This way, it looks a bit like the Japanese Kendo court stands.
The long screws are really a good idea because, initially, I considered glue, but didn't go with as it is probably not going to be strong enough. "Strong enough" again, em... gotta think of something else to say.
Oh, yes, the shelves, can I call them that? I just hold them at an angle and drill the hole with 3mm drills and inserted screws. No need for special treatment and as long as the drill go through four layers, it is all Okey.
Added a few pieces of EVA foam on the shelves and on the back, because I don't wan the protruding bolt head scratching my wall and the it protests the goodies resting on them.
Don't worry, the "guns" are not real, just water gel pellets projectile shooters, like the Snobnose Blade Runner blaster. And they were bought for visual value than their shooting prowess.
There is little expendability at the bottom for one more shelf, but I want to leave it as it is for now and it can grow upwards if necessary, though, the base needs to be upgraded as well in that case.
It isn't too difficult to drill at an angle with a hole drill on PVC pile, that's how I did the bottom diagonal supports.
Well, we are at the end again. What do you think? Any suggestions?
I just bought a omni mecha arm for camera, hopefully can start making some videos. Would appreciate suggestions on that too.
Stay safe and good luck!
")