dlcramer
New Member
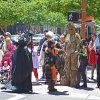
After Phoenix Comicon Fan Fest last December, my wife and I challenged ourselves to actually dress up for comicon this past weekend. I took on the task of being Groot. It was a blast figuring out how I would pull it off. Spent a lot of time here looking for tips and tricks others did and I thank everyone who I stole ideas from. My biggest regret is not getting enough pictures of the parts of the build.
Biggest obstacles were glue, surface finish, and procrastination.
Glue was most difficult because the different materials. The majority of the costume is comprised of eva (2mm and and 9.5mm aka 3/8 thick), water pipe insulation, long sleeve tee, shorts, and the glues. We finally found Beacon fabric. Tack worked with everything. Great! Downside was it's not very flexible when dry with the amount we used. But it worked.
Note to future Groots - hot glue melts/eats water pipe insulation. Bad for glueing but handy to texture if done right.
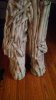
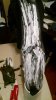
Surface finish. For Eva it was a snap. Score with exact and then take the heat gun to it to open up the score marks. But the water pipe insulation wasn't as forgiving. We tried doing a layer of latex caulk. Worked well for texture but peeled to easily. Needed up peeling the majority of it off and taking a coarse sand paper to the insulation to make it more receptive to paint which held on well considering.
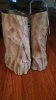
Paint. To keep a muted look (many groot builds seem to dark to me) I went with krylon boat camouflage in the beige and olive green (both flat) and a dusting of a darker flat brown. Plastidip was used only on areas where cloth material was still exposed. With no primer, and 2 layers of paint it gave a color I was happy with.
Procrastination. Ran out of time to fine tune things like covering my neck, coming up with a cooling option (a good idea to have in Phoenix.
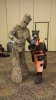
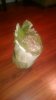
Risers. Went sturdy. 2 pieces of 8 inch long 4inch diameter pvc per foot. Velcro straps. Encased in spray foam that was carved then cover with 2mm eva. 3/8 pvc sheet on top and bottom with 3/8 eva for soles. I wish I took pics of the assembly. They were heavy but very sturdy and held up to walking and riding the escalators.
Finished off the costume using Moss from a craft store to hide a lot of mistakes.
Attached pictures that I do have from the build.
Biggest obstacles were glue, surface finish, and procrastination.
Glue was most difficult because the different materials. The majority of the costume is comprised of eva (2mm and and 9.5mm aka 3/8 thick), water pipe insulation, long sleeve tee, shorts, and the glues. We finally found Beacon fabric. Tack worked with everything. Great! Downside was it's not very flexible when dry with the amount we used. But it worked.
Note to future Groots - hot glue melts/eats water pipe insulation. Bad for glueing but handy to texture if done right.
Surface finish. For Eva it was a snap. Score with exact and then take the heat gun to it to open up the score marks. But the water pipe insulation wasn't as forgiving. We tried doing a layer of latex caulk. Worked well for texture but peeled to easily. Needed up peeling the majority of it off and taking a coarse sand paper to the insulation to make it more receptive to paint which held on well considering.
Paint. To keep a muted look (many groot builds seem to dark to me) I went with krylon boat camouflage in the beige and olive green (both flat) and a dusting of a darker flat brown. Plastidip was used only on areas where cloth material was still exposed. With no primer, and 2 layers of paint it gave a color I was happy with.
Procrastination. Ran out of time to fine tune things like covering my neck, coming up with a cooling option (a good idea to have in Phoenix.
Risers. Went sturdy. 2 pieces of 8 inch long 4inch diameter pvc per foot. Velcro straps. Encased in spray foam that was carved then cover with 2mm eva. 3/8 pvc sheet on top and bottom with 3/8 eva for soles. I wish I took pics of the assembly. They were heavy but very sturdy and held up to walking and riding the escalators.
Finished off the costume using Moss from a craft store to hide a lot of mistakes.
Attached pictures that I do have from the build.
Attachments


Last edited: