How To Build A BB/TDK/R Utility Belt From Scratch.... For Under $20!!

Material List:

1/4" mdf sheet 2'x4' ...............$6.00
1 can high-build primer............$4.00
1can gold spray paint.............$4.00
1 can clear acrylic.................$4.00

Required Tools:
Jig saw
drill gun/ drill bits
sandpaper

Beneficial Tools:
Drill press
Bandsaw
Mitre saw
Router

This whole build can be made with just a drill, a jig saw, and some sand paper. But I have collected some others over the years so I made use of them in this build... :D

The fist step is basically to cut out all of the basic shapes. To make this go fastest it is beneficial to first cut out strips of the appropriate thickness and then just cut off the amount of blocks needed.

For the buckle I used two pieces sandwiched. The bottom was a base, and the top was shaped with sandpaper.
 

Attachments

  • IMG_0176_zps4ca77ee4.jpg
    IMG_0176_zps4ca77ee4.jpg
    55.8 KB · Views: 139
  • IMG_0177_zps466d7544.jpg
    IMG_0177_zps466d7544.jpg
    61.5 KB · Views: 117
  • IMG_0181_zps34bbe976.jpg
    IMG_0181_zps34bbe976.jpg
    86 KB · Views: 123
  • IMG_0182_zps0c4148c2.jpg
    IMG_0182_zps0c4148c2.jpg
    69.5 KB · Views: 113
  • IMG_0183_zpsa07f0102.jpg
    IMG_0183_zpsa07f0102.jpg
    85.2 KB · Views: 116
  • IMG_0184_zpse564bad3.jpg
    IMG_0184_zpse564bad3.jpg
    85.6 KB · Views: 135
  • IMG_0185_zpsba60b789.jpg
    IMG_0185_zpsba60b789.jpg
    87.6 KB · Views: 112
  • IMG_0186_zpsfa817376.jpg
    IMG_0186_zpsfa817376.jpg
    90.8 KB · Views: 115
  • IMG_0187_zps0bc2d9b8.jpg
    IMG_0187_zps0bc2d9b8.jpg
    91.8 KB · Views: 144
  • IMG_0188_zps9ea7b1dc.jpg
    IMG_0188_zps9ea7b1dc.jpg
    79 KB · Views: 119
Last edited:
To cut the 14 smaller links into an "I" shape, you could just do each one individually. I decided to stack them all up in a jig and then notch them all out at once with a router. This saved a TON of time.
 

Attachments

  • IMG_0189_zps9fe59a7e.jpg
    IMG_0189_zps9fe59a7e.jpg
    84.2 KB · Views: 127
  • IMG_0190_zps00653633.jpg
    IMG_0190_zps00653633.jpg
    89.6 KB · Views: 122
  • IMG_0191_zpsd4322cbe.jpg
    IMG_0191_zpsd4322cbe.jpg
    70.7 KB · Views: 224
  • IMG_0192_zps5c7c0bf0.jpg
    IMG_0192_zps5c7c0bf0.jpg
    93 KB · Views: 134
  • IMG_0195_zps438745b0.jpg
    IMG_0195_zps438745b0.jpg
    108.7 KB · Views: 127
Last edited:
Finishing each piece consists of spraying each part with some high-build primer. This gives you a surface which can be flatted down with some 400grit sand paper. This will give you a good smooth finish which can later be painted over without exposing the rough sides of the MDF. Then I coated each one with a coat of metallic gold.


Thats where I am so far. I still need to add rivets and detail the center.

Also, The pieces still look kind of "plasticky" I am trying to figure out a way to give them a better finish, I was thinking of some washes of other paint to give the parts some detail. I'm sure someone has tackled this problem on an iron-man build. So in the mean time ill be reading up on those. Anyone have any suggestions on metallic finishes?
 

Attachments

  • IMG_0198_zpsd221adca.jpg
    IMG_0198_zpsd221adca.jpg
    64.5 KB · Views: 168
  • IMG_0199_zpsc4656b85.jpg
    IMG_0199_zpsc4656b85.jpg
    62.5 KB · Views: 127
  • IMG_0200_zps05417be0.jpg
    IMG_0200_zps05417be0.jpg
    67.4 KB · Views: 127
  • IMG_0201_zps5c81c761.jpg
    IMG_0201_zps5c81c761.jpg
    64.2 KB · Views: 122
  • IMG_0202_zps76e7299a.jpg
    IMG_0202_zps76e7299a.jpg
    62.6 KB · Views: 124
  • IMG_0203_zps308a0ee8.jpg
    IMG_0203_zps308a0ee8.jpg
    61.5 KB · Views: 122
  • IMG_0205_zpsa85e8ba4.jpg
    IMG_0205_zpsa85e8ba4.jpg
    92.7 KB · Views: 117
  • IMG_0207_zps078cb4a4.jpg
    IMG_0207_zps078cb4a4.jpg
    79.7 KB · Views: 136
  • IMG_0209_zps5e2db700.jpg
    IMG_0209_zps5e2db700.jpg
    78.6 KB · Views: 121
  • IMG_0210_zps3705d062.jpg
    IMG_0210_zps3705d062.jpg
    78.4 KB · Views: 128
Last edited:
hmmm.... (Invalid Attachment specified. If you followed a valid link, please notify the administrator.)
 
Ohh that was weird, I redid the attachments so they should show up now.. let me know if there are any more problems with them and ill try to get em sorted out.
 
Here's an update on what I completed today:

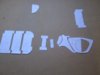
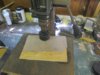
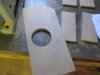
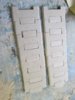
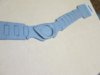
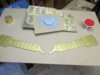
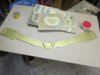
I added the rivets to the pieces. They're just normal aluminum pop rivets you can get from home depot. You drill a hole of the appropriate size and then use the tool to set the rivets.

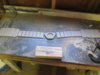
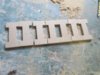
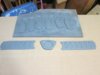
I also made some decisions on the finish. It's really difficult to get a decent metallic finish and it was disappointing to see something which looked awesome in primer look like a cheap piece of plastic after I sprayed it with the gold and the clear. So instead I decided to make a belt with some battle damage.

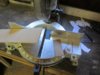
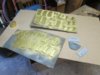
1. To weather the pieces I sanded the clear coat on each one with some 400grit sandpaper. This dulled the finish and added some really small one directional scrapes. ***This is important. Sanding in one direction will help give a brushed metal look.

2. Then I did a wash of black acrylic paint. I just rubbed some on a towel and smeared it all over the pieces. making sure to get it into all the corners near the rivets.. etc

3. Then I smeared off the paint, leaving smear marks in the same direction as the sanding in step one.

4. I sanded each piece again to remove some of the paint and really bring out the look of brushed metal.

5. Then I rubbed each piece down with some mold release wax to polish them up a bit.

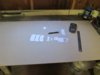
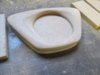
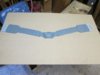
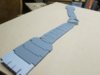
I think it turned out really good. some of the primer on the corners got exposed, but after all the washes and plishing it looks kind of like chips from usage. I'm still not finished with it. I'll go in and do some drybrushing and final touches later. I also still have to add the metal bars to each link, as well as finish the inner belt buckle.

This it so far: let me know what you guys think .

IMG_0211_zps10299ae4.jpgIMG_0212_zps0fe2872c.jpg
IMG_0213_zps0c0026e9.jpgIMG_0214_zps3528f829.jpg
 
Back
Top