Beetroot
Active Member
Hi all,
Here is my attempt at “The Martian” extravehicular suit for my daughter this Halloween. This build was inspired by the team over at tested.com and there complete build but most of the reference and build ideas came from “The Martian Space Suit” thread.
http://www.therpf.com/showthread.php?t=239801&highlight=martian
As I progress through the build I will attempt to reference the sources as accurately as I can.
I have set this up as a separate build post to separate this from the highly detailed and accurate work going over at that thread as this build is both on a budget and for a child. I also wanted to highlight a lot of the issues that I encountered with this build and want others to avoid if possible.
Enough waffling and onto the build.
The suit: We are going to start with the hardest part of the build. After seeing the type of fabric used and the amount of panels on the original (tested’s video on this gives great reference) I decided (in my ignorance) to use an old wet suit. The plan was to get it cheap, spend a few minutes getting it the right colour and it would be super comfortable for my toddler to wear.

Since the original colour and size was off I cut it down and sewed it to size. This was my first error (keep track there will be a few) the wet suit was too thick. It was difficult to sew and ended up being too hot and not flexible enough to move in. I also made the pattern too big (took me 5 months to realize as I started to early and my son didn’t grow as much as I thought he would) and that is how it ended up being my daughters costume. After finding out about a product called textile medium, an additive to acrylic paint that makes it flexible. I went to work repainting it to white.

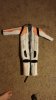
After getting the suit a reasonable level of white came my next great idea of using orange and grey fabric markers to add the coloured panels (instead of screen printing).


After getting the orange complete and adding the grey I then added the “circuit” pattern using black markers. All of these markings were based on a rough pattern that I had come up with based on picture/videos of the suit.

Next came the outlines. Obviously the actual suit is made up of many panels with hollow black piping between each panel. Not have the time (read as patience) or the correct materials I faked it using black “puff paint”. This worked ok but I couldn’t get anywhere near a crisp enough lines but gave a good overall effect.
Finally I need to add the remaining black panels. This was done by cutting out the armpits and behind the knee and hand sewing in with a stretchy black fabric. (If I had planned this better I could have done this when I sewed the initial suit).


Here is my attempt at “The Martian” extravehicular suit for my daughter this Halloween. This build was inspired by the team over at tested.com and there complete build but most of the reference and build ideas came from “The Martian Space Suit” thread.
http://www.therpf.com/showthread.php?t=239801&highlight=martian
As I progress through the build I will attempt to reference the sources as accurately as I can.
I have set this up as a separate build post to separate this from the highly detailed and accurate work going over at that thread as this build is both on a budget and for a child. I also wanted to highlight a lot of the issues that I encountered with this build and want others to avoid if possible.
Enough waffling and onto the build.
The suit: We are going to start with the hardest part of the build. After seeing the type of fabric used and the amount of panels on the original (tested’s video on this gives great reference) I decided (in my ignorance) to use an old wet suit. The plan was to get it cheap, spend a few minutes getting it the right colour and it would be super comfortable for my toddler to wear.
Since the original colour and size was off I cut it down and sewed it to size. This was my first error (keep track there will be a few) the wet suit was too thick. It was difficult to sew and ended up being too hot and not flexible enough to move in. I also made the pattern too big (took me 5 months to realize as I started to early and my son didn’t grow as much as I thought he would) and that is how it ended up being my daughters costume. After finding out about a product called textile medium, an additive to acrylic paint that makes it flexible. I went to work repainting it to white.
After getting the suit a reasonable level of white came my next great idea of using orange and grey fabric markers to add the coloured panels (instead of screen printing).
After getting the orange complete and adding the grey I then added the “circuit” pattern using black markers. All of these markings were based on a rough pattern that I had come up with based on picture/videos of the suit.
Next came the outlines. Obviously the actual suit is made up of many panels with hollow black piping between each panel. Not have the time (read as patience) or the correct materials I faked it using black “puff paint”. This worked ok but I couldn’t get anywhere near a crisp enough lines but gave a good overall effect.
Finally I need to add the remaining black panels. This was done by cutting out the armpits and behind the knee and hand sewing in with a stretchy black fabric. (If I had planned this better I could have done this when I sewed the initial suit).