GMH Boba Fett helmet--ESB style

superjedi

Sr Member
Hi all!
I usually post my Boba Fett helmet threads over on TDH, but this one is for
member Seven right here on the good ol' RPF. :)

I received the helmet kit several days ago along with some very nice accessories.
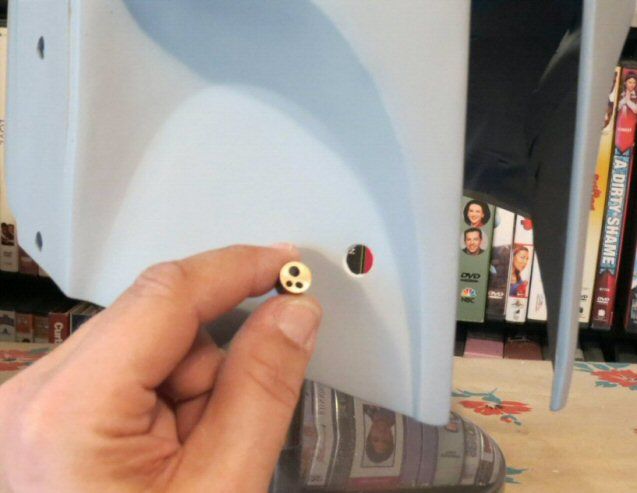
This is a GMH resin Fett helmet, and Seven sent along a set of machined aluminum
ear parts, including the RF stalk, a real Borden dental tool connector, and a real MQ-1
circuit board for the keyslot insert.

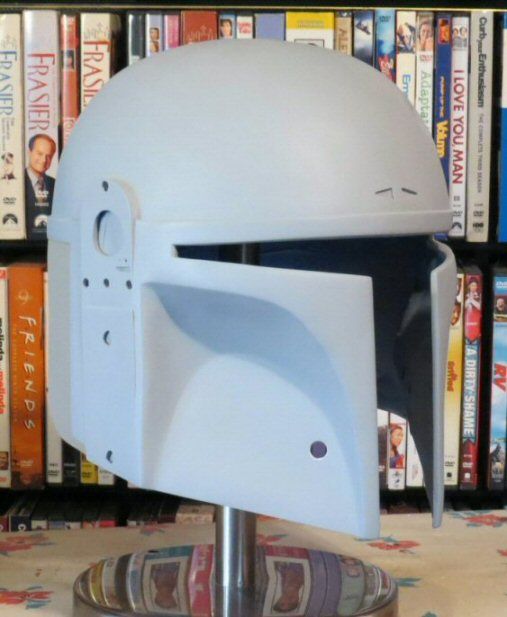
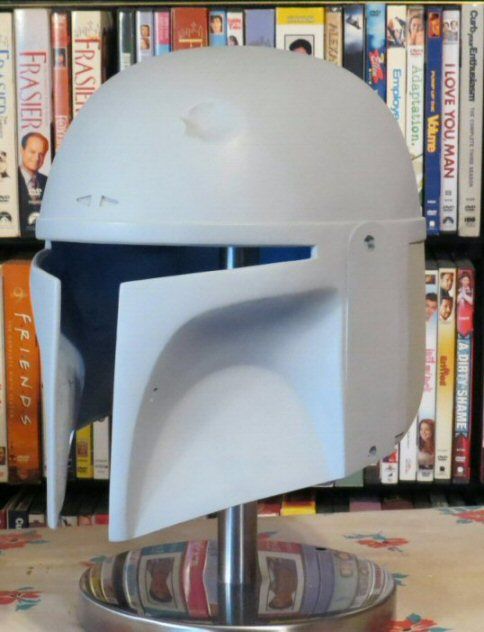
I began prepping the helmet by cutting out the visor area, trimming along the bottom
of the helmet, opening up the keyslots, and drilling out the ear attachment holes.
I used some Bondo to fill the molded-in PrePro 2 damage and hit the helmet with a
couple of coats of primer. I didn't take any pics during the prep, but here's where
the helmet stands now.


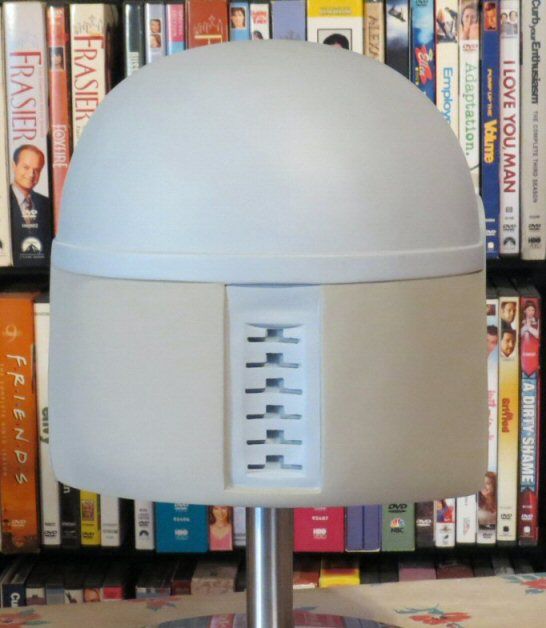
I have also put the first color coat on the back panels. I like to use Floquil/Polly Scale
paints as much as possible, but with them being discontinued, they're going to become
more rare. :cry I used Floquil Concrete on the back panels.


I cut down the Borden connector, and Dremeled out the detail that's molded in on
the helmet's right cheek. After all the paint work is complete, I'll epoxy the metal
Borden in place.


I do my Fett paint jobs topically. I've seen some amazing layered paint jobs as well,
but I've always preferred the topical method. I just feel I have more control that way.
More to come!
 
Thanks, guys, appreciate it!

UPDATE: December 25, 2013

Merry Christmas! Some elves did some work on the helmet the last few days,
so I thought I'd share their efforts. :)

Got the base green laid down over the Concrete on the rear panels. The panels
were stenciled, then masked with some Winsor & Newton masking fluid. This is
great stuff! I've had the same bottle for over 5 years at least, and it's still going
strong. Once the panels had the W&N applied, I airbrushed the green on in a light
to medium coat. I try to keep it just a little translucent at first, then go back and
darken certain areas to try and match the reference pics as much as possible.


After airbrushing, I go back with the same color and add the small darker splotches with
the same base green using a fine brush. My favorite size detail brush is a size 000 Model
Master brush. If you take care of these brushes, they'll last for a long time!
Adding the base color with a brush makes the color appear more dense, and it stands out
just enough over the airbrushed base to give it some contrast.


Now that this stage is complete I'll move on to the gray damage sections. These will be
stenciled and transferred onto the helmet, too. All of the stencils I use were created by a
member over on The Dented Helmet called RafalFett. He has developed some amazing
templates for not only ESB and ROTJ Fett helmets, but the PrePro variants as well! I use
Rafal's templates as a starting point, and when I'm painting, I always have a couple of
reference pics up on my laptop as I'm working to make sure everything stays true to the
screen-used bucket. Hope everyone has a great Christmas! More to come. . .
 
oh boy, if I ever decide to add a Fett bucket to my collection, I make sure to commission YOU for the paintjob and assembly.
I admire your work Eric...makes it look so easy :)

watching progress with great interest!

Markus
 
Oh dude!!! This looks great!!! Can you send me some details about your painting commissions?
 
Markus, if you lived in the states you would have to have a Fett helmet. . . it's the law! :D

Geeza, thanks! PM coming your way.

I've gotten the left rear panel complete. I added the gray and the silver, then went back
with a sharp compass point and added the very fine scratches.


If you look around the curve beyond the keyslots, you can see that I've already laid
in some of the gray on that large damage section on the right panel. I paint on many of
the larger gray chips to give myself "landmarks" as I do the silver. After I apply the silver
on that section, I'll go back and do all the tiny gray chips and marks.
 
Here's the latest.

I have completed the rear panels. That big silver area always makes me go
cross-eyed :wacko, so I do it in several sessions. I went back and finished the gray
chips, and then added the gray and silver in the upper right corner and the
lower right corner. I finished by adding the fine scratches with my compass point.


There's a contrasting pale gray color in a few areas all over the helmet, including
the back panels. I'll add this after the entire helmet is painted.
The next stage will be to apply the base green on the dome and inner cheeks.
 
Hate to sound uneducated but id be still in the dark if i didnt ask, what is the difference between topical and the layered air brush method for painting?

So far, be it only the back panels, your painting skills look incredible.
I shall be following, I love to see a fett helmet bought to life.
 
Rosskow, if we use the Boba Fett helmet as an example, a layered paint job would begin
with a coat of silver over the entire helmet. The areas to remain silver would be masked
off with some type of masking agent like artists' masking fluid, then sprayed with the color
that surrounds the silver. In this case, gray.
The silver AND gray would then be masked off, and the next color applied, and so on.

With a topical paint job, it's pretty much the opposite. The overall color is laid down first,
then the detail colors over that.

When I do my helmet paint ups, I do everything topical except for that intermediate stage
on the rear panels. After I spray the concrete color, I use masking fluid, then spray the
darker green. Everything else is done by brush.
 
Happy New Year!
Have a day off, and what better way to enjoy my free time than
to do some painting.

This update shows several stages. I laid down my base color on the
dome and inner cheeks. To break up the starkness of all that green, I mixed
a lightened shade and airbrushed some splotchy, diffuse patterns. These
patterns are very subtle, but the screen-used helmet has that appearance.
I try to duplicate it as best I can.

I also began the detailing on the back of the dome. I added the gray and silver,
and used my compass point again for the network of really fine scratches.


I'll continue working my way around the dome using these same colors. It's starting
to look a bit more like Boba now! :)
 
Second update for today. This finishes the area behind the RF ear.
Next up will be the "cat scratch" region in front of the RF ear arch. :)

 
Sigh. It must be the paint I use and/or the (Filbert) brush size...but when I paint topical, I can see every lousy paint brush mark, especially silver. Even still, topical painting is great fun though.

Rant over. Great thread. Love the details you provide.
 
Tictoc, I've been brush painting with Polly Scale acrylics for years. They level really well.

Here's the latest. I've gotten the whole cat scratch area complete. This area has 3 significant
damage patterns, and they're all closely related, so I do them together.


The cat scratch is one of those easily identifiable ESB features, and there's a lot of
detail going on in such a small area!

After that section was complete, I did the smaller mark over the turn signals.
The compass was used here again for the really fine scratches.


Next up will be the dent! :)
 
My god that is a phenomenal paintjob. Really just incredible. It seems like a weird thing to focus on, but I love the fine scratches, they really sell it.
 
Thanks, Rubber Slug! I love all those little scratches, too.

Got the dent/streak done. There will be a bit more added to this area
during final weathering with the contrasting gray and some pastels.
Here are a couple of angles.


Next up is the big scrape on top of the dome.
 
More. . .


This completes all the damage on the dome that I do prior to painting the killstripes.
The gray and silver areas that remain are closely aligned with the stripes, so I add
them first, then complete the rest of the gray and silver.
However, before I do the killstripes, I'll move on to the cheeks.
 
I got some work done on the cheeks. I typically don't have much time during the week
to work on hobby projects, but I squeeze some painting time in here and there.

I painted the outer cheeks, then began the detail painting on the right side.


I've already stenciled the left cheek and laid down the silver. I'll get to the gray tomorrow,
then it will be. . . killstripe time!
 
Got the left cheek complete. :)


This part of the helmet has another of the few custom mixed colors that I use.
The inner cheek has that longish vertical gray scratch that turns outward. The
outer portion of that section, and down to the base, is a slightly darker, greener
gray. I've looked thru a lot of reference pics, and this seems to be the only place
where that color is used.

Next will be the killstripes. :thumbsup
 
Back
Top