AxiomUltra
Active Member
Hi all,
I thought I’d share with everyone the project I’ve been working on and off over the past year. My girlfriend and I both love the character designs in Dan LuVisi’s ‘Last Man Standing’ series and thought it would be fun to go as Gabriel and Alice to DragonCon 2014. We actually reached out to Dan to see if he would be OK with it, since it’s a newer and fairly popular IP we didn’t know how he’d react. I always thought that it's good to make the effort to ask, even if you don’t hear anything back. Anyways, he actually did reply and was very cool about the whole thing.
I know it’s a little late for a write up, but work got busy and life stuff happened. The next thing you know almost a year goes by and I only needed to do that one last thing to finish the project off. So here it goes.
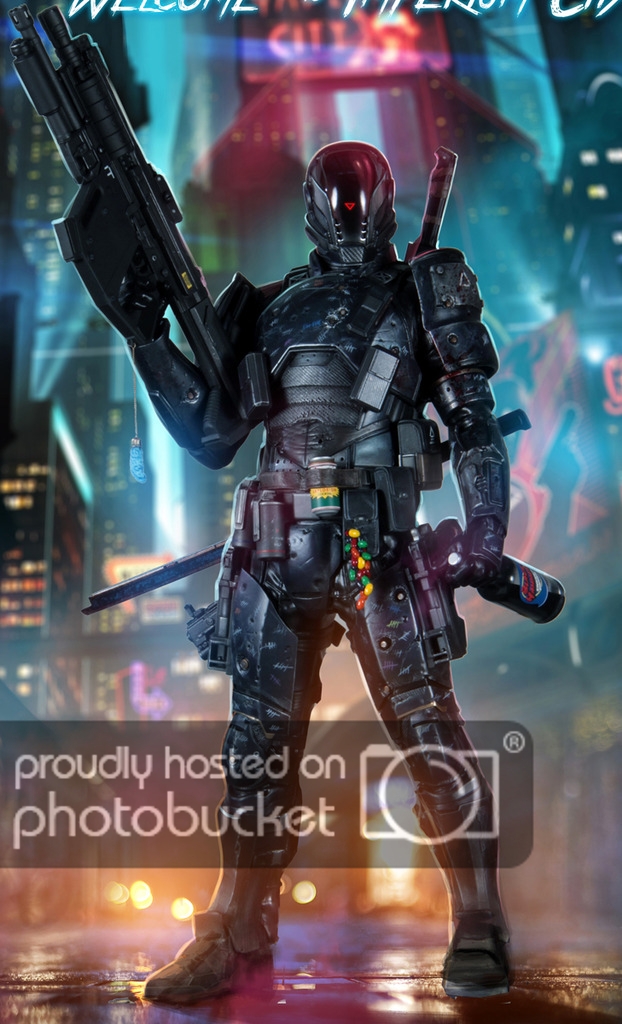
Promo shot released for soundtrack. Illustration by Dan LuVisi.
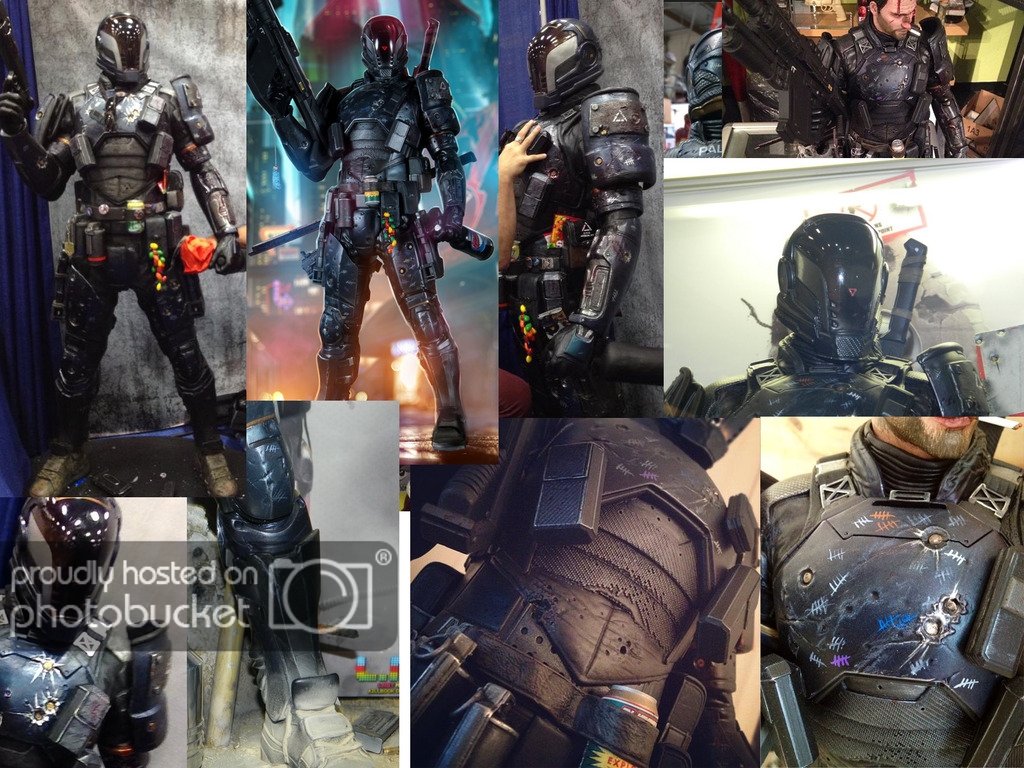
The first thing I had to do to get this project started was actually decide on which look of the character I wanted to base the costume off of. At the time Dan’s illustrations of Gabriel tended to differ from one image to the next. I found an image that was released as a promo shot for a small soundtrack dedicated to the series. That same image also happened to be a small character bust and 1:1 statue at Comic Con. That design came from the combined efforts of Dan LuVisi and Darnell Isom at Legacy Effects. I knew that if there was a statue and a bust at the convention someone would take some photos. So I waited it out until the reference started filtering in.

It was pretty obvious that Gabriel was designed with very super-hero features, which I happen to not have. But there is an advantage that goes with pre-production on a costume in which you know the actor’s dimensions, and particularly in armor builds. Often you will see people fabricate their costume, generally one piece at a time. They will take special care to ensure that the part fits ‘just right’ into it’s respective spot only to have the entire aesthetic proportions fail to complement one another. Basically, you get the typical bobble headed look. There are several ways to deal with this and ensure the final look of your project turns out exactly the way you envision, but here I will primarily talk about some of the things you should consider when going the 3D pre-production route.
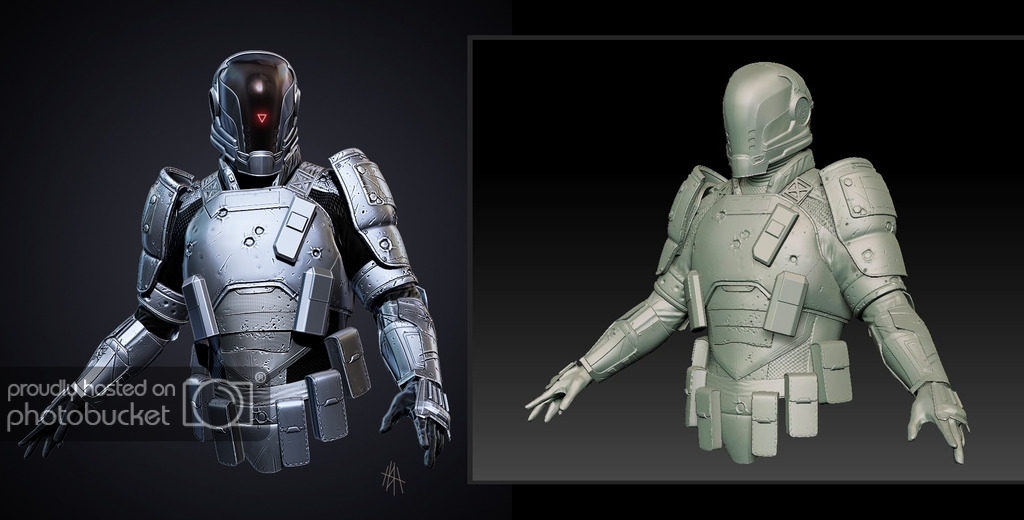
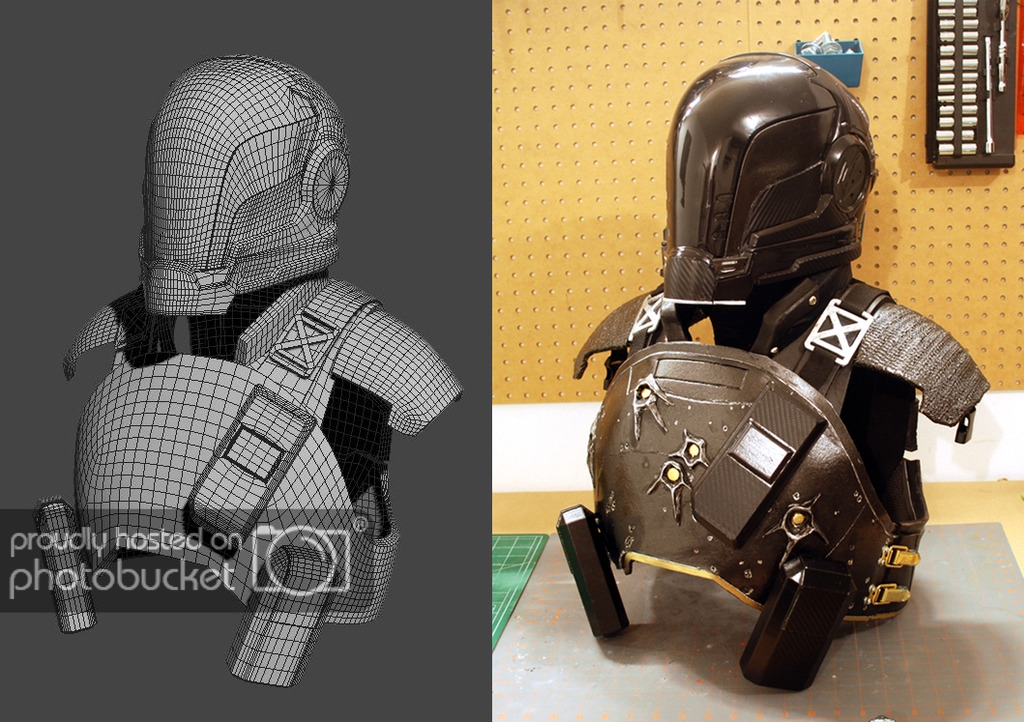
Before I even really considered scale, proportions, or whether it would even look ok on me I sat down and did a ‘study’ sculpt. I explored some common shapes and designs of the character and techniques for possibly replicating battle damage or wear and tear. I thought about how the shoulders would attach and move in relation to each other. How the magazines would mount onto a curved chest plate.
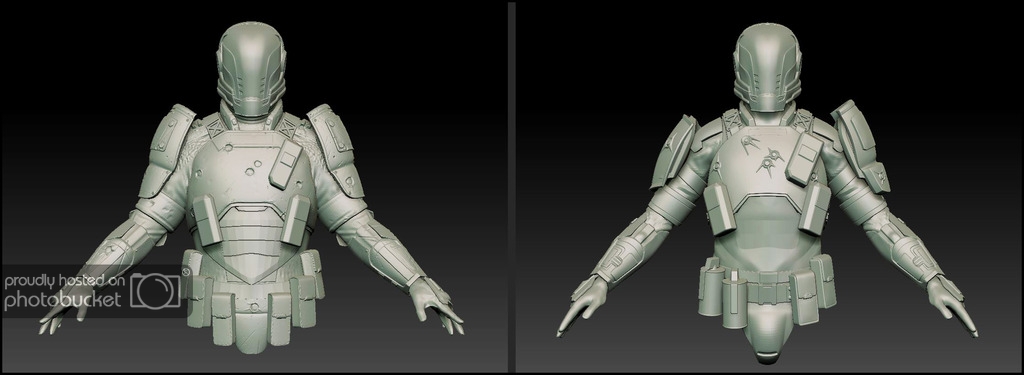
I realized I had a lot going on in the lower trunk of the model, which was exaggerating the hips and making the design look too hefty. I also noticed that Gabriel didn’t have symmetrical shoulders so that would need to be blocked out too. It took quite a lot of editing but I finally got a look that I thought could work.
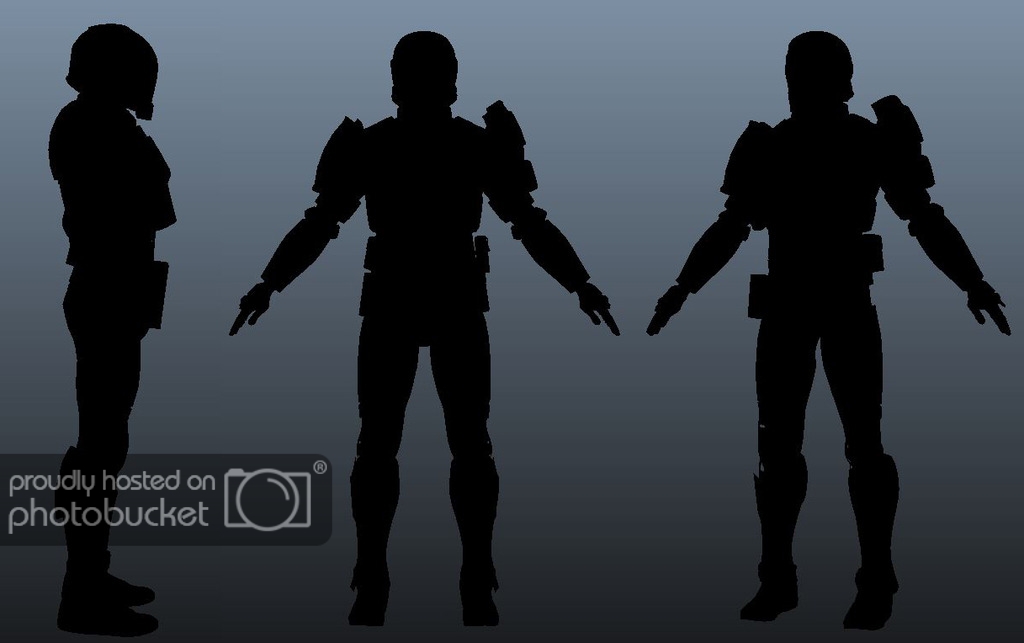
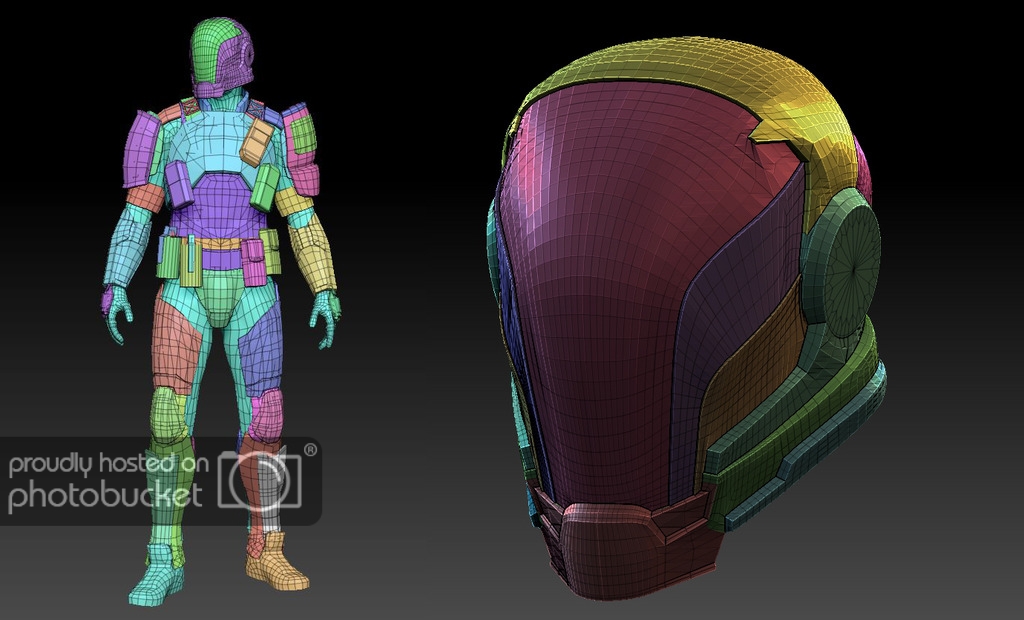
Once the silhouette was determined I broke everything up into the shapes that I would be building. I removed them and re-ordered them onto a digital model ‘mannequin’ that I had made in a prior project. The model is the same height and proportions as me, at least I think it is. You could try and do a scan of yourself to make your own. I’ll be honest, I tried and it didn’t quite work out for me. I relied on good ol’ photos and calipers to do the model work.

Polygroup organization in ZBrush
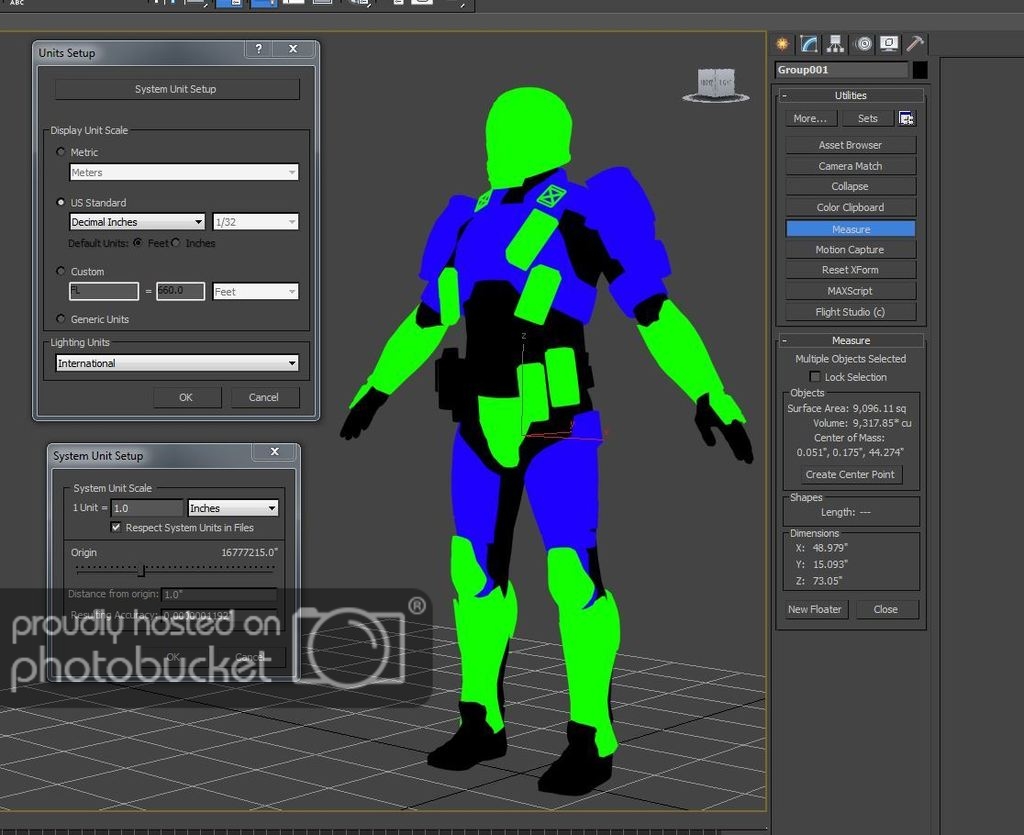
If you’re using a 3D program to assemble everything, make sure you have a master scene set up for real world units. As in, if I export a 1in x 1in x1in cube out as a .STL file, will the 3d printer read it as that? Will Pepakura? (Pro Tip – if you are using 3ds max and building US decimal inches, when you export your obj file to Pepakura after hitting unfold look for the scale box. The scale value of 25.3 is what you’re looking for. Everything will unfold the same size as in your max scene.)
My background is not in CAD or industrial design. I actually learned everything from a visual effects trade and for me 3ds Max is a godsend for fabrication. It’s as easy as just setting up your units to be whatever real world dimensions you like.
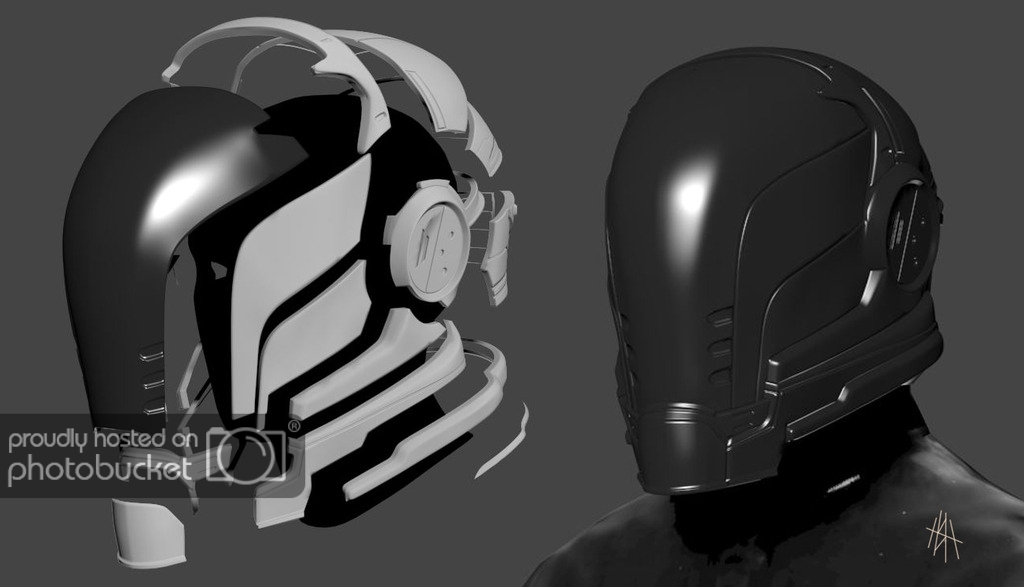
It was time to break down the helmet. Arguably the most important and challenging part. When I began learning how to build costumes one of the things that often came up was to never start with the helmet or mask first. I considered this but then decided that the helmet of this character is essentially its entire identity, and if I wasn’t 100% sure I could build it right then there wasn’t much of a point in doing the rest of it.
The way I learned to model was a combination of patch and asset modeling, where you look at the reference and determine the various pieces that compose the part you are trying to make and then design them. The last step would be to finally bring them back together. With most man made, techy things you’ll notice they are rarely made of one solid casted part.
If my 3D printer had a huge print bed I could be tempted to “1-shot” the build in one run, but I almost always feel that the final look of parts like that fail to do the reference justice. Panel lines fall off too gradually, crisp lines look bubbly, etc. The same aesthetic flaws that immediately tell you that something is a prop and not really from that fantasy world you love.
As it stands, at least for me, 3d printing is a tool that allows me to work on other things at the same time. Ultimately, you need a good core set of finishing skills to really make a printed part shine. And what I mean to say is it takes a hell of a lot more than an acetone vapor bath.
My printer is an old, now discontinued model of the 3D Touch. I say discontinued because they re-branded the design with a proprietary cartridge system, but technically the machine is still the same. Anyways, the machine is a crude beast. Kind of like how an AK-47 can take a beating and keep firing, but it’s still considered more or less ‘meh’ to other guns. The printer has no heated bed and needs a lot of maintenance. I actually envy a lot of other people and what they get to use now, but I wouldn’t trade it for anything. Every machine you print off of is going to have its own set of quirks. Some things it’ll like, others it won’t. And it takes time and failure to get past all that. To learn and adapt to get to a point where you can use that tool effectively. If that sounds hopelessly frustrating hang in there. Every year the tech keeps getting better and better.
The material I used for the helmet was actually PLA. Now a lot of enthusiasts probably prefer ABS because of all the neat things you can do with it. But I found that PLA just happened to deliver consistent results. Plus, I happened to have a lot of it. I feel that it holds up better during the cleanup stages.
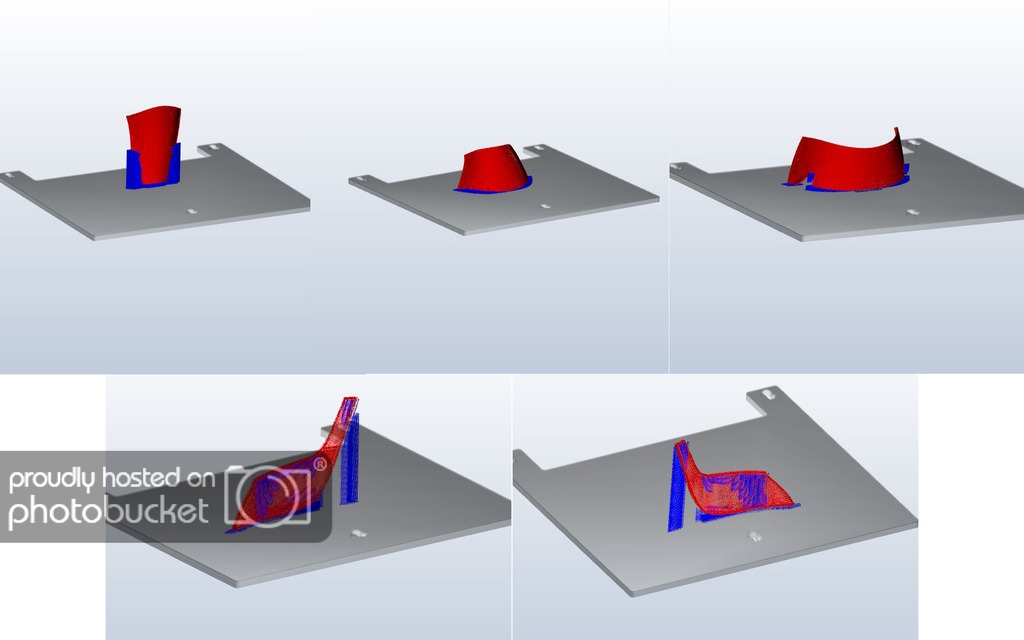
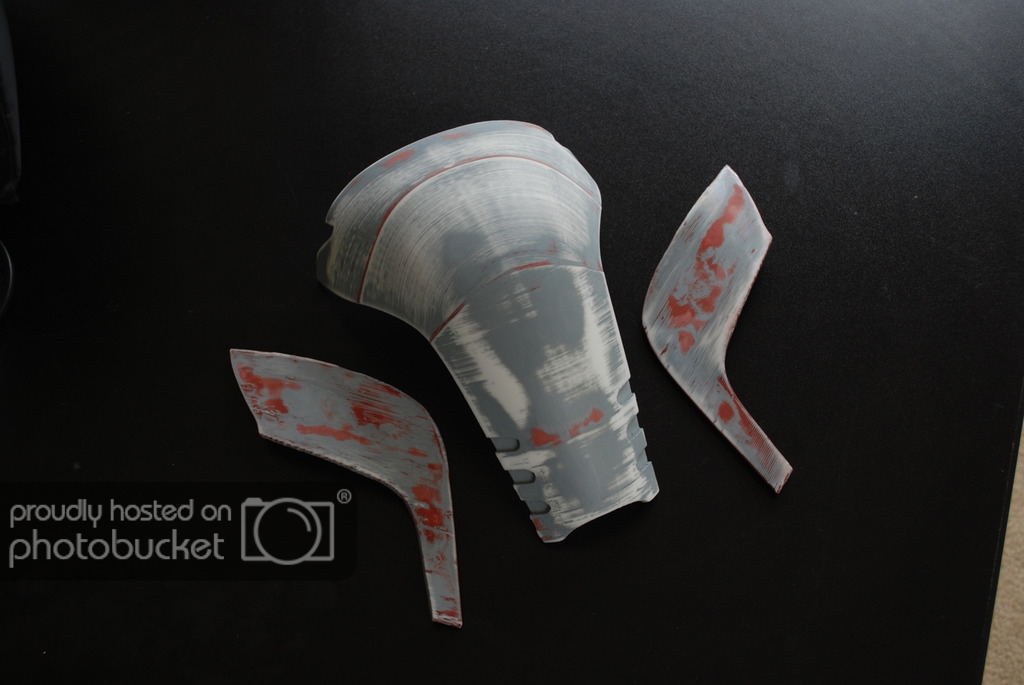
The images above are the three sections that make up the helmet visor and the two upper cheek areas. Now I could have printed the whole visor as one object, but that’s one of the things you’ll have to decide when ‘slicing’ a model. I had to choose between A – Having the part as one object without seams but run a high risk of part warping, or B – Split the part up and deal with the seams during cleanup. The choice really rests on your own abilities and what you’re comfortable with fixing. For myself attaching parts and filling seams in not a big deal, but fixing a warped part is a huge pain. So seam it up!

Since it was PLA I didn’t have the luxury of using Acetone. Filler primer and a little spot putty worked fine. The nice part about PLA is I could take some nice grit sandpaper and not have to worry about sanding away the plastic. It just sanded better than the ABS printed parts for me.

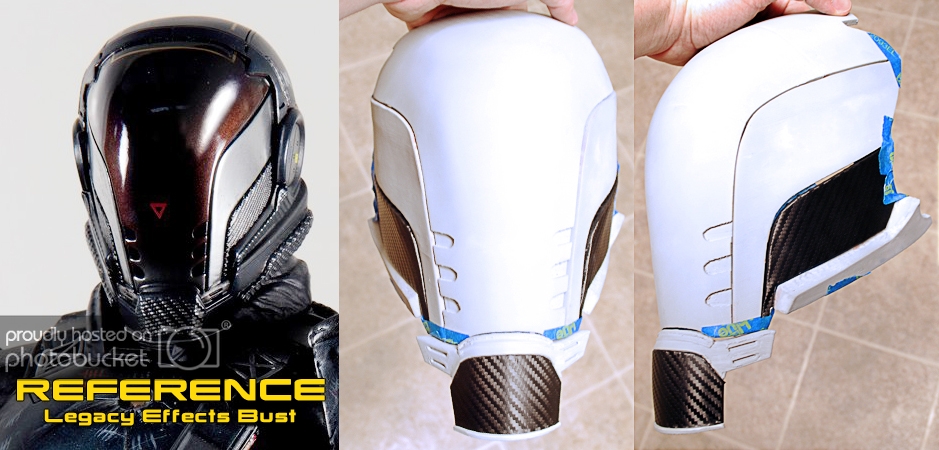
The reference showed a neat carbon fiber trim. Well for us that aren’t car specialists and/or loaded we tend to look for that tacky carbon fiber vinyl trim. Now, the nice part about being a 3d modeler with a proper scale scene is that you can unfold your own model and use it as a template to wrap around your printed assets. I used pepakura to create the template for these parts. Very simple and very effective.
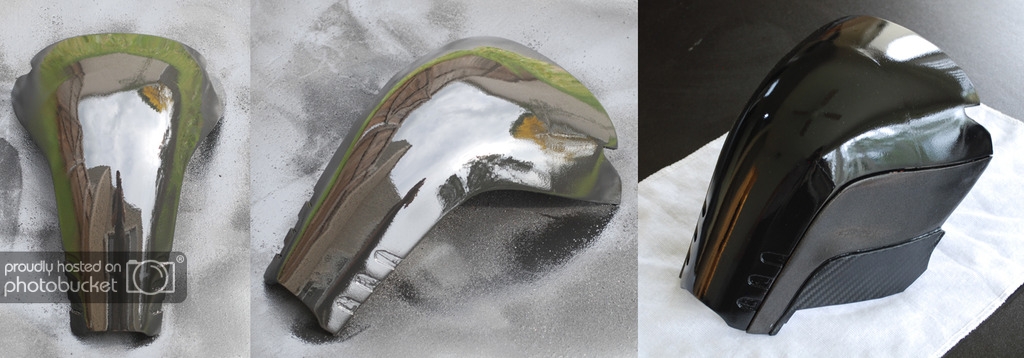
The design of Gabriel, aside from his tally marks and skittles, isn’t all that colorful. To mix it up I used four different combos of black and gray to try and highlight the design. I only went up to 800 grit on these parts. And in hindsight I probably spend WAY too much time playing around with this visor when it was only a stand in until the tinted one.

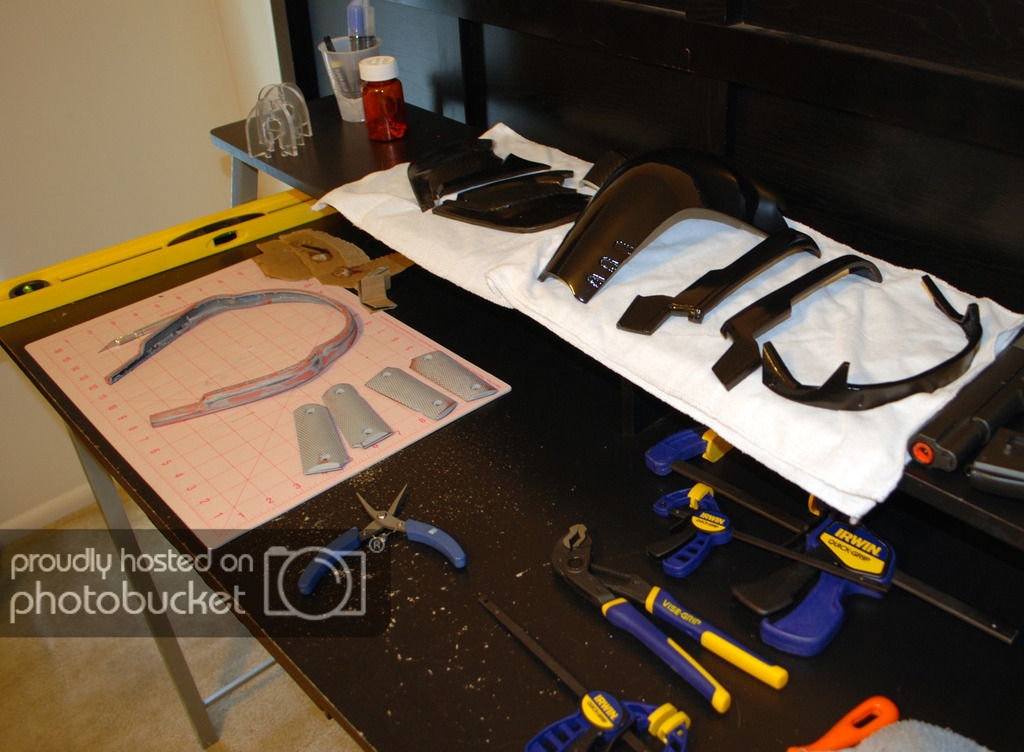
This mess is a place. I had to occupy a small corner of the office because my tiny garage workshop got way too hot.

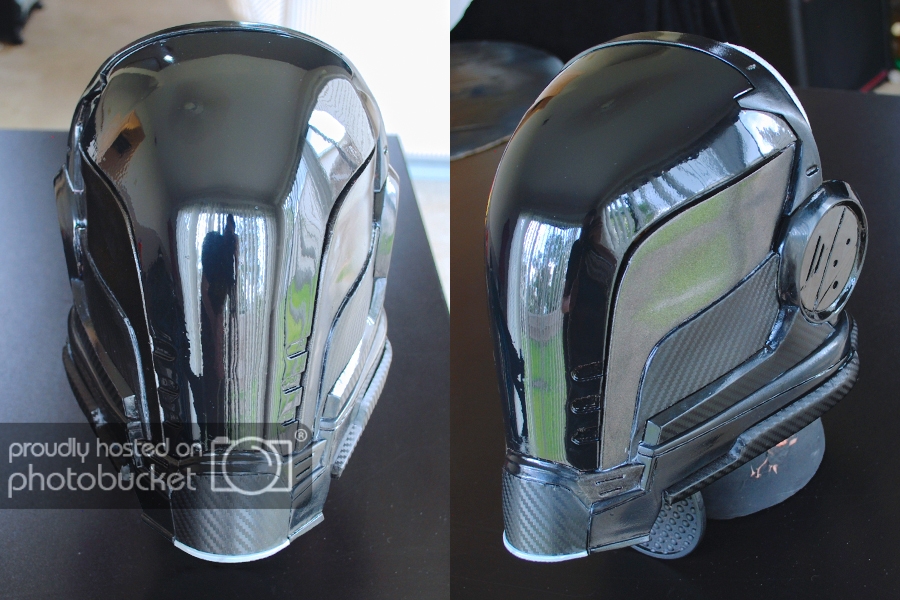
Finally after a few days of off and on printing when I wasn’t working I was able to get the first glimpse of Gabriel.
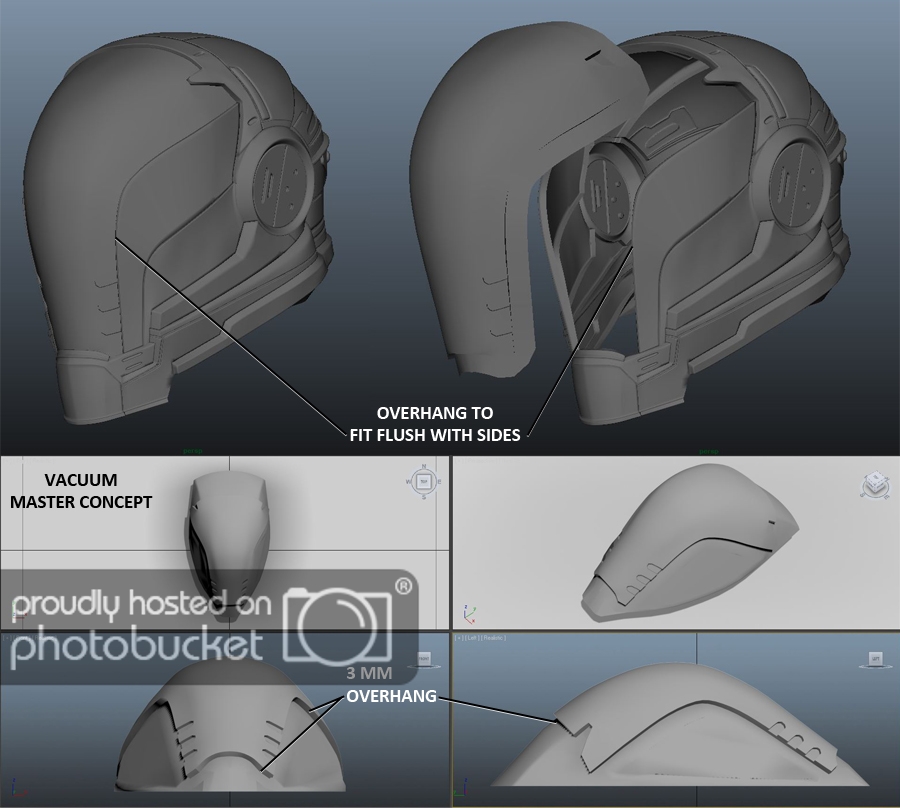
Once I had the hang of getting the helmet parts printed and finished it was time to face the challenge of creating the visor. I looked at a few options and it looked like doing a small vacuum form pull in PETG was going to cut it. I went ahead and isolated the geometry for the visor in Maya and designed a form that would be used to pull the plastic over. In the final print I added several holes around the rim of the visor shape to promote air flow. The vacuum table I used was a simple 12”x12” hobby size. The visor form fit perfectly.
After the pull I needed to dye the visor. Using Volpin’s advice and an awesome video from Cosplay4UsAll I was able to dye the visor a very dark red which would help the LED I planned on installing.
Here’s the video that pretty much told me everything I needed to get the job done.
https://www.youtube.com/watch?v=lGUf1VpvICI
Thank you Wendy for that very helpful tutorial.
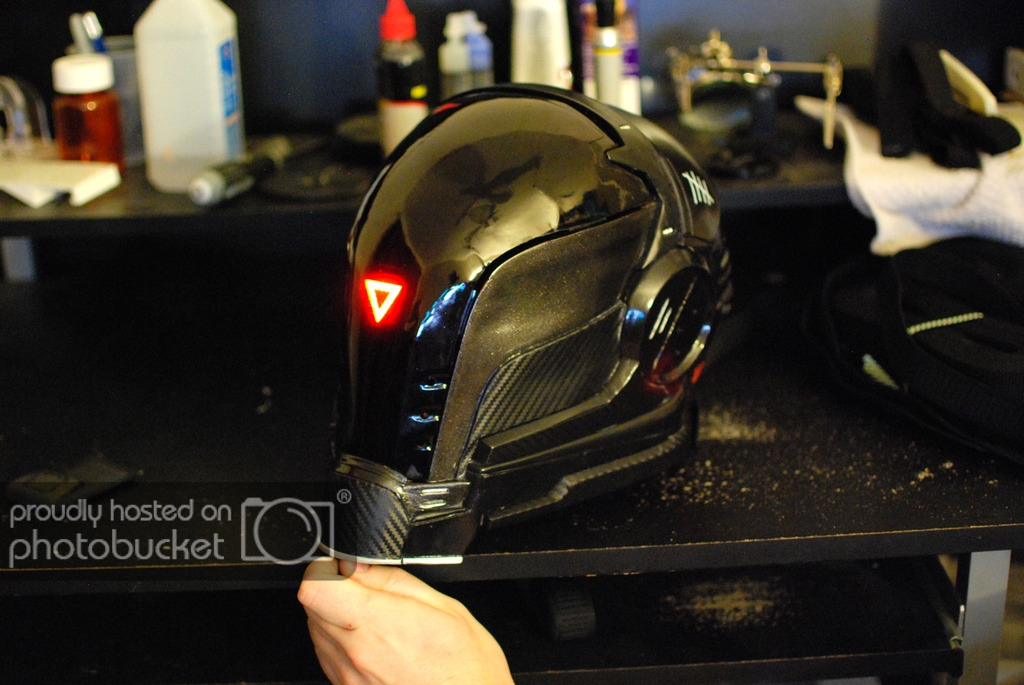
The red triangle light was made using a simple square LED dome light, 2 thin red lighting gel filters, and electrical tape. I simply cut two small squares from the filter to fit over the light and used the electrical tap to mask of a triangle. Not hi-tech at all but I didn’t feel like it needed to be any fancier than that. I did have to end up doing my own soldering to set it up to run off of two 9 volts but that’s about as techy as it got.
Not everything needed to be 3d printed. I actually prefer things to be made of foam for the weight reduction and cost savings. If it’s a larger, simpler shape that can be easily setup or worn, why not just hand build it? It may be tempting to just fabricate the whole suit and expect it to flawlessly shine at the convention, but once you start going through the finishing steps of your 10th or 20th printed part you’ll start to realize it’s just as much work anyways and you had to sit around for your machine to crank it out.
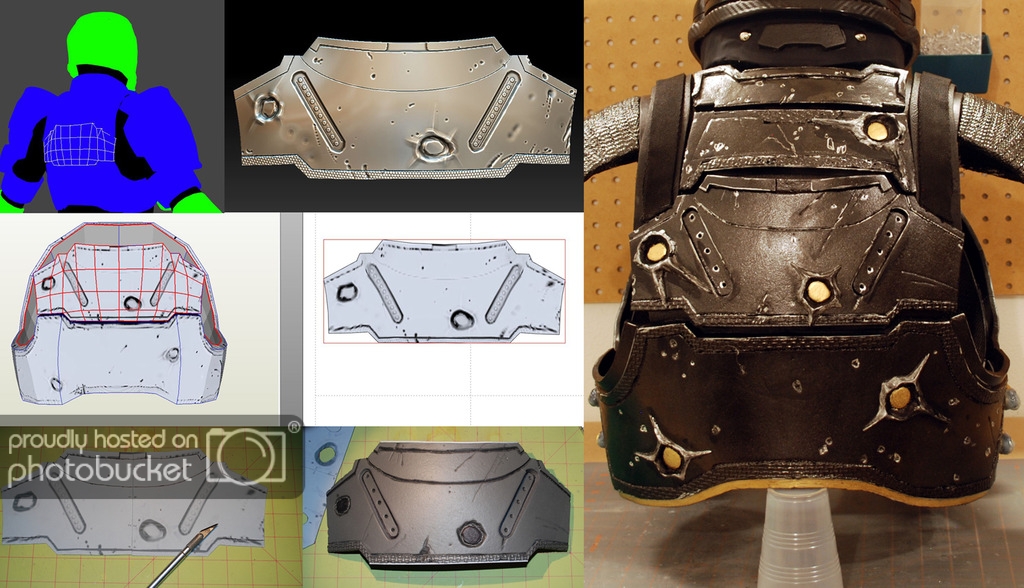
Here is an example of one of Gabriel’s back plates. In the image you can see the steps I took from isolating the geometry to the final part installed on the chest harness. I use Pepakura to quickly draft up templates and print them off on my inkjet. You could just as easily do them in another program like photoshop or illustrator, but pepakura allowed me to use the same ‘but also lower resolution’ mesh that was sculpted. Plus, I have pepakura set up to automatically unfold all of my parts at the same 1:1 scale I worked out of 3DS max with. A simple tool but extremely effective tool that can really help you out if you can’t afford a large format printer.
You’ll notice that I have texture detail on the pepakura pattern. If you understand the texture mapping process for models then this should make sense to you. Basically I used the sculpted geometry from ZBrush to bake down the battle damage and other details I wanted to keep into a texture map that I loaded into the model in pepakura. When I printed it out I used an exacto knife to cut away those details and mark them on the foam so I’d know where to add damage or sculpt in details later. I know that foam building can be considered a rough “do it by hand” method but I prefer to get my ducks all lined up before doing anything I regret.

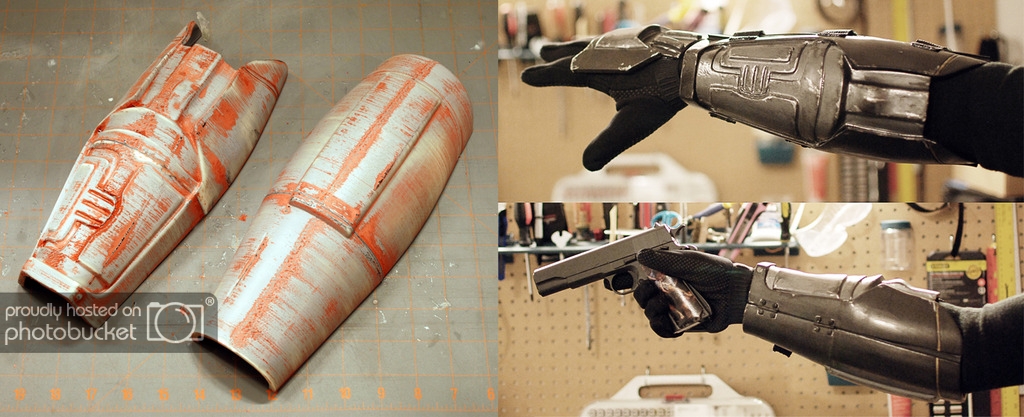
Forearms for Gabriel. I learned hard lessons when I made my Mass Effect armor about forarm design and comfort. I wasn’t going to take that chance this time and designed a Fett inspired clam-shell system.

Remember, as a 3d artist your modeling scene is your domain. That is where you want to make all of your mistakes, make all of your edits, and explore all of your options. Any mistake you make outside of your domain is costing you not just time, but money. In the workshop there is no ctrl+z so don’t rush it and enjoy the first time you get to build you project, because if you didn’t know already you are the lucky few that get to build your entire costume twice! Yay! That’s right, the no good talentless 3d cheating hack has to actually do twice the amount of work.

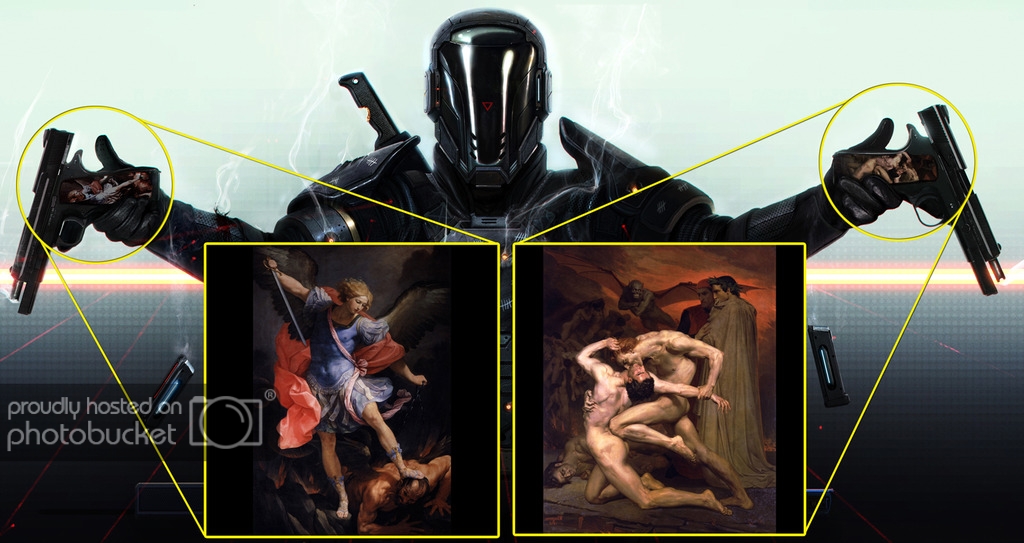
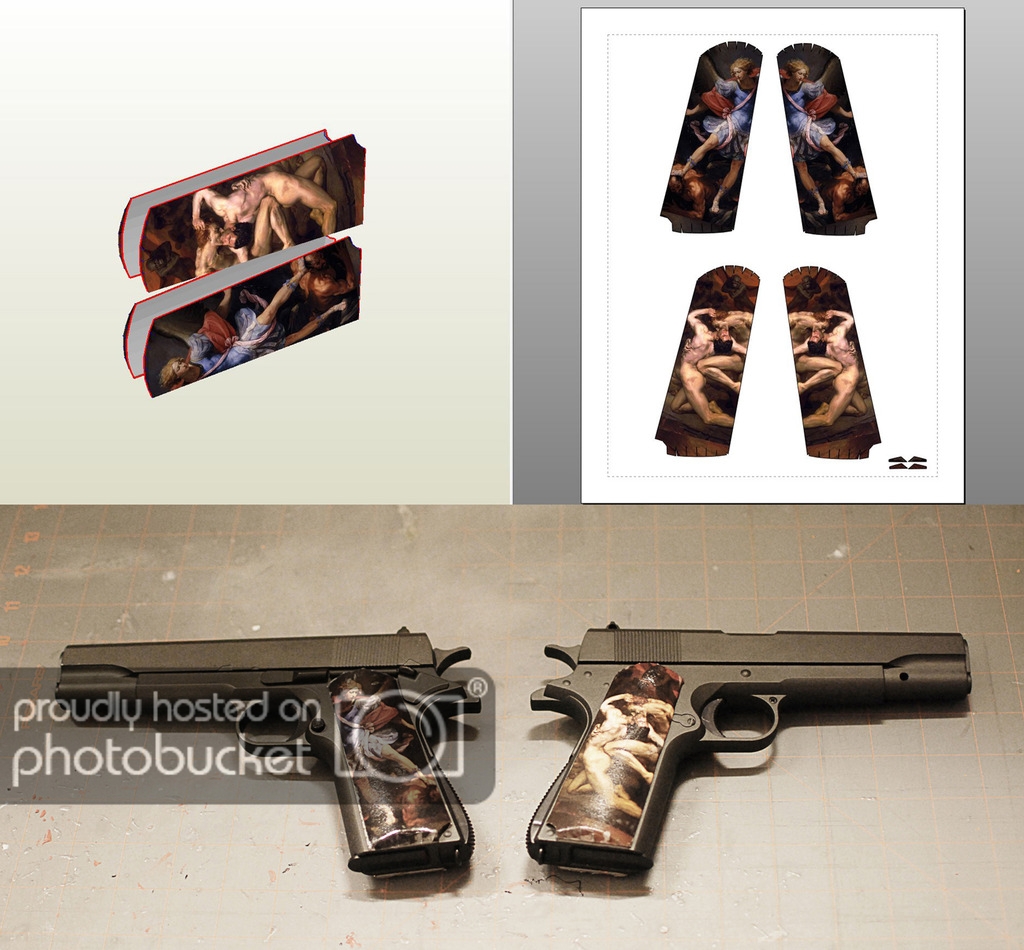
Gabriel has a set of pistols made popular by this Illustration by Dan. I was able to find out the two paintings he used on the sweetheart grips because I am insane and love the challenge of figuring things out like that. The paintings are ‘Dante and Virgil in Hell’ and ‘The Archangel Michael Defeating Satan’ – at least that’s how I get them with google. If that’s not their exact names let me know.

One website said that I 3D printed the guns so let me just clarify that I did NOT print the pistols. They were a couple cheapo airsoft pistols that I popped the grips off of and just attached the sweetheart grips to. I didn’t like the size in relation to the armor anyway so I opted to not use them. Plus most conventions would frown on that sort of thing. It just didn’t work for me.

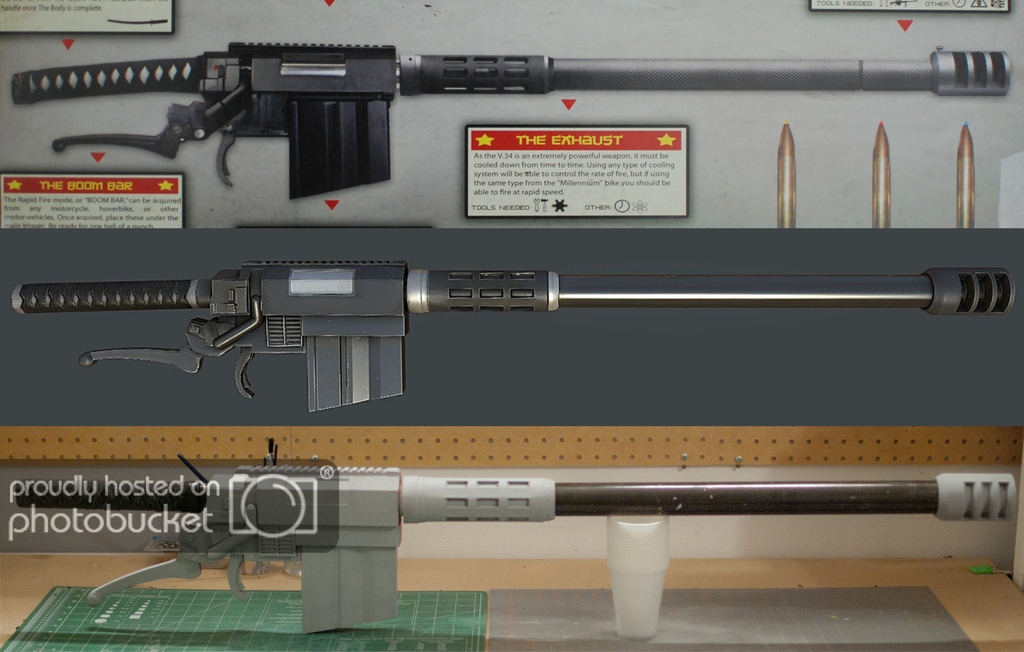
Instead I made Gabriel’s Gunbaton. The top image is the original art from Dan’s ‘Killbook of a Bounty Hunter’ detailing all of the parts and history. (Very cool by the way) The middle image is my 3d textured mock up and the last is the finished build before painting. This one was a last minute prop that I ended up doing in a little less than two weeks. It’s weird but cool. It was more interesting than the pistols anyway.
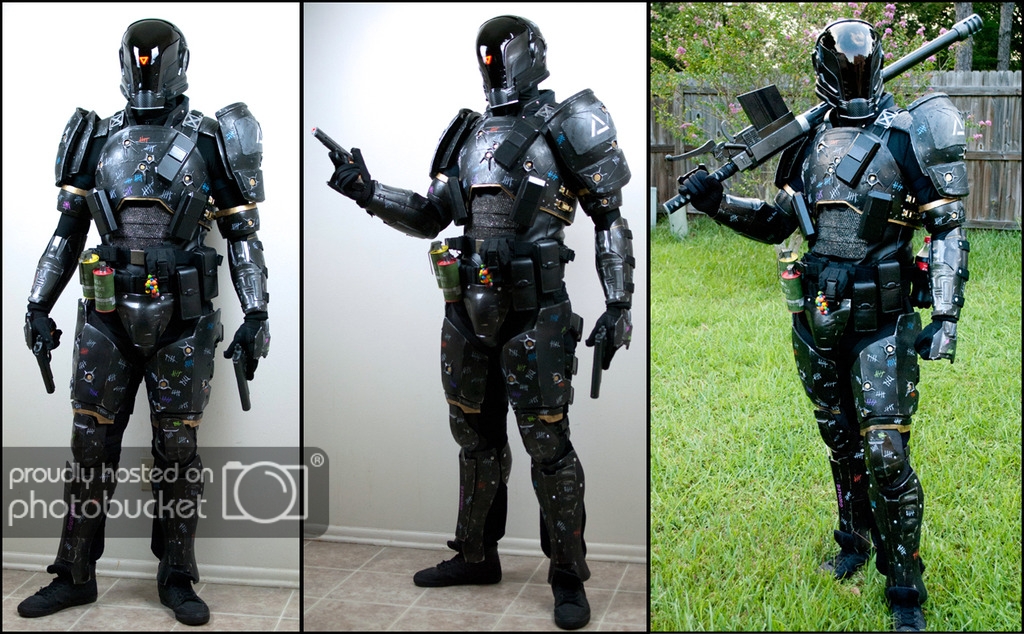
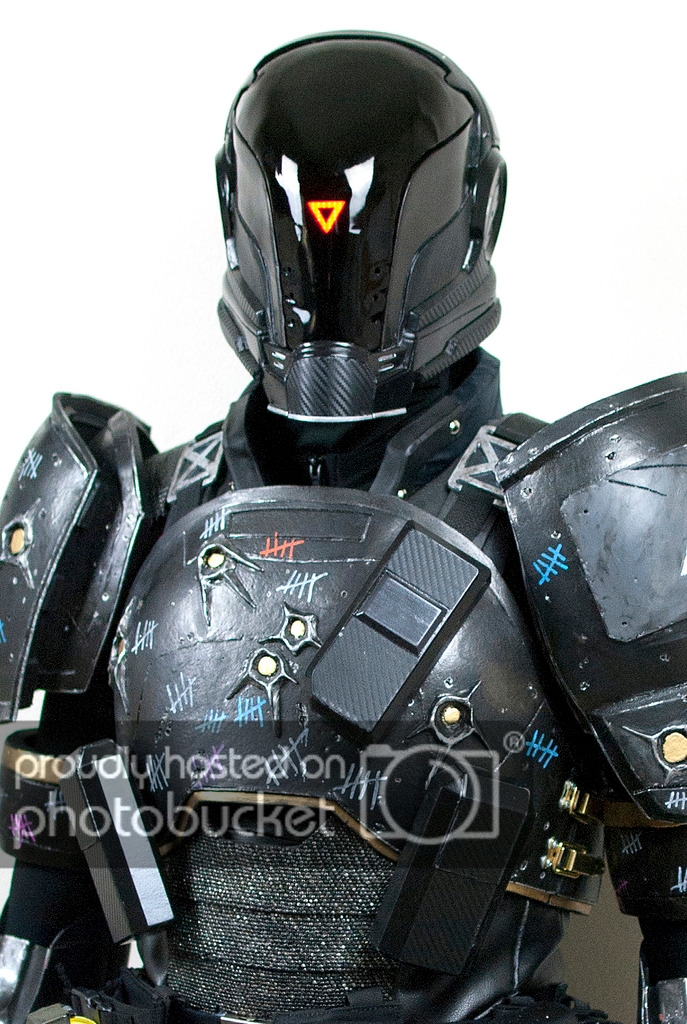
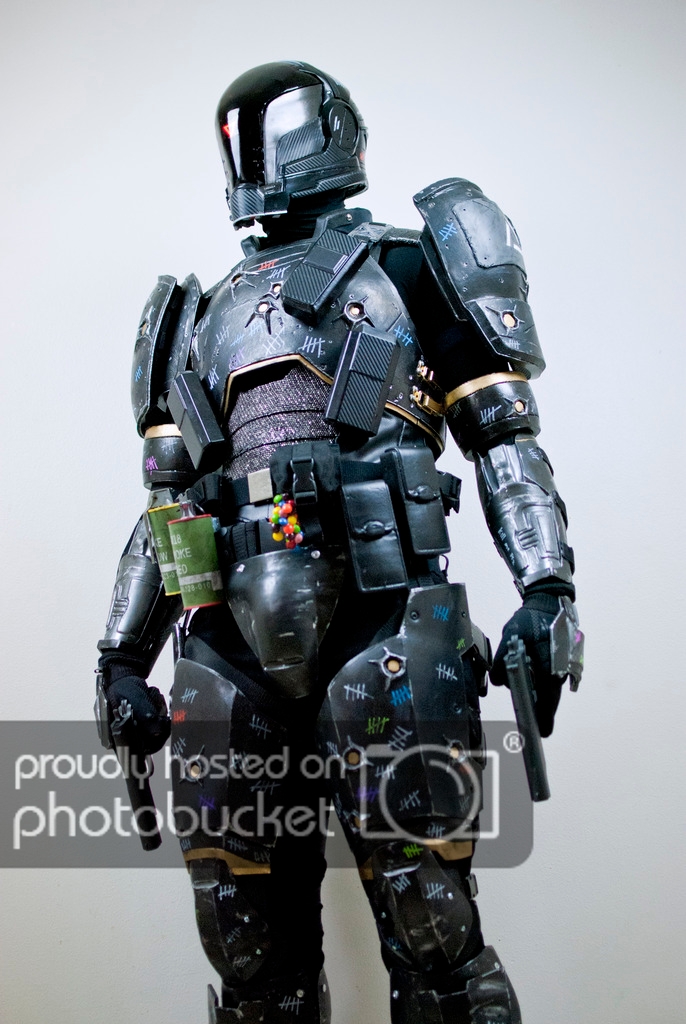 So that’s about it. This is a photo of the finished suit on my first full test fit. The entire suit of armor was basically repeating the foam or 3d print process I talked about. All of the painting was done the same way. Some parts like the gas cans, pistols, and skittles were sourced. One of the neat things about Gabriel’s design is the use of tally marks and skittles to add color. Things like that and the gold trim help distinguish him as an unique character and not a generic sci-fi super soldier. I should have also added the cigarette, perhaps in the future.

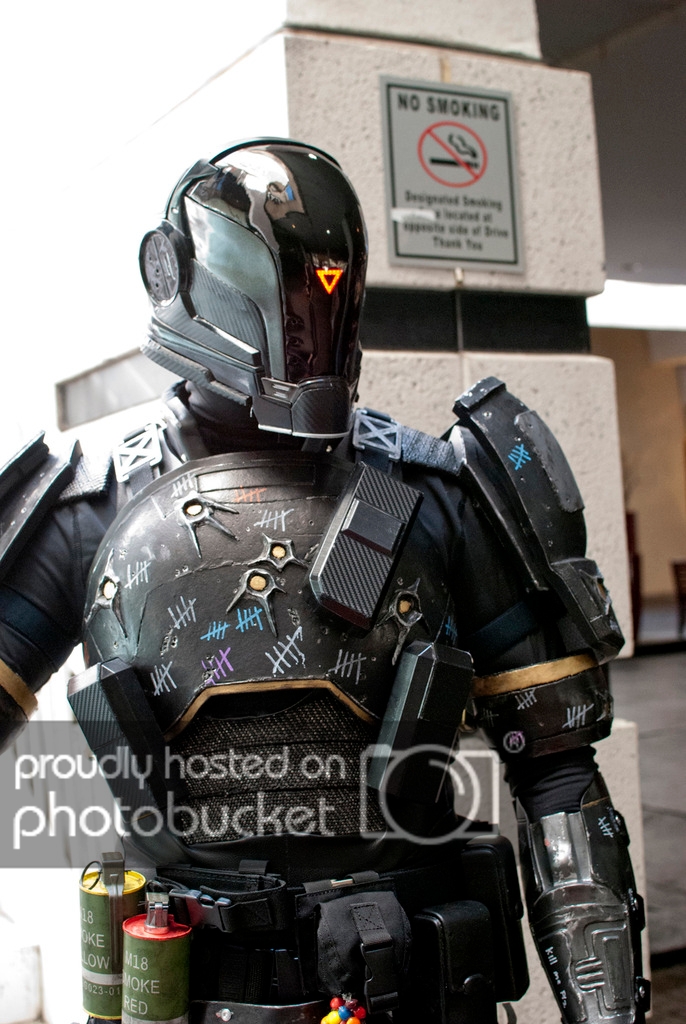
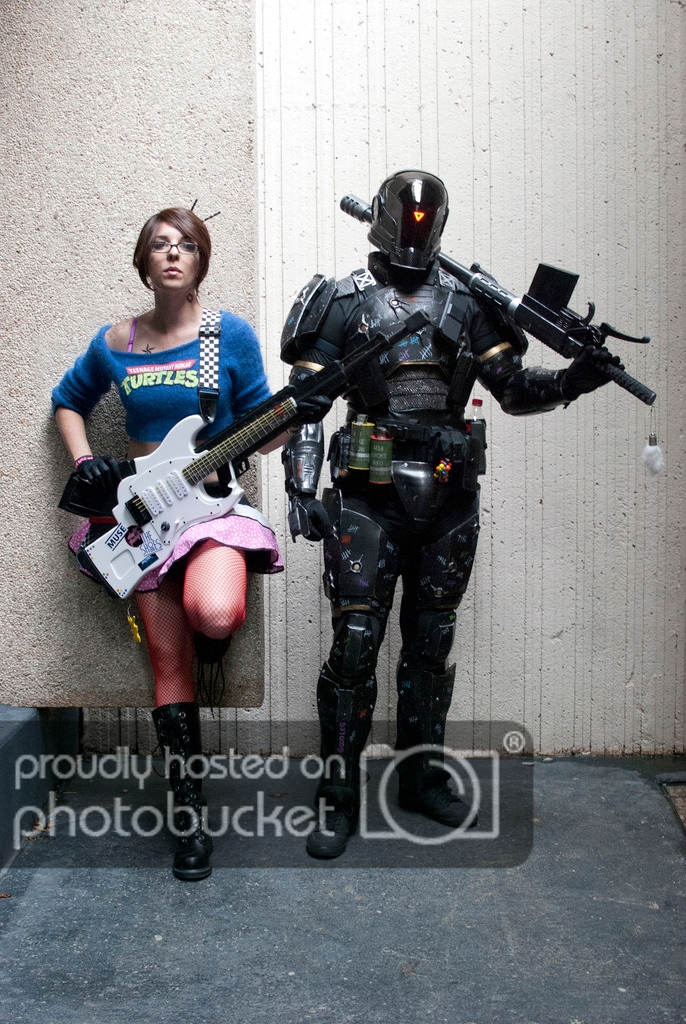
Here’s a photo of me out at DragonCon last summer in Atlanta. I had a lot of fun and met some really awesome people.
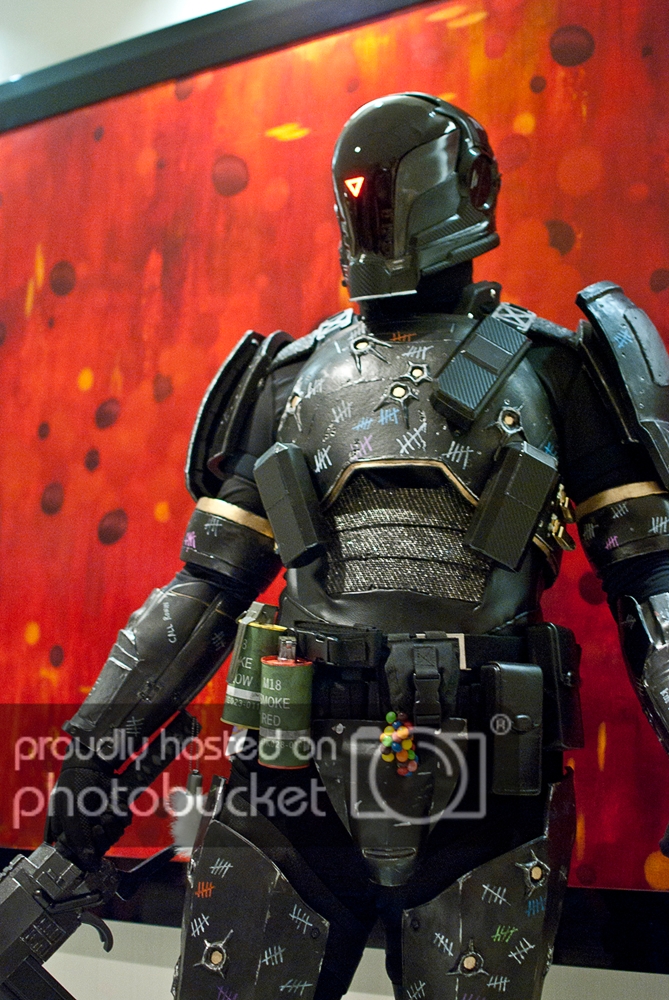
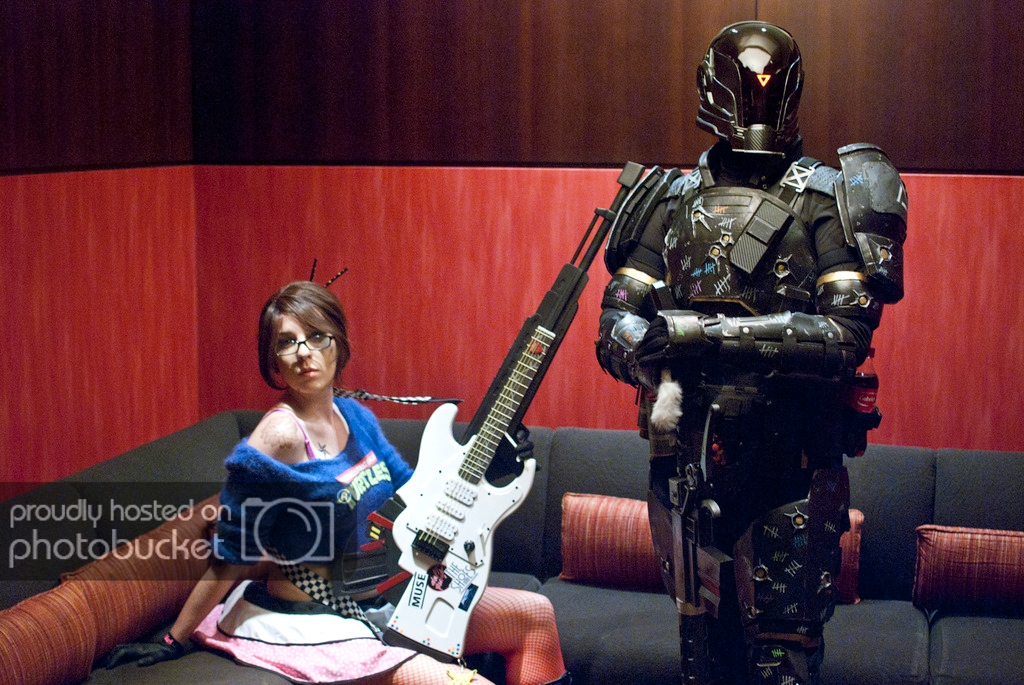
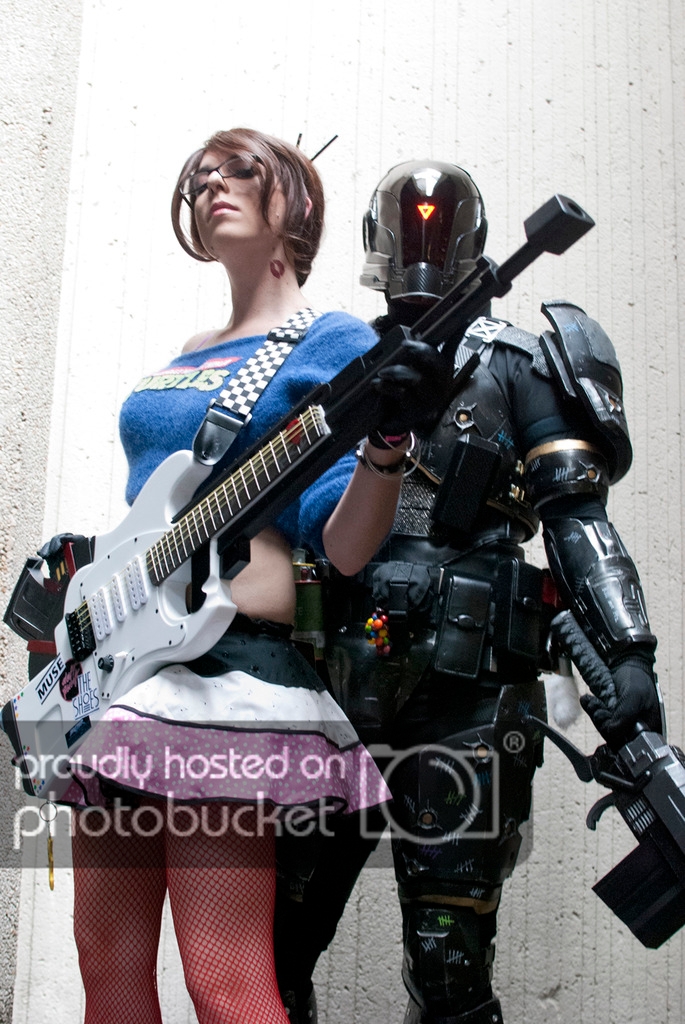

And a few more from DragonCon of us

Digital asset creation not only helps a ton when doing things like prop and costume design it also allows you to do all kinds of other awesome stuff if you take the time to set it up. Like merchandise, for example. Or you can achieve the ultimate level of narcissism and make an action figure of yourself.
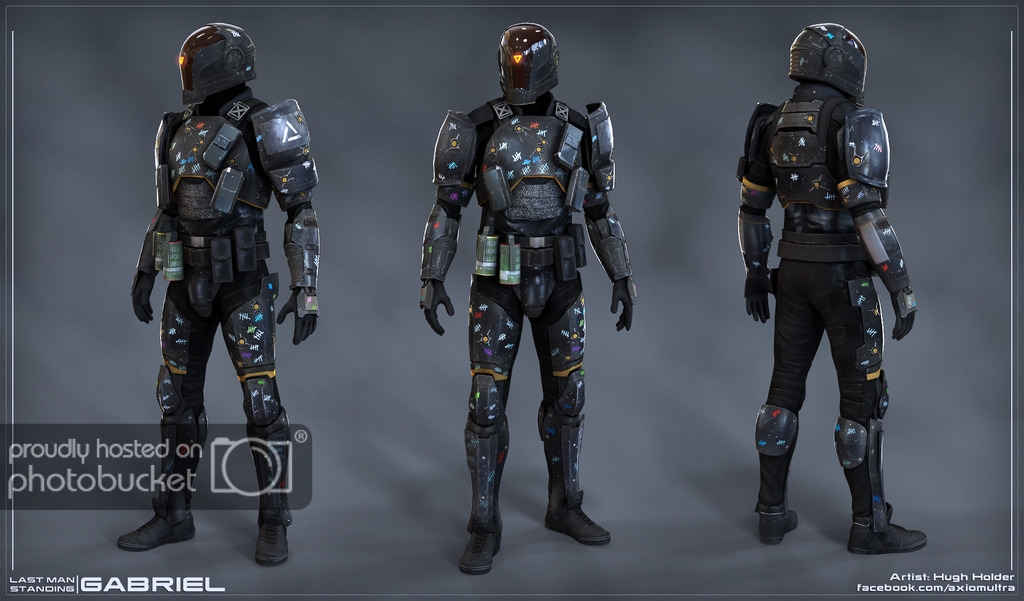
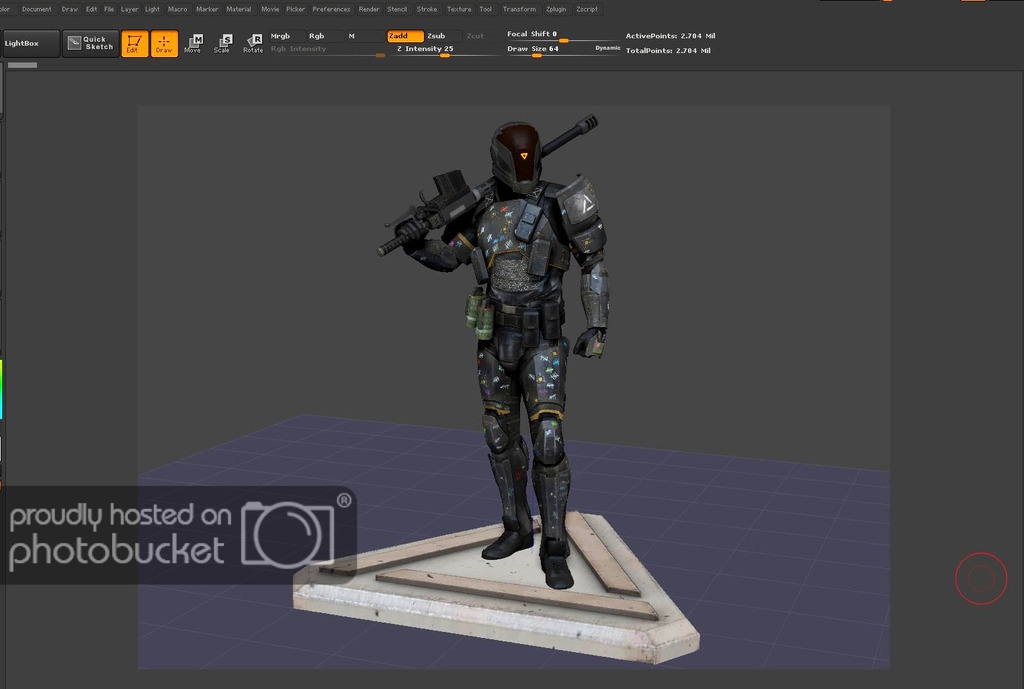
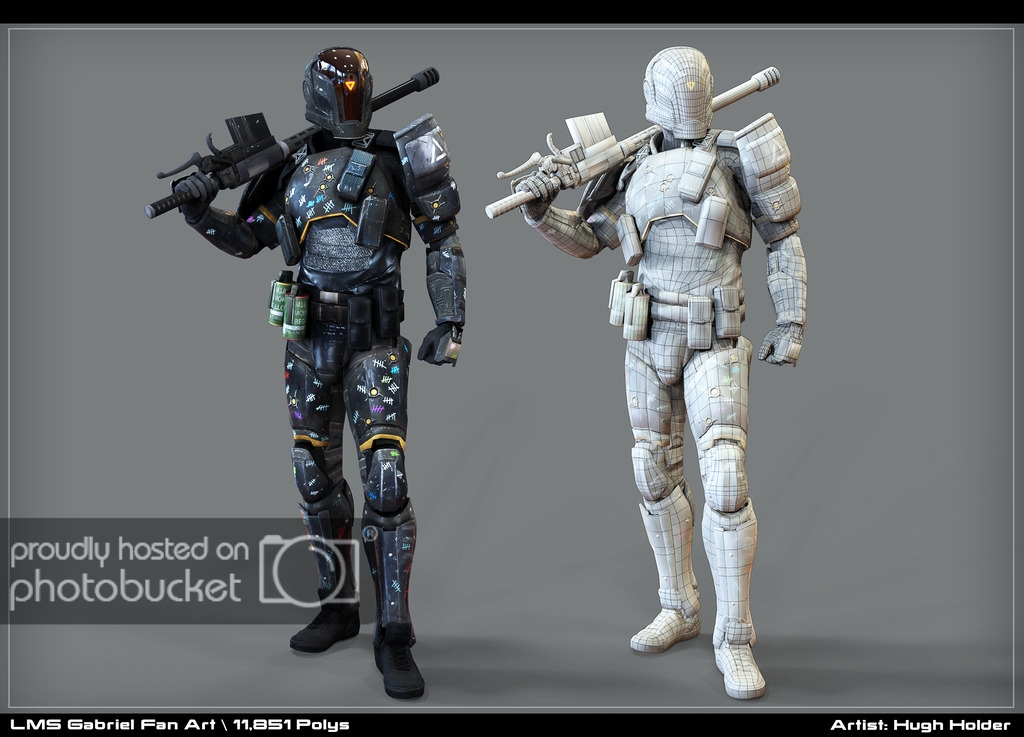
Or make a nice portfolio piece to tie your project all together. This is the final 3d model.

Hope you enjoyed and thanks for reading!












I thought I’d share with everyone the project I’ve been working on and off over the past year. My girlfriend and I both love the character designs in Dan LuVisi’s ‘Last Man Standing’ series and thought it would be fun to go as Gabriel and Alice to DragonCon 2014. We actually reached out to Dan to see if he would be OK with it, since it’s a newer and fairly popular IP we didn’t know how he’d react. I always thought that it's good to make the effort to ask, even if you don’t hear anything back. Anyways, he actually did reply and was very cool about the whole thing.
I know it’s a little late for a write up, but work got busy and life stuff happened. The next thing you know almost a year goes by and I only needed to do that one last thing to finish the project off. So here it goes.
Promo shot released for soundtrack. Illustration by Dan LuVisi.
The first thing I had to do to get this project started was actually decide on which look of the character I wanted to base the costume off of. At the time Dan’s illustrations of Gabriel tended to differ from one image to the next. I found an image that was released as a promo shot for a small soundtrack dedicated to the series. That same image also happened to be a small character bust and 1:1 statue at Comic Con. That design came from the combined efforts of Dan LuVisi and Darnell Isom at Legacy Effects. I knew that if there was a statue and a bust at the convention someone would take some photos. So I waited it out until the reference started filtering in.
It was pretty obvious that Gabriel was designed with very super-hero features, which I happen to not have. But there is an advantage that goes with pre-production on a costume in which you know the actor’s dimensions, and particularly in armor builds. Often you will see people fabricate their costume, generally one piece at a time. They will take special care to ensure that the part fits ‘just right’ into it’s respective spot only to have the entire aesthetic proportions fail to complement one another. Basically, you get the typical bobble headed look. There are several ways to deal with this and ensure the final look of your project turns out exactly the way you envision, but here I will primarily talk about some of the things you should consider when going the 3D pre-production route.
Before I even really considered scale, proportions, or whether it would even look ok on me I sat down and did a ‘study’ sculpt. I explored some common shapes and designs of the character and techniques for possibly replicating battle damage or wear and tear. I thought about how the shoulders would attach and move in relation to each other. How the magazines would mount onto a curved chest plate.
I realized I had a lot going on in the lower trunk of the model, which was exaggerating the hips and making the design look too hefty. I also noticed that Gabriel didn’t have symmetrical shoulders so that would need to be blocked out too. It took quite a lot of editing but I finally got a look that I thought could work.
Once the silhouette was determined I broke everything up into the shapes that I would be building. I removed them and re-ordered them onto a digital model ‘mannequin’ that I had made in a prior project. The model is the same height and proportions as me, at least I think it is. You could try and do a scan of yourself to make your own. I’ll be honest, I tried and it didn’t quite work out for me. I relied on good ol’ photos and calipers to do the model work.
Polygroup organization in ZBrush
If you’re using a 3D program to assemble everything, make sure you have a master scene set up for real world units. As in, if I export a 1in x 1in x1in cube out as a .STL file, will the 3d printer read it as that? Will Pepakura? (Pro Tip – if you are using 3ds max and building US decimal inches, when you export your obj file to Pepakura after hitting unfold look for the scale box. The scale value of 25.3 is what you’re looking for. Everything will unfold the same size as in your max scene.)
My background is not in CAD or industrial design. I actually learned everything from a visual effects trade and for me 3ds Max is a godsend for fabrication. It’s as easy as just setting up your units to be whatever real world dimensions you like.
It was time to break down the helmet. Arguably the most important and challenging part. When I began learning how to build costumes one of the things that often came up was to never start with the helmet or mask first. I considered this but then decided that the helmet of this character is essentially its entire identity, and if I wasn’t 100% sure I could build it right then there wasn’t much of a point in doing the rest of it.
The way I learned to model was a combination of patch and asset modeling, where you look at the reference and determine the various pieces that compose the part you are trying to make and then design them. The last step would be to finally bring them back together. With most man made, techy things you’ll notice they are rarely made of one solid casted part.
If my 3D printer had a huge print bed I could be tempted to “1-shot” the build in one run, but I almost always feel that the final look of parts like that fail to do the reference justice. Panel lines fall off too gradually, crisp lines look bubbly, etc. The same aesthetic flaws that immediately tell you that something is a prop and not really from that fantasy world you love.
As it stands, at least for me, 3d printing is a tool that allows me to work on other things at the same time. Ultimately, you need a good core set of finishing skills to really make a printed part shine. And what I mean to say is it takes a hell of a lot more than an acetone vapor bath.
My printer is an old, now discontinued model of the 3D Touch. I say discontinued because they re-branded the design with a proprietary cartridge system, but technically the machine is still the same. Anyways, the machine is a crude beast. Kind of like how an AK-47 can take a beating and keep firing, but it’s still considered more or less ‘meh’ to other guns. The printer has no heated bed and needs a lot of maintenance. I actually envy a lot of other people and what they get to use now, but I wouldn’t trade it for anything. Every machine you print off of is going to have its own set of quirks. Some things it’ll like, others it won’t. And it takes time and failure to get past all that. To learn and adapt to get to a point where you can use that tool effectively. If that sounds hopelessly frustrating hang in there. Every year the tech keeps getting better and better.
The material I used for the helmet was actually PLA. Now a lot of enthusiasts probably prefer ABS because of all the neat things you can do with it. But I found that PLA just happened to deliver consistent results. Plus, I happened to have a lot of it. I feel that it holds up better during the cleanup stages.
The images above are the three sections that make up the helmet visor and the two upper cheek areas. Now I could have printed the whole visor as one object, but that’s one of the things you’ll have to decide when ‘slicing’ a model. I had to choose between A – Having the part as one object without seams but run a high risk of part warping, or B – Split the part up and deal with the seams during cleanup. The choice really rests on your own abilities and what you’re comfortable with fixing. For myself attaching parts and filling seams in not a big deal, but fixing a warped part is a huge pain. So seam it up!
Since it was PLA I didn’t have the luxury of using Acetone. Filler primer and a little spot putty worked fine. The nice part about PLA is I could take some nice grit sandpaper and not have to worry about sanding away the plastic. It just sanded better than the ABS printed parts for me.
The reference showed a neat carbon fiber trim. Well for us that aren’t car specialists and/or loaded we tend to look for that tacky carbon fiber vinyl trim. Now, the nice part about being a 3d modeler with a proper scale scene is that you can unfold your own model and use it as a template to wrap around your printed assets. I used pepakura to create the template for these parts. Very simple and very effective.
The design of Gabriel, aside from his tally marks and skittles, isn’t all that colorful. To mix it up I used four different combos of black and gray to try and highlight the design. I only went up to 800 grit on these parts. And in hindsight I probably spend WAY too much time playing around with this visor when it was only a stand in until the tinted one.
This mess is a place. I had to occupy a small corner of the office because my tiny garage workshop got way too hot.
Finally after a few days of off and on printing when I wasn’t working I was able to get the first glimpse of Gabriel.
Once I had the hang of getting the helmet parts printed and finished it was time to face the challenge of creating the visor. I looked at a few options and it looked like doing a small vacuum form pull in PETG was going to cut it. I went ahead and isolated the geometry for the visor in Maya and designed a form that would be used to pull the plastic over. In the final print I added several holes around the rim of the visor shape to promote air flow. The vacuum table I used was a simple 12”x12” hobby size. The visor form fit perfectly.
After the pull I needed to dye the visor. Using Volpin’s advice and an awesome video from Cosplay4UsAll I was able to dye the visor a very dark red which would help the LED I planned on installing.
Here’s the video that pretty much told me everything I needed to get the job done.
https://www.youtube.com/watch?v=lGUf1VpvICI
Thank you Wendy for that very helpful tutorial.
The red triangle light was made using a simple square LED dome light, 2 thin red lighting gel filters, and electrical tape. I simply cut two small squares from the filter to fit over the light and used the electrical tap to mask of a triangle. Not hi-tech at all but I didn’t feel like it needed to be any fancier than that. I did have to end up doing my own soldering to set it up to run off of two 9 volts but that’s about as techy as it got.
Not everything needed to be 3d printed. I actually prefer things to be made of foam for the weight reduction and cost savings. If it’s a larger, simpler shape that can be easily setup or worn, why not just hand build it? It may be tempting to just fabricate the whole suit and expect it to flawlessly shine at the convention, but once you start going through the finishing steps of your 10th or 20th printed part you’ll start to realize it’s just as much work anyways and you had to sit around for your machine to crank it out.
Here is an example of one of Gabriel’s back plates. In the image you can see the steps I took from isolating the geometry to the final part installed on the chest harness. I use Pepakura to quickly draft up templates and print them off on my inkjet. You could just as easily do them in another program like photoshop or illustrator, but pepakura allowed me to use the same ‘but also lower resolution’ mesh that was sculpted. Plus, I have pepakura set up to automatically unfold all of my parts at the same 1:1 scale I worked out of 3DS max with. A simple tool but extremely effective tool that can really help you out if you can’t afford a large format printer.
You’ll notice that I have texture detail on the pepakura pattern. If you understand the texture mapping process for models then this should make sense to you. Basically I used the sculpted geometry from ZBrush to bake down the battle damage and other details I wanted to keep into a texture map that I loaded into the model in pepakura. When I printed it out I used an exacto knife to cut away those details and mark them on the foam so I’d know where to add damage or sculpt in details later. I know that foam building can be considered a rough “do it by hand” method but I prefer to get my ducks all lined up before doing anything I regret.
Forearms for Gabriel. I learned hard lessons when I made my Mass Effect armor about forarm design and comfort. I wasn’t going to take that chance this time and designed a Fett inspired clam-shell system.
Remember, as a 3d artist your modeling scene is your domain. That is where you want to make all of your mistakes, make all of your edits, and explore all of your options. Any mistake you make outside of your domain is costing you not just time, but money. In the workshop there is no ctrl+z so don’t rush it and enjoy the first time you get to build you project, because if you didn’t know already you are the lucky few that get to build your entire costume twice! Yay! That’s right, the no good talentless 3d cheating hack has to actually do twice the amount of work.
Gabriel has a set of pistols made popular by this Illustration by Dan. I was able to find out the two paintings he used on the sweetheart grips because I am insane and love the challenge of figuring things out like that. The paintings are ‘Dante and Virgil in Hell’ and ‘The Archangel Michael Defeating Satan’ – at least that’s how I get them with google. If that’s not their exact names let me know.
One website said that I 3D printed the guns so let me just clarify that I did NOT print the pistols. They were a couple cheapo airsoft pistols that I popped the grips off of and just attached the sweetheart grips to. I didn’t like the size in relation to the armor anyway so I opted to not use them. Plus most conventions would frown on that sort of thing. It just didn’t work for me.
Instead I made Gabriel’s Gunbaton. The top image is the original art from Dan’s ‘Killbook of a Bounty Hunter’ detailing all of the parts and history. (Very cool by the way) The middle image is my 3d textured mock up and the last is the finished build before painting. This one was a last minute prop that I ended up doing in a little less than two weeks. It’s weird but cool. It was more interesting than the pistols anyway.
Here’s a photo of me out at DragonCon last summer in Atlanta. I had a lot of fun and met some really awesome people.
And a few more from DragonCon of us
Digital asset creation not only helps a ton when doing things like prop and costume design it also allows you to do all kinds of other awesome stuff if you take the time to set it up. Like merchandise, for example. Or you can achieve the ultimate level of narcissism and make an action figure of yourself.
Or make a nice portfolio piece to tie your project all together. This is the final 3d model.
Hope you enjoyed and thanks for reading!
Last edited by a moderator:
