WarDarkFox
Active Member
This is my first attempt at prop making and what could be a good starting point than building a proton pack. I originally was going to do the entire thing out of mdf after seeing Mr. Spiders build on this forum but after my jigsaw busted and without easy access to power tools my whole build stopped. Plus I don't think the wife and kids would appreciate me using power tools at midnight. So it was back to the drawing board.
About 2 weeks ago I found a build done using pepakura. It sounds easy enough and worth the try considering my inexperience with prop building and my hours that I am able to do it. So Proton Charger at gbfans sent me his files to use and I got started. Here is what I have done so far.
Ion Arm


PPD Box 2


Ion Arm + PPD Box 2

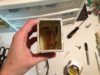
Power Cell


That's it for the moment. My next part is going to be the PPD box 1.
If anyone has any helpful hints or tips for using pep or even with the build I'm open to suggestions since this is my first prop. So far I have a plan to finish the top section of the pack and then run those parts through fiberglassing before I work on the bottom part of the pack.
About 2 weeks ago I found a build done using pepakura. It sounds easy enough and worth the try considering my inexperience with prop building and my hours that I am able to do it. So Proton Charger at gbfans sent me his files to use and I got started. Here is what I have done so far.
Ion Arm


PPD Box 2


Ion Arm + PPD Box 2

Power Cell


That's it for the moment. My next part is going to be the PPD box 1.
If anyone has any helpful hints or tips for using pep or even with the build I'm open to suggestions since this is my first prop. So far I have a plan to finish the top section of the pack and then run those parts through fiberglassing before I work on the bottom part of the pack.
Last edited by a moderator: