DakGibralter
Member
Hi RPF!
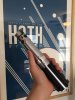
Apologies for posting yet another vanilla ESB build, but it's my first ever and I thought you might like to check it out.


I built this with a genuine 3-cell graf, lots of help from the very knowledgable mugatu, and roygilsing's excellent ESB kit from wannawanga. You guys are right - holding the real deal in one's hand is pretty incredible. As luck would have it, I happen to have kept my glass eye so I can switch it out for a TFA at a moment's notice. Bonus!
I do have a couple questions however - my apologies since these have undoubtedly been asked and answered before, but I've been unable to locate the threads:
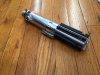
Has anyone had any luck weathering the mylar tape strip (which covers the graf logo) to match the brushed look of the clamp a little better? It's a little too shiny for my taste and I think a little steel wool might help it blend better, but I don't want to mess it up. Any thoughts?
Also, my unsteady dremel hand ended up making a couple dings on either side of the beer tab, showing the brass (?) underneath the brushed exterior. Does anyone have any good fixes for this? I'm not only clumsy, I'm a newbie as well so I don't have any ideas there, but those golden smudges are bothering me. I might like to cover the beer tab nub as well, unless the standard procedure is to leave it.

Finally, I'm considering giving this a little weathering to give it some light battle damage, draw attention from some of my less-than-perfect dremel work on the grips, and match some of the less-worn components like the grips, clip and circuit board with some of the more weathered vintage parts like the clamp and the buttons. Maybe even some tempering or scorching around the emitter. Nothing too crazy as I want it to look film-ready, but just something to personalize it and make it feel lived-in. I've searched for threads on this but mostly only able to come up with similar tutorials for the Obi-Wan, which are awesome but I'll have to save until I can buy one. Does anyone have a thread or link handy to some good Luke weathering tutorials?
Okay, this was long. Sorry for rambling. Looking forward to hearing your thoughts!
Apologies for posting yet another vanilla ESB build, but it's my first ever and I thought you might like to check it out.
I built this with a genuine 3-cell graf, lots of help from the very knowledgable mugatu, and roygilsing's excellent ESB kit from wannawanga. You guys are right - holding the real deal in one's hand is pretty incredible. As luck would have it, I happen to have kept my glass eye so I can switch it out for a TFA at a moment's notice. Bonus!
I do have a couple questions however - my apologies since these have undoubtedly been asked and answered before, but I've been unable to locate the threads:
Has anyone had any luck weathering the mylar tape strip (which covers the graf logo) to match the brushed look of the clamp a little better? It's a little too shiny for my taste and I think a little steel wool might help it blend better, but I don't want to mess it up. Any thoughts?
Also, my unsteady dremel hand ended up making a couple dings on either side of the beer tab, showing the brass (?) underneath the brushed exterior. Does anyone have any good fixes for this? I'm not only clumsy, I'm a newbie as well so I don't have any ideas there, but those golden smudges are bothering me. I might like to cover the beer tab nub as well, unless the standard procedure is to leave it.
Finally, I'm considering giving this a little weathering to give it some light battle damage, draw attention from some of my less-than-perfect dremel work on the grips, and match some of the less-worn components like the grips, clip and circuit board with some of the more weathered vintage parts like the clamp and the buttons. Maybe even some tempering or scorching around the emitter. Nothing too crazy as I want it to look film-ready, but just something to personalize it and make it feel lived-in. I've searched for threads on this but mostly only able to come up with similar tutorials for the Obi-Wan, which are awesome but I'll have to save until I can buy one. Does anyone have a thread or link handy to some good Luke weathering tutorials?
Okay, this was long. Sorry for rambling. Looking forward to hearing your thoughts!
Attachments

Last edited:
") Is that another genuine red button?
Is that another genuine red button?


