Triple 8 Props
Active Member
I've been playing Fallout 4 for a while now and I finally decided I need to make something from the game. I previously made the 10mm Pistol from Fallout 3 and New Vegas and I was originally planning on making the one from Fallout 4. Then I realized how many people have made it. So instead I chose the Laser Pistol. I am making the standard Laser Pistol but later on down the line I might add some of the modifications that can be done in game.
I'd like to mention that there is a really good 3D model of the Laser Pistol over on Thingiverse done by a person named "lilykill" that I used as a reference for my build. I did, however, find a few flaws in the model which I plan on fixing in my build. I also modified the MF cell from this model but we'll get to that later.
I started by spending a few hours taking pictures of the weapon in game and trying to figure out the scale for the gun. The model over on Thingiverse puts the length at somewhere around 18 inches which was way too big for my purposes. The reason it is this big is because the model in-game has to be transformed from a pistol to a rifle fairly easily inside of Fallout 4's gun modifications system. So things like grip size, thickness, etc have to be constant across a pistol and a rifle at the same time. This puts the pistol at a more sub machinegun size. Moral of the story, I scaled mine wayyy down so that it was a pistol size and would have good proportions with my body.
So let's begin! (Here's a fair warning, this is going to be a long build with a lot of pictures and details, so maybe grab a snack)
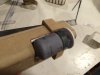
I started with the handle which was two layers of half inch MDF glued together and then cut on my scroll saw.


I also transferred lines that would later be used for shaping.

Next, I attacked this thing with my dremel. I started by rounding out most of the edges with a standard sanding drum.


Then I used one of those little ball/engraving bits in my dremel to carve out the recesses in the grip.

Next I added a PVC sheet panel to the bottom and then proceeded to carve the pommel way too thin.


Luckily that was easily fixed with some Apoxie Sculpt (which I will be using extensively in this build). For the little circular detail, I used a trick I learned from Zander over at Z-Props. I basically cut a rough circle out of styrene, drilled a small hole in the middle, and then used my dremel as a lathe to make the rough circle perfectly circular and to add an even angle across the edged. The hole in the middle was filled with Apoxie Sculpt and then detail holes were drilled as well.

All of those dark MDF edges are where I slicked the MDF with superglue to help the painting process later on.

I also embedded a trigger into place in the handle.

And there's the finished grip! You can see how I scaled it down so that it fits in my hand unlike the one in-game which would require two hands to hold comfortably.

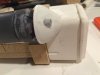
Now before I get to the body, I'm going to take a quick exhibition for the Microfusion Cell.
It started as a scaled down version of the MF Cell from the Thingiverse model I mentioned earlier.

I had this printed via a website called the 3D Hubs. It is basically a website where people with 3D printers can print things for other people without the cost of more proffesional sites like Shapeways. I found a guy right near me with awesome prices and who can ship to me. So after sending him the file, he printed it out and sent me the print a few days later.

It's definitely rough but I don't have a lathe so this was really my only option.

To smooth this guy out, I used Smooth On's XTC-3D product. It does a really good jobs on prints like this that don't have a lot of detal which the empoxy tends to cover up. After a good coat of XTC and some sanding, I had a really good looking piece.

Now it's on to the body which is the bulk of this build. It's packed with complex geometry and pieces that all have to fit together but it's well worth it.
I started with four pieces of half inch MDF. These were carfully measured from the blueprints and they accomadote a cut-out for the MF Cell (yay for planning ahead!).


After glueing, the pieces were pretty rough but thanks to my super retro yet very handy belt sander, I was able to clean this "core" (as I called it) up pretty quickly.

Even after a bunch of sanding, the shape still isn't perfect (you can see how the back and fron lift off of the table) but luckily most of this core is covered up by other panels.
I'd like to mention that there is a really good 3D model of the Laser Pistol over on Thingiverse done by a person named "lilykill" that I used as a reference for my build. I did, however, find a few flaws in the model which I plan on fixing in my build. I also modified the MF cell from this model but we'll get to that later.
I started by spending a few hours taking pictures of the weapon in game and trying to figure out the scale for the gun. The model over on Thingiverse puts the length at somewhere around 18 inches which was way too big for my purposes. The reason it is this big is because the model in-game has to be transformed from a pistol to a rifle fairly easily inside of Fallout 4's gun modifications system. So things like grip size, thickness, etc have to be constant across a pistol and a rifle at the same time. This puts the pistol at a more sub machinegun size. Moral of the story, I scaled mine wayyy down so that it was a pistol size and would have good proportions with my body.
So let's begin! (Here's a fair warning, this is going to be a long build with a lot of pictures and details, so maybe grab a snack)
I started with the handle which was two layers of half inch MDF glued together and then cut on my scroll saw.
I also transferred lines that would later be used for shaping.
Next, I attacked this thing with my dremel. I started by rounding out most of the edges with a standard sanding drum.
Then I used one of those little ball/engraving bits in my dremel to carve out the recesses in the grip.
Next I added a PVC sheet panel to the bottom and then proceeded to carve the pommel way too thin.
Luckily that was easily fixed with some Apoxie Sculpt (which I will be using extensively in this build). For the little circular detail, I used a trick I learned from Zander over at Z-Props. I basically cut a rough circle out of styrene, drilled a small hole in the middle, and then used my dremel as a lathe to make the rough circle perfectly circular and to add an even angle across the edged. The hole in the middle was filled with Apoxie Sculpt and then detail holes were drilled as well.
All of those dark MDF edges are where I slicked the MDF with superglue to help the painting process later on.
I also embedded a trigger into place in the handle.
And there's the finished grip! You can see how I scaled it down so that it fits in my hand unlike the one in-game which would require two hands to hold comfortably.
Now before I get to the body, I'm going to take a quick exhibition for the Microfusion Cell.
It started as a scaled down version of the MF Cell from the Thingiverse model I mentioned earlier.
I had this printed via a website called the 3D Hubs. It is basically a website where people with 3D printers can print things for other people without the cost of more proffesional sites like Shapeways. I found a guy right near me with awesome prices and who can ship to me. So after sending him the file, he printed it out and sent me the print a few days later.
It's definitely rough but I don't have a lathe so this was really my only option.
To smooth this guy out, I used Smooth On's XTC-3D product. It does a really good jobs on prints like this that don't have a lot of detal which the empoxy tends to cover up. After a good coat of XTC and some sanding, I had a really good looking piece.
Now it's on to the body which is the bulk of this build. It's packed with complex geometry and pieces that all have to fit together but it's well worth it.
I started with four pieces of half inch MDF. These were carfully measured from the blueprints and they accomadote a cut-out for the MF Cell (yay for planning ahead!).
After glueing, the pieces were pretty rough but thanks to my super retro yet very handy belt sander, I was able to clean this "core" (as I called it) up pretty quickly.
Even after a bunch of sanding, the shape still isn't perfect (you can see how the back and fron lift off of the table) but luckily most of this core is covered up by other panels.